
OpenCode Desktop App Tutorial: Install, Plan Mode and Your First Build
The free, open-source OpenCode agent now ships a desktop app in beta for macOS, Windows and Linux. This 16-step walkthrough covers the brew cask install, connecting providers or free models, Plan mode's clarifying questions, Build mode's to-do list, unified diffs, inline comments and the built-in terminal — every step verified against a clean screen recording.
TL;DR — what the OpenCode desktop app is
- OpenCode Desktop is the GUI companion to the OpenCode coding agent — the same agent as the CLI in a window with a file browser, diff review and terminal tabs. It is still labelled OpenCode Desktop (Beta) on opencode.ai/download, with installers for macOS (Apple Silicon and Intel), Windows x64 and Linux (.deb/.rpm), plus the Homebrew route: brew install --cask opencode-desktop.
- You never have to pick a model vendor up front. The Select model dialog ships free models (Big Pickle, DeepSeek V4 Flash Free, MiMo V2.5 Free, Nemotron 3 Ultra Free, North Mini Code Free), and Popular providers covers OpenCode Zen, OpenCode Go, Anthropic, GitHub Copilot, OpenAI, Google and more — a Copilot subscription connects by device login without an extra API key.
- The working rhythm is Plan → Build → review. Plan mode asks clarifying questions and drafts a plan without writing files; approve it, flip to Build mode and the agent ticks through a to-do list. Session changes shows an 11-file unified diff you can comment on line by line, and the terminal tab runs dev servers.
- Version context for 2026: the OpenCode 2.0 line landed in September (tags v2.0.0 through v2.0.11 by Sep 20), the desktop app was ported from Tauri to Electron in spring, and both keep shipping fast — update from the download page whenever a step looks different.
How to Download, Install & Use OpenCode Desktop App | Vibe Coding Machine | Build Two Apps
Video walkthrough:WebStylePress7:51
OpenCode Desktop: Great UI/UX + Run Multiple AI Agents (Free)
Video walkthrough:AI With Nathan9:32
OpenCode Desktop App — 75+ Providers, Parallel Sessions, File Browser & More
Video walkthrough:AI Stack Engineer8:22
How to Install OpenCode Desktop App on Windows 10/11 2026
Video walkthrough:United Top Tech2:46
OpenCode Download & Docs — OpenCode Desktop (Beta), v2 install
Product facts:opencode.aiDownload page
Steps 1-3, 6, 8 and 9 are stills from WebStylePress's Windows walkthrough; step 4 comes from United Top Tech's install recording; steps 5 and 7 come from AI Stack Engineer's provider setup; steps 10-16 are stills from AI With Nathan's plan-to-build session. Install commands and 2.0 release facts are quoted from opencode.ai/download and the anomalyco/opencode repository.
Frames are credited screenshots from the source videos, each deep-linked to its timestamp. This guide's text is original; facts come from those recordings plus the official download page, docs and repository.
OpenCode Desktop, step by step
1 · Install the OpenCode desktop app
- 1
Open the download page and grab the OpenCode Desktop (Beta) installer
Go to opencode.ai/download and scroll to section 2, OpenCode Desktop (Beta). Homebrew users on macOS can run brew install --cask opencode-desktop; everyone else picks a Download button — macOS (Apple Silicon), macOS (Intel), Windows (x64), Linux (.deb) or Linux (.rpm). The Windows download is about 116 MB. Section 3 on the same page installs the VS Code, Cursor, Zed and Windsurf extensions if you want IDE integration later.
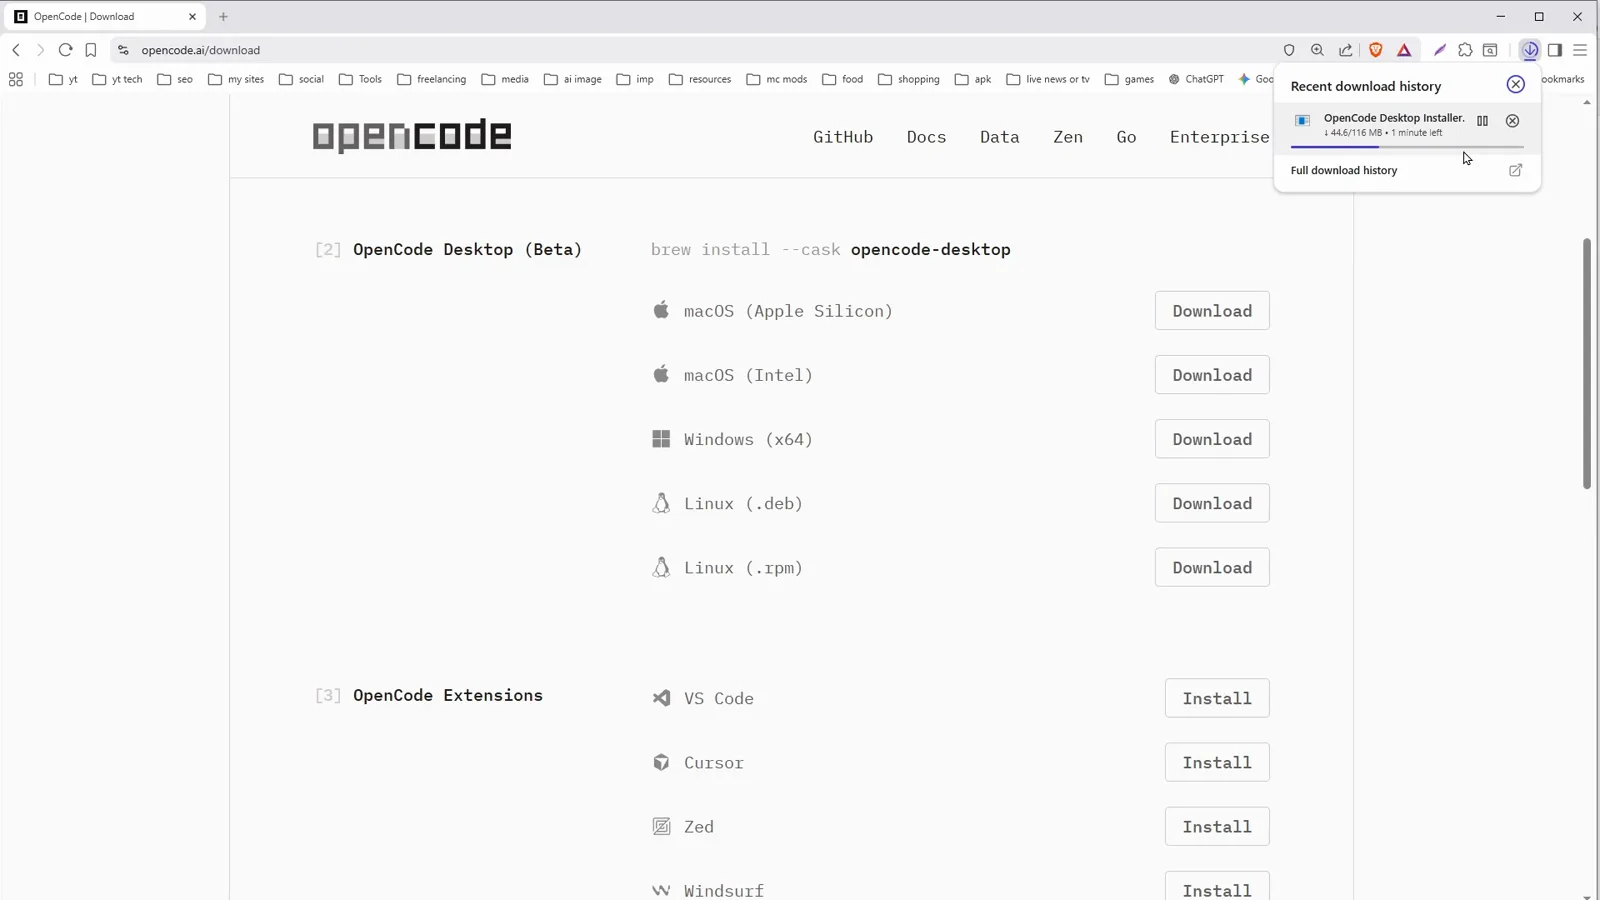
The OpenCode Desktop (Beta) section of opencode.ai/download with the Homebrew cask command.Watch at 0:25 - 2
Get past Windows SmartScreen with More info
The desktop app is beta software signed by a young publisher, so Microsoft Defender SmartScreen pops the classic Windows protected your PC warning and blocks the unrecognized app. Click More info on the warning — the dialog expands and reveals who signed the file and a Run anyway button. On macOS and Linux this step does not exist: just mount the .dmg or install the .deb/.rpm package.
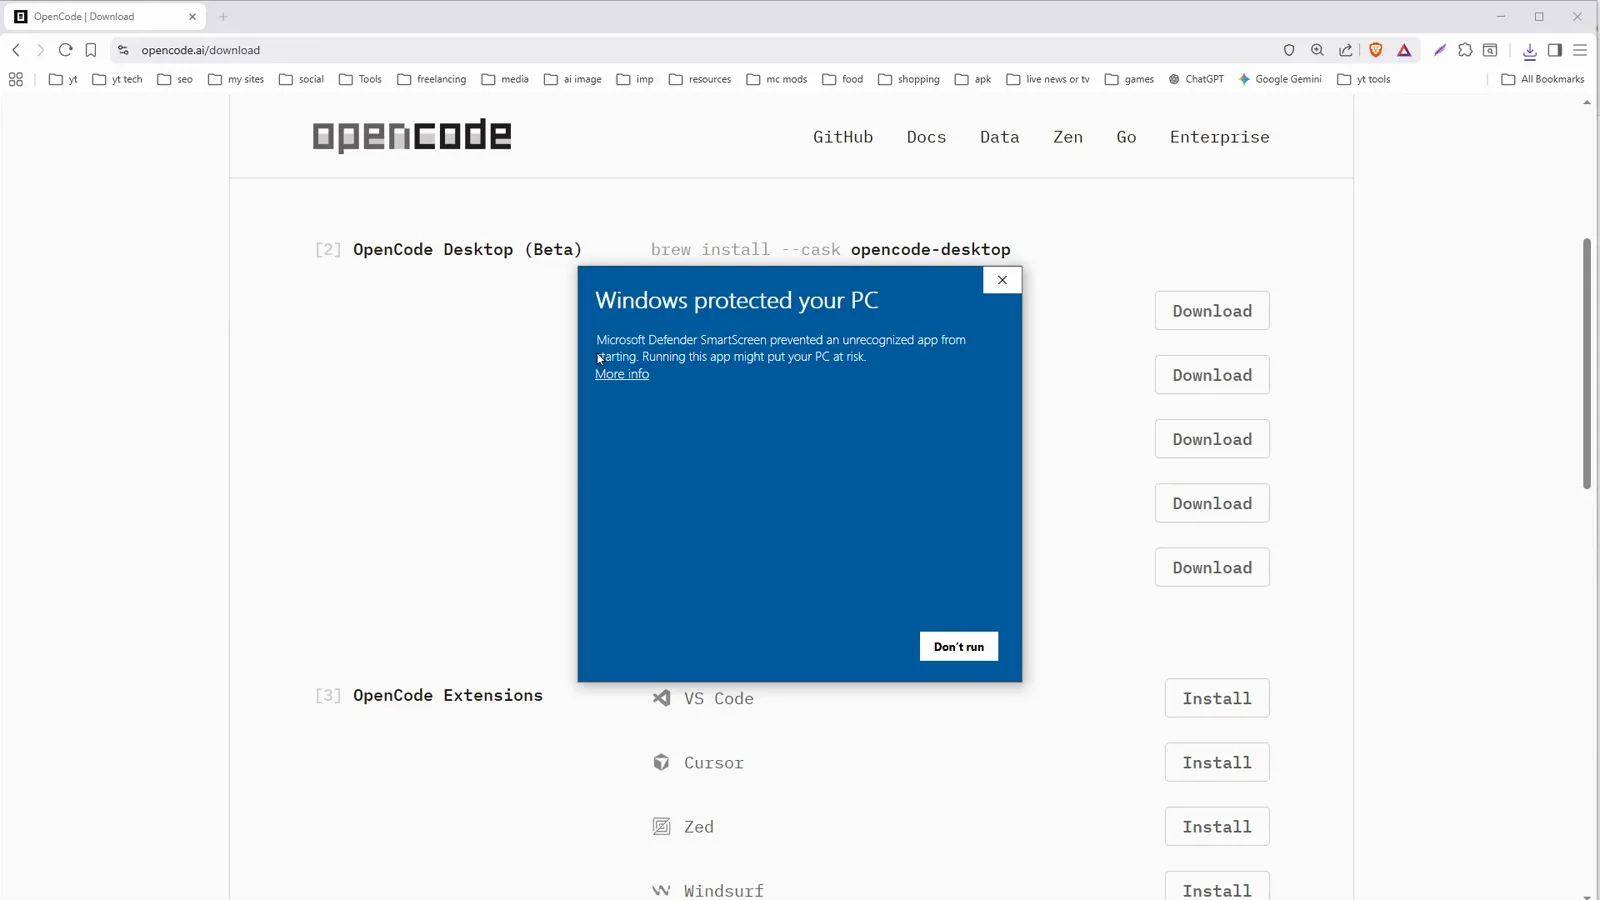
SmartScreen blocks the unrecognized installer until you click More info.Watch at 0:33 - 3
Run anyway and let the setup finish
The expanded dialog names OpenCode Desktop Installer.exe and the publisher, Anomaly Innovations, Inc. Click Run anyway and the setup wizard does the rest. First launch takes a few seconds while the app boots its local server — that is normal on every platform.
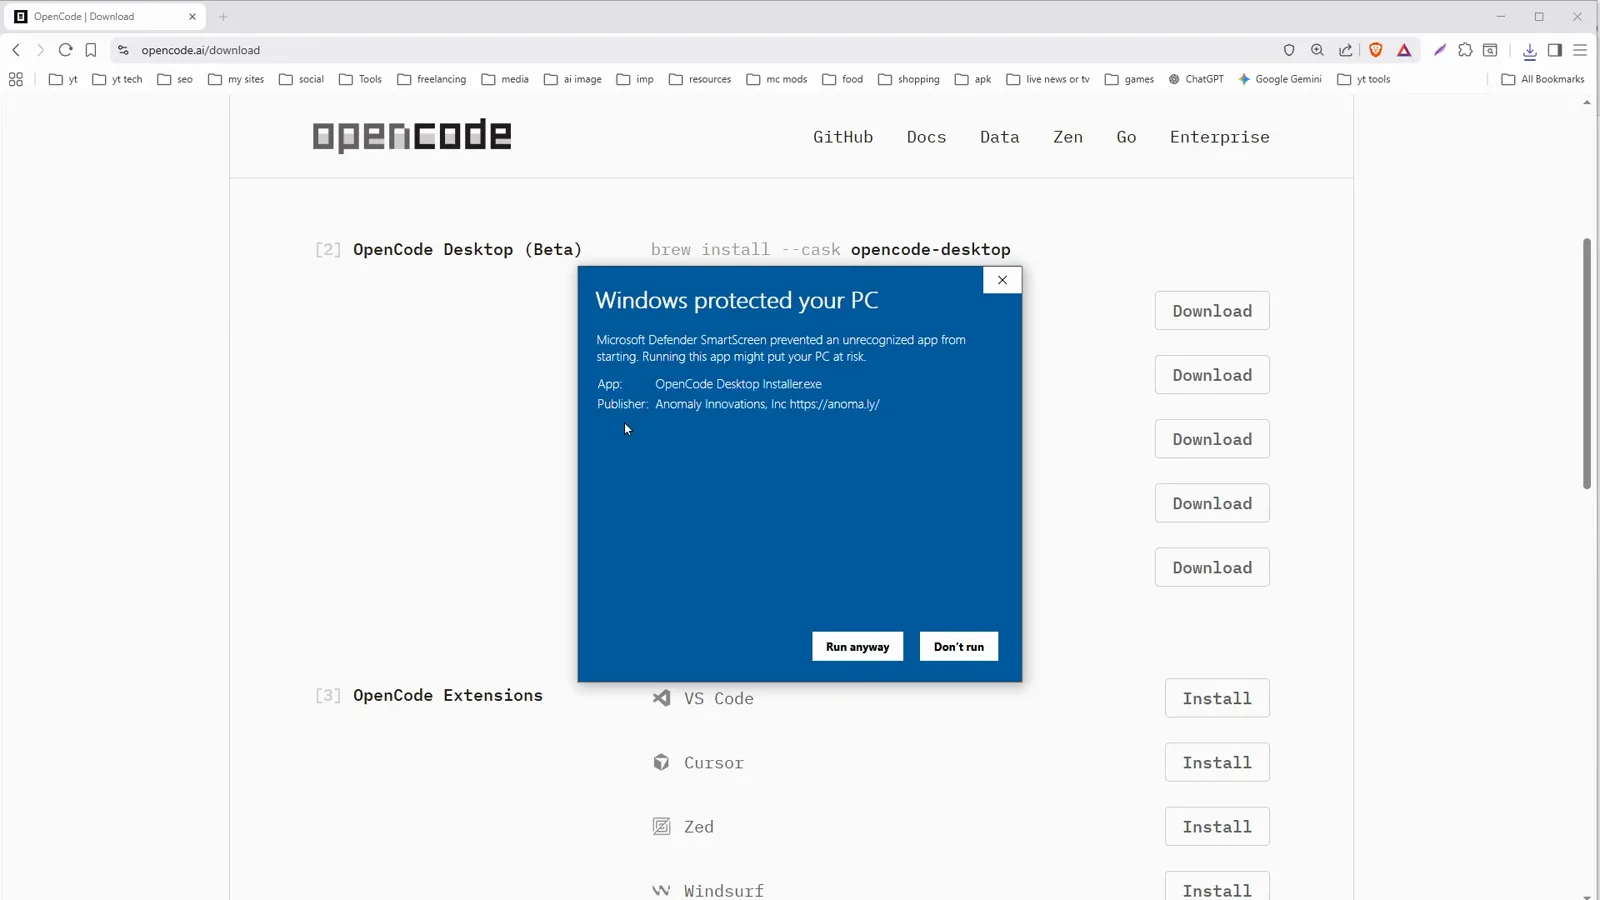
The expanded dialog names the publisher; Run anyway starts the setup.Watch at 0:40 - 4
First launch: check Local Server and open a project
The home screen shows a green Local Server dot, the Recent projects list and an Open project button. Click Open project, pick any folder — a brand-new empty one works fine — and the app lands you in a workspace with a Build anything composer. Recent projects remembers your folders from here on.
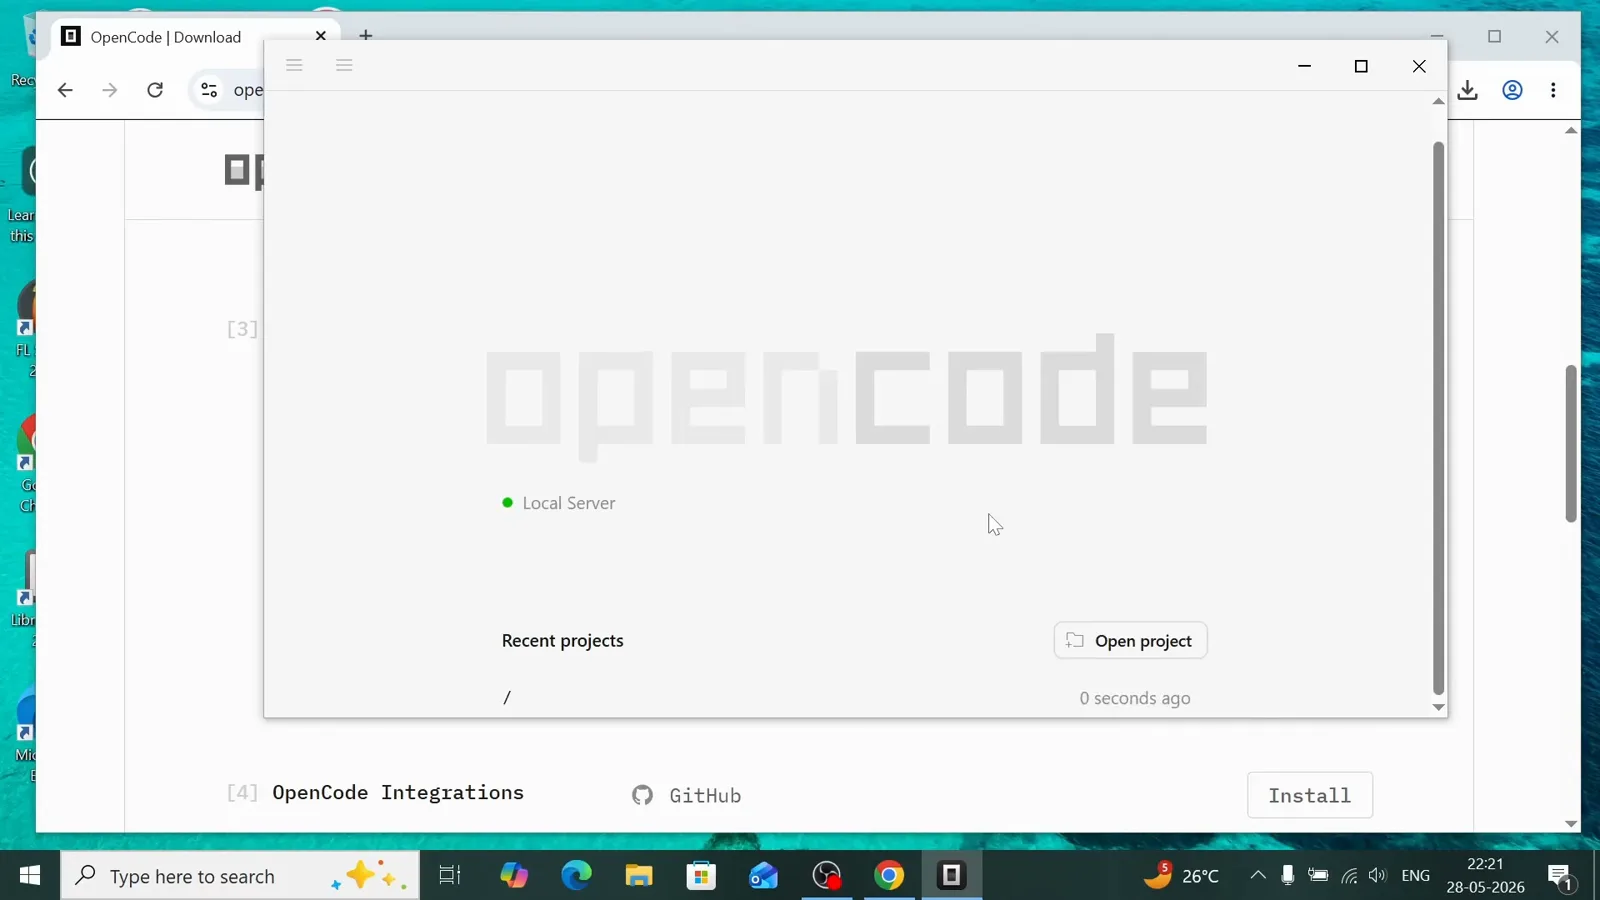
First launch: Local Server is up and Recent projects is empty until you open a folder.Watch at 1:02
2 · Connect a provider and pick a model
- 5
Use the Getting started card to connect your first provider
A fresh install greets you with a Getting started card: OpenCode includes free models so you can start immediately, and Connect any provider to use models from Claude, GPT, Gemini and more. The Connect provider button on that card is the fastest route into provider setup — or skip it entirely and stay on the free models.
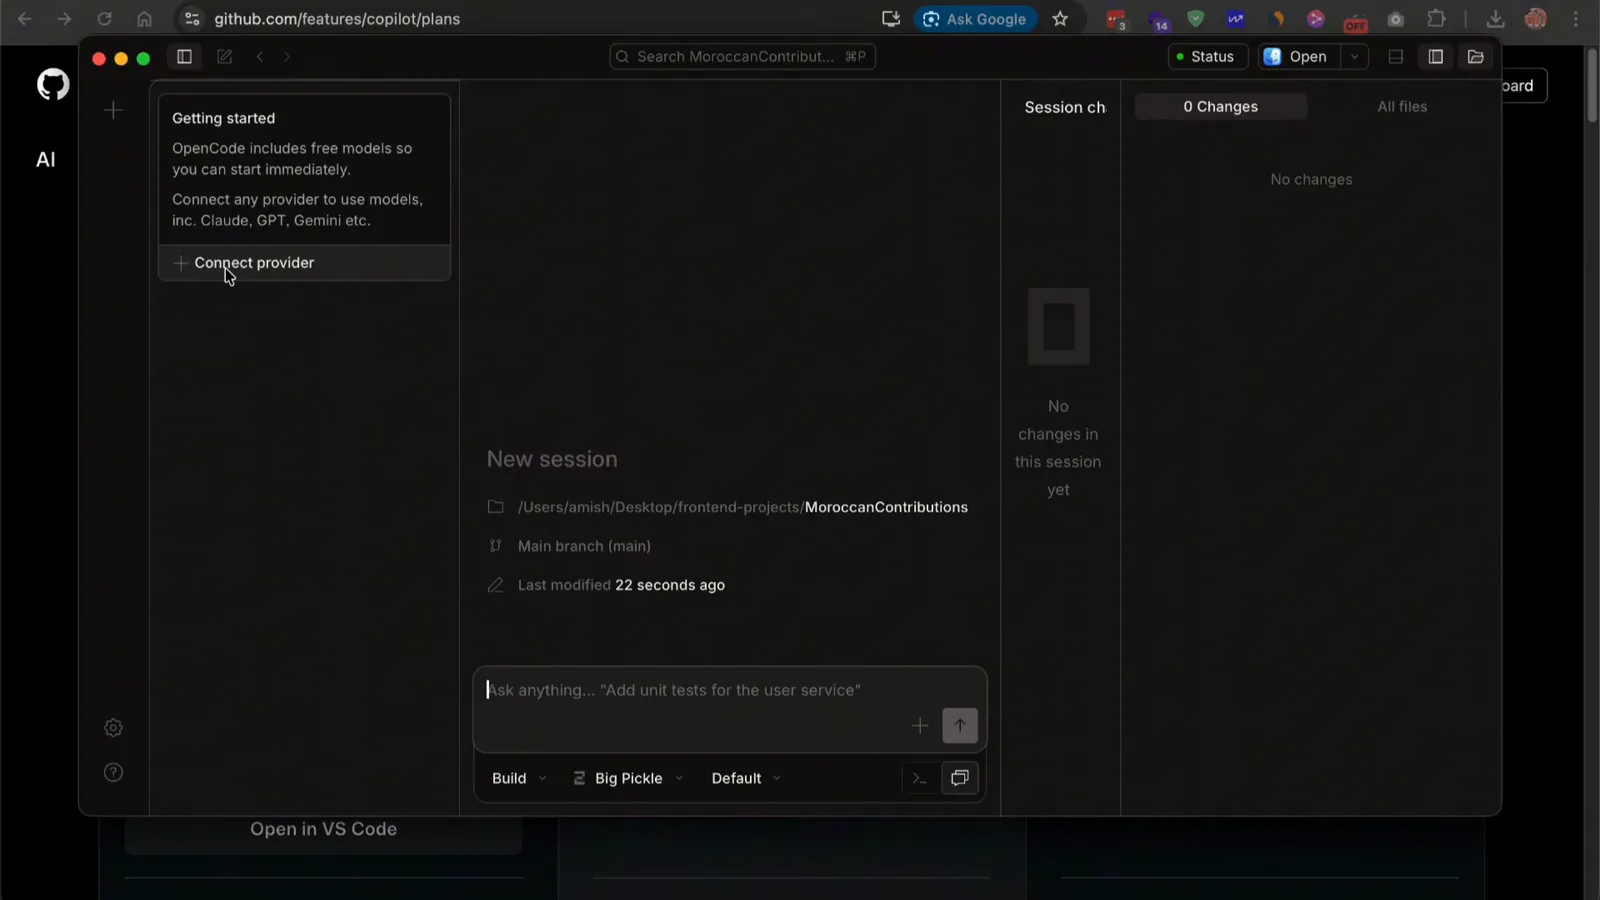
The Getting started card points at Connect provider; free models work out of the box.Watch at 2:20 - 6
Pick a provider in Settings → Providers
Open the gear icon and choose Providers. OpenCode Zen (curated models including Claude, GPT and Gemini) and OpenCode Go (a low-cost subscription) sit at the top as Recommended, followed by Anthropic for direct Claude access, GitHub Copilot, OpenAI, Google — and OpenRouter, which carries a pile of free models. A custom provider entry covers anything else.
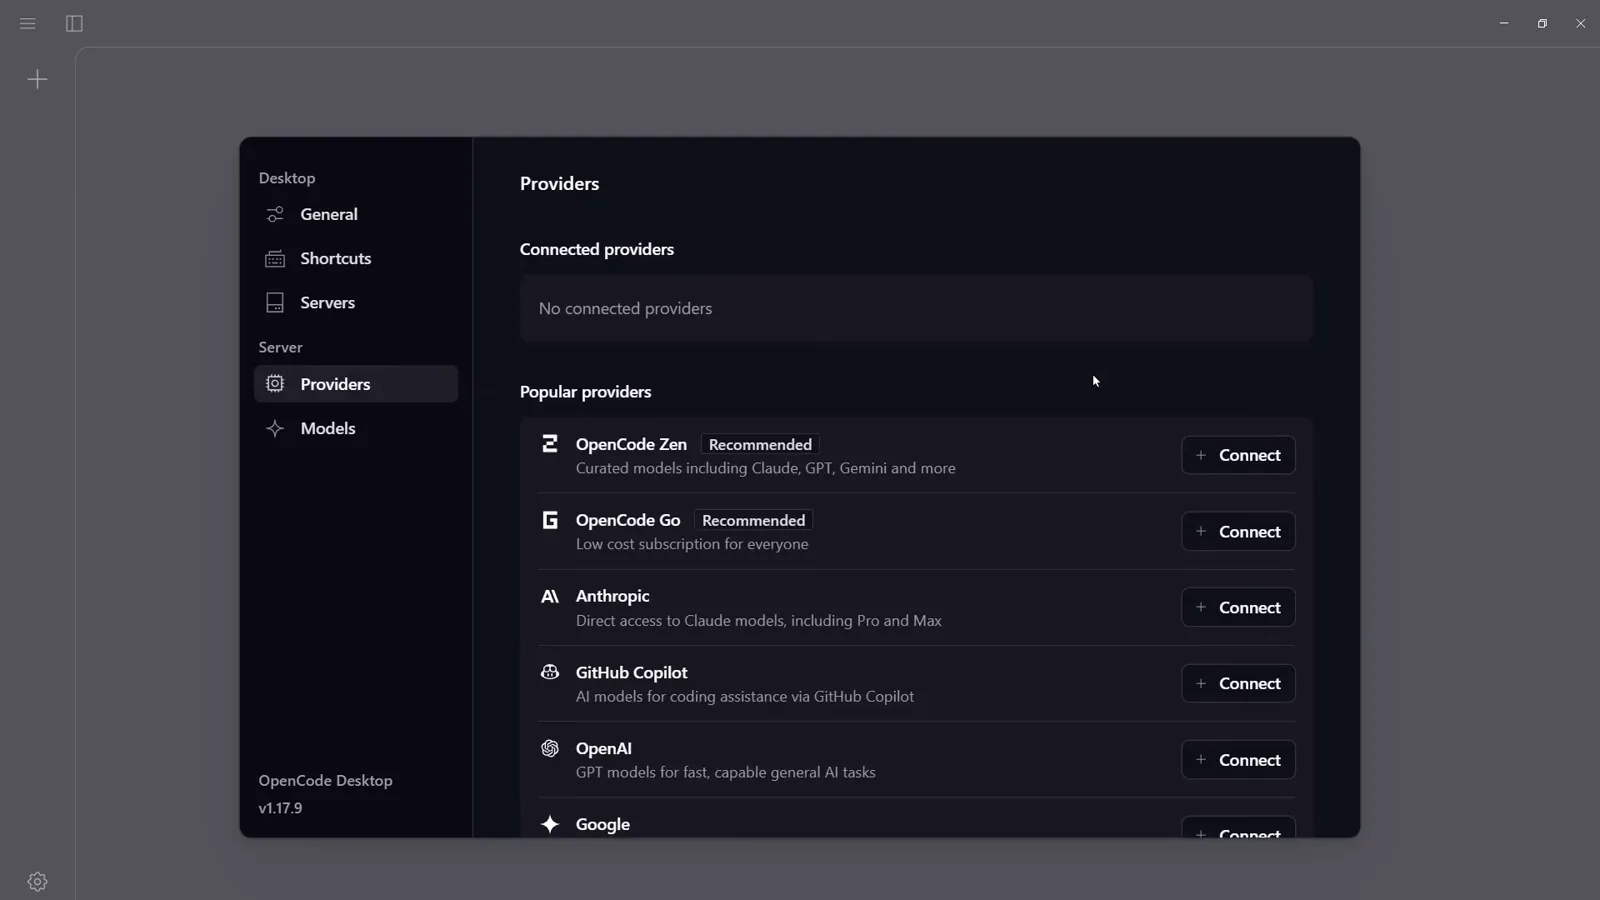
Settings → Providers: OpenCode Zen and OpenCode Go are the recommended rows.Watch at 1:26 - 7
Connect GitHub Copilot by device login
If you already pay for GitHub Copilot — Pro, Pro+, Business or Enterprise — you can use it without an extra API key. Choose GitHub Copilot, and the app shows a Connect GitHub Copilot dialog with a confirmation code and a link: open github.com/login/device, enter the code, authorize, and your Copilot plan's models appear in the picker.
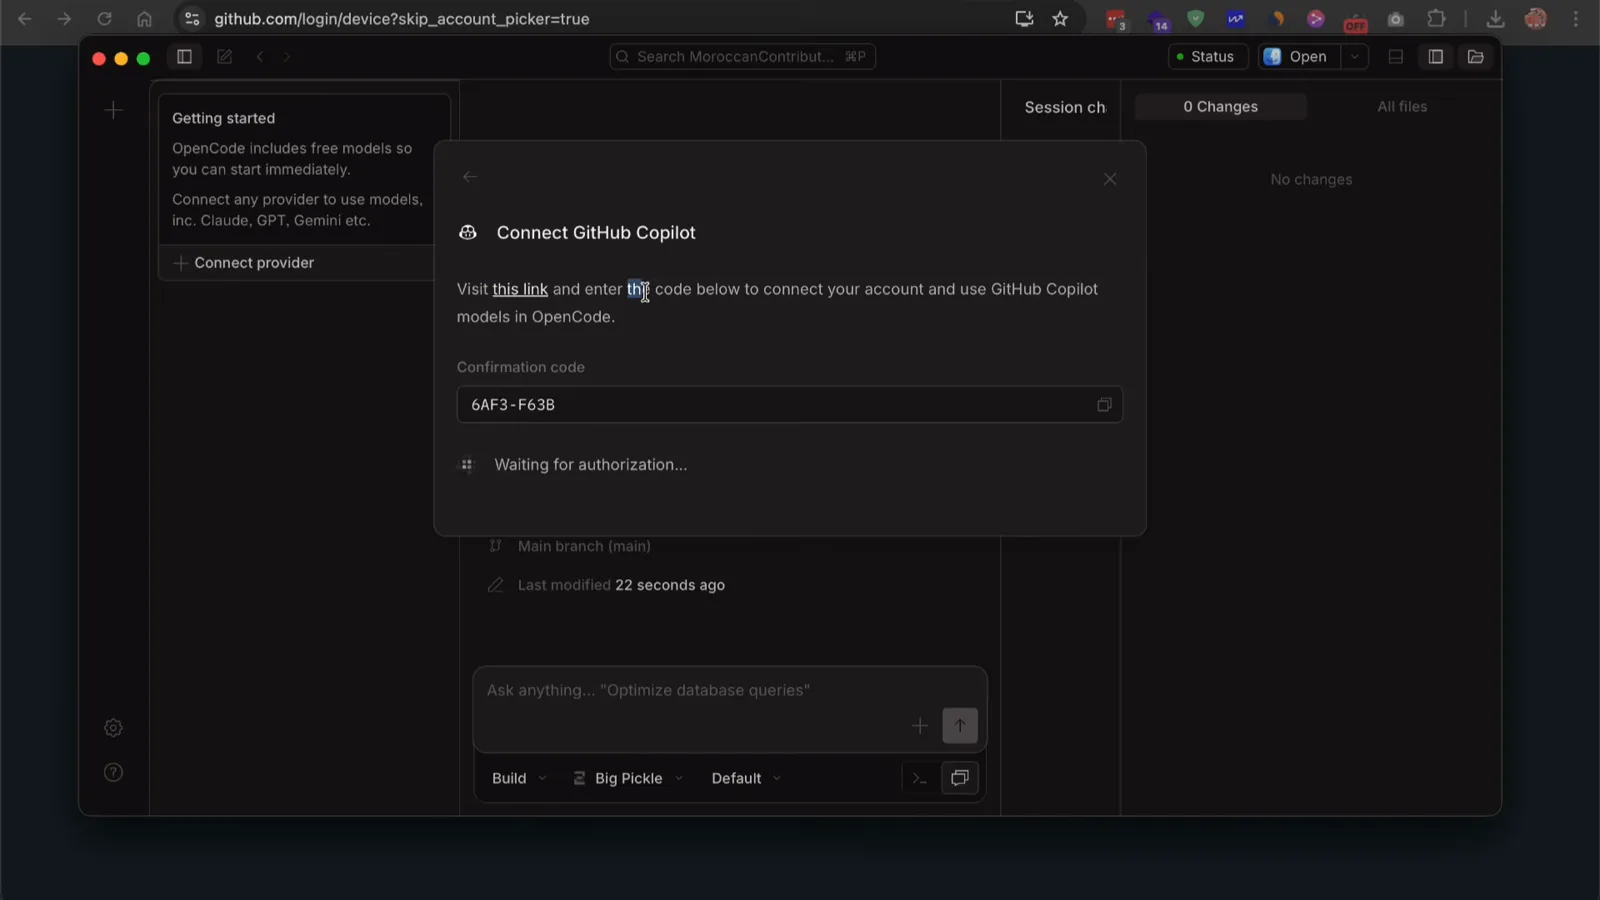
The device login flow: enter the code at github.com/login/device and authorize.Watch at 2:30 - 8
Select a model — free ones included
The Select model dialog lists the free models provided by OpenCode: Big Pickle, DeepSeek V4 Flash Free, MiMo V2.5 Free, Nemotron 3 Ultra Free and North Mini Code Free. Below them, Add more models from popular providers pulls in OpenCode Zen, Anthropic, GitHub Copilot and friends. Depending on the model you may also get a thinking-effort selector (low to max) — leave the default on your first run.
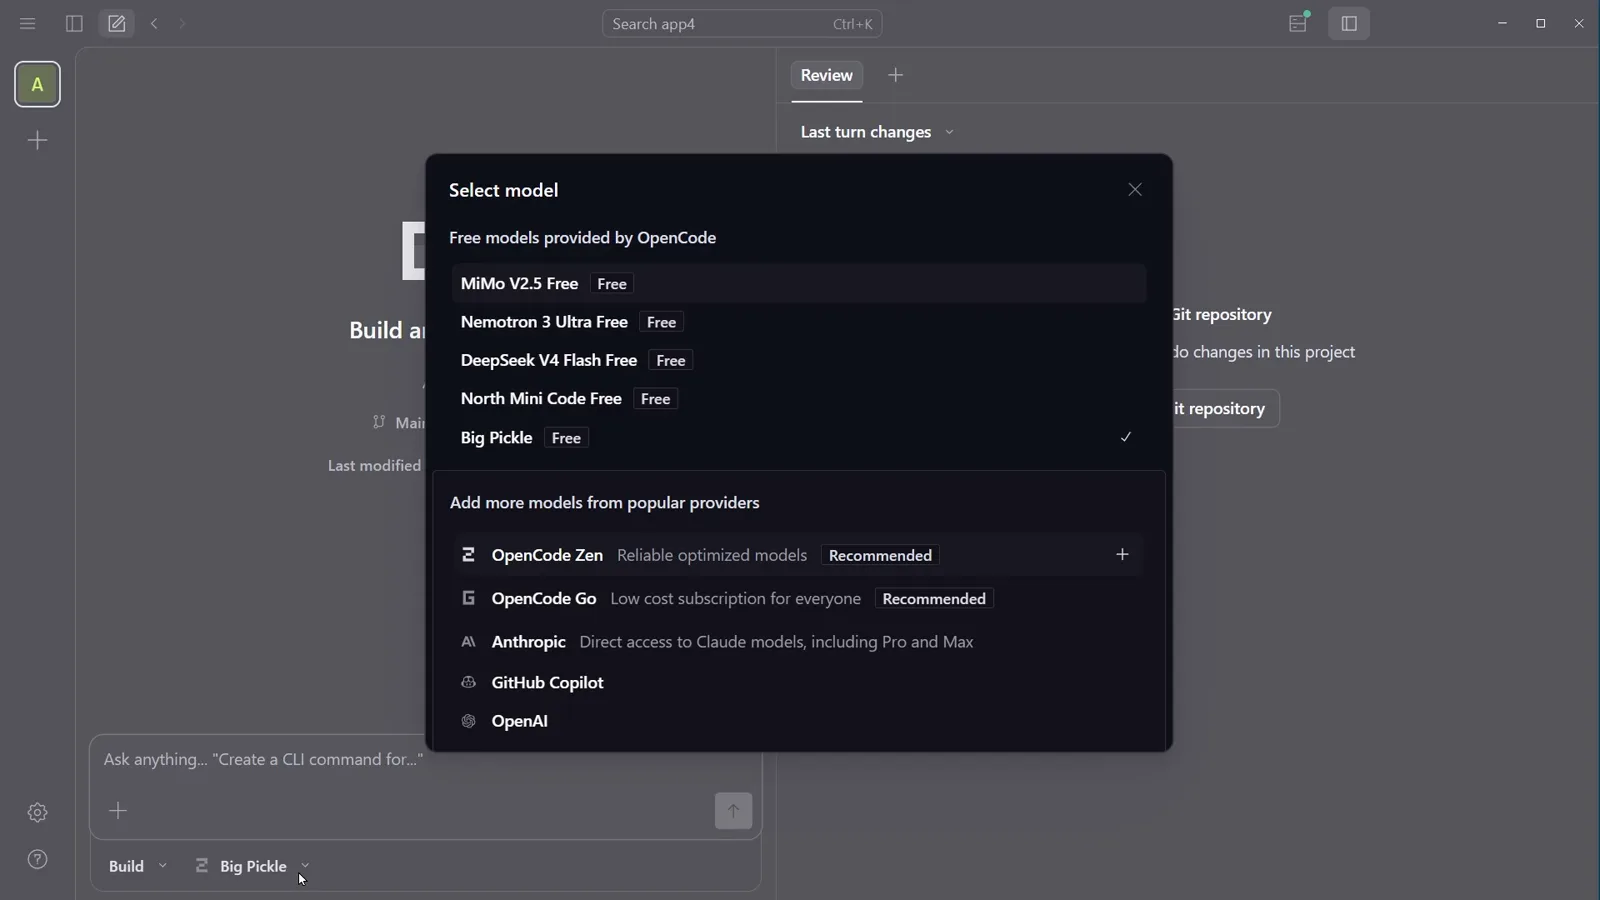
Five free models ship with the app; add provider models from the same dialog.Watch at 2:44
3 · Plan mode: scope the work before any code
- 9
Flip the composer to Plan mode
Under the prompt box sit two dropdowns: the mode (Build or Plan) and the model. Switch the mode to Plan before sending anything. Plan mode is one of the two built-in agents: it can analyze your project and propose an approach but cannot write or change files — the same Plan/Build pair you get with the Tab key in the terminal UI, where a lower-right indicator shows which one is active.
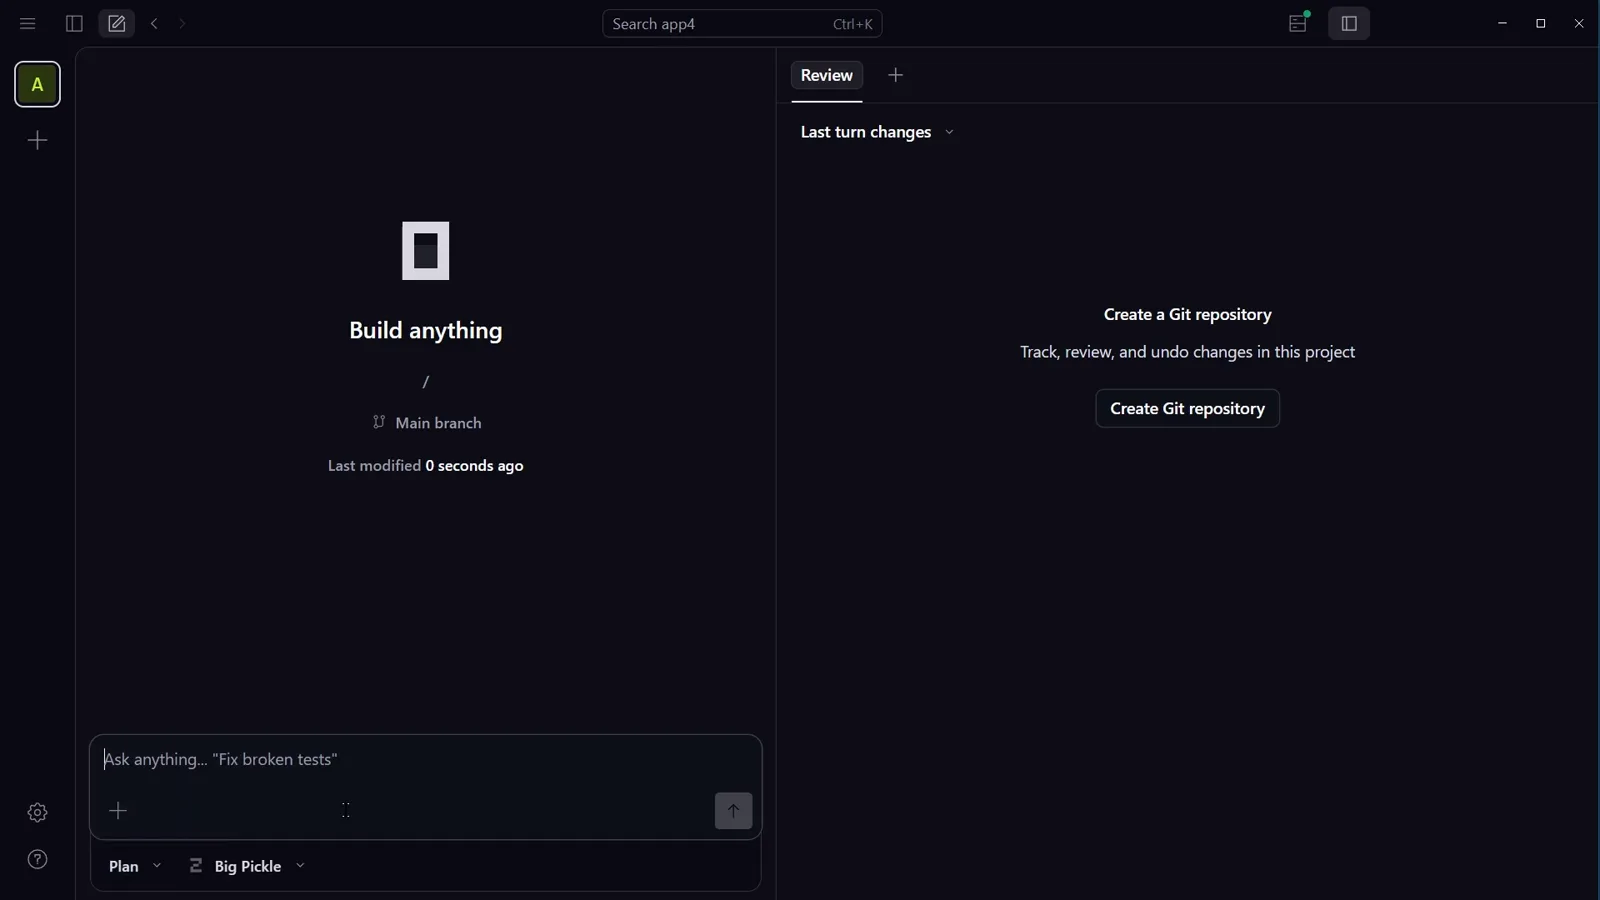
The mode dropdown flips between Plan and Build right under the prompt box.Watch at 3:00 - 10
Answer the clarifying questions
Send your brief — in the recording, a CSV data analysis web app — and Plan mode comes back with a Questions panel instead of code. This session got four: Tech Stack (React + Node.js, Next.js, Vue + FastAPI or Plain HTML/JS), Charting Library, Processing Location and Insight Depth. Answer each, add your own notes, and submit; the answers shape the plan.
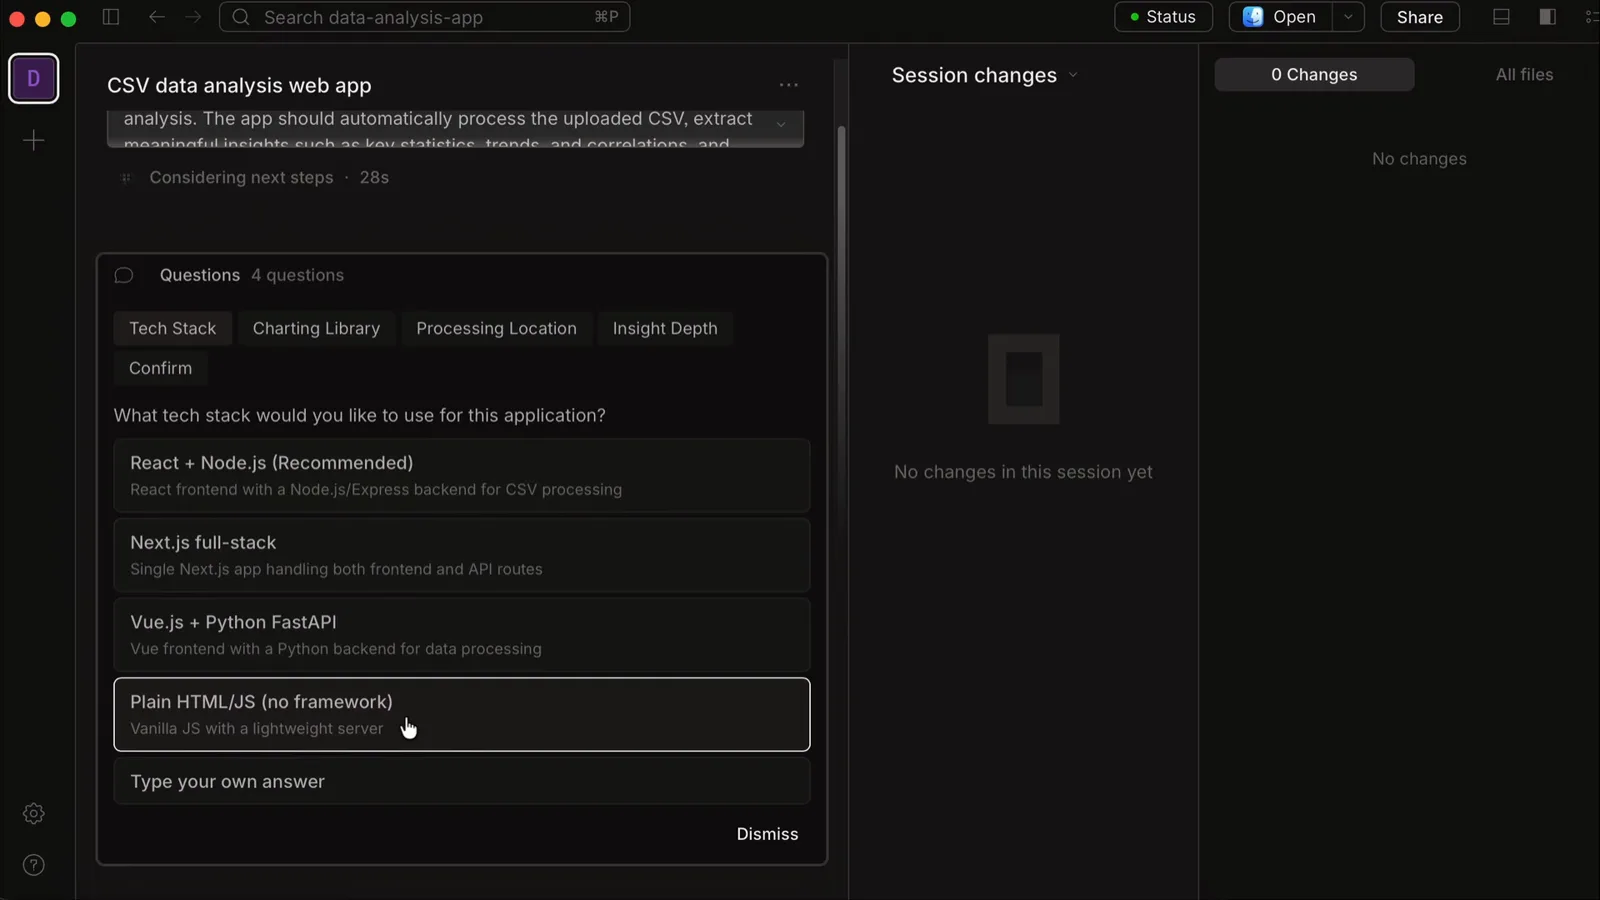
Plan mode asks clarifying questions before it writes a single file.Watch at 3:20 - 11
Approve the plan and switch to Build
When the plan is settled the agent asks Ready to build. Should I proceed? with a yes proceed quick reply. File writes stay blocked until Build mode is active — and in the beta the agent may not flip it for you, so move the mode dropdown from Plan to Build yourself, then confirm. That mirrors the official docs: plan first, then switch to build to make the changes.
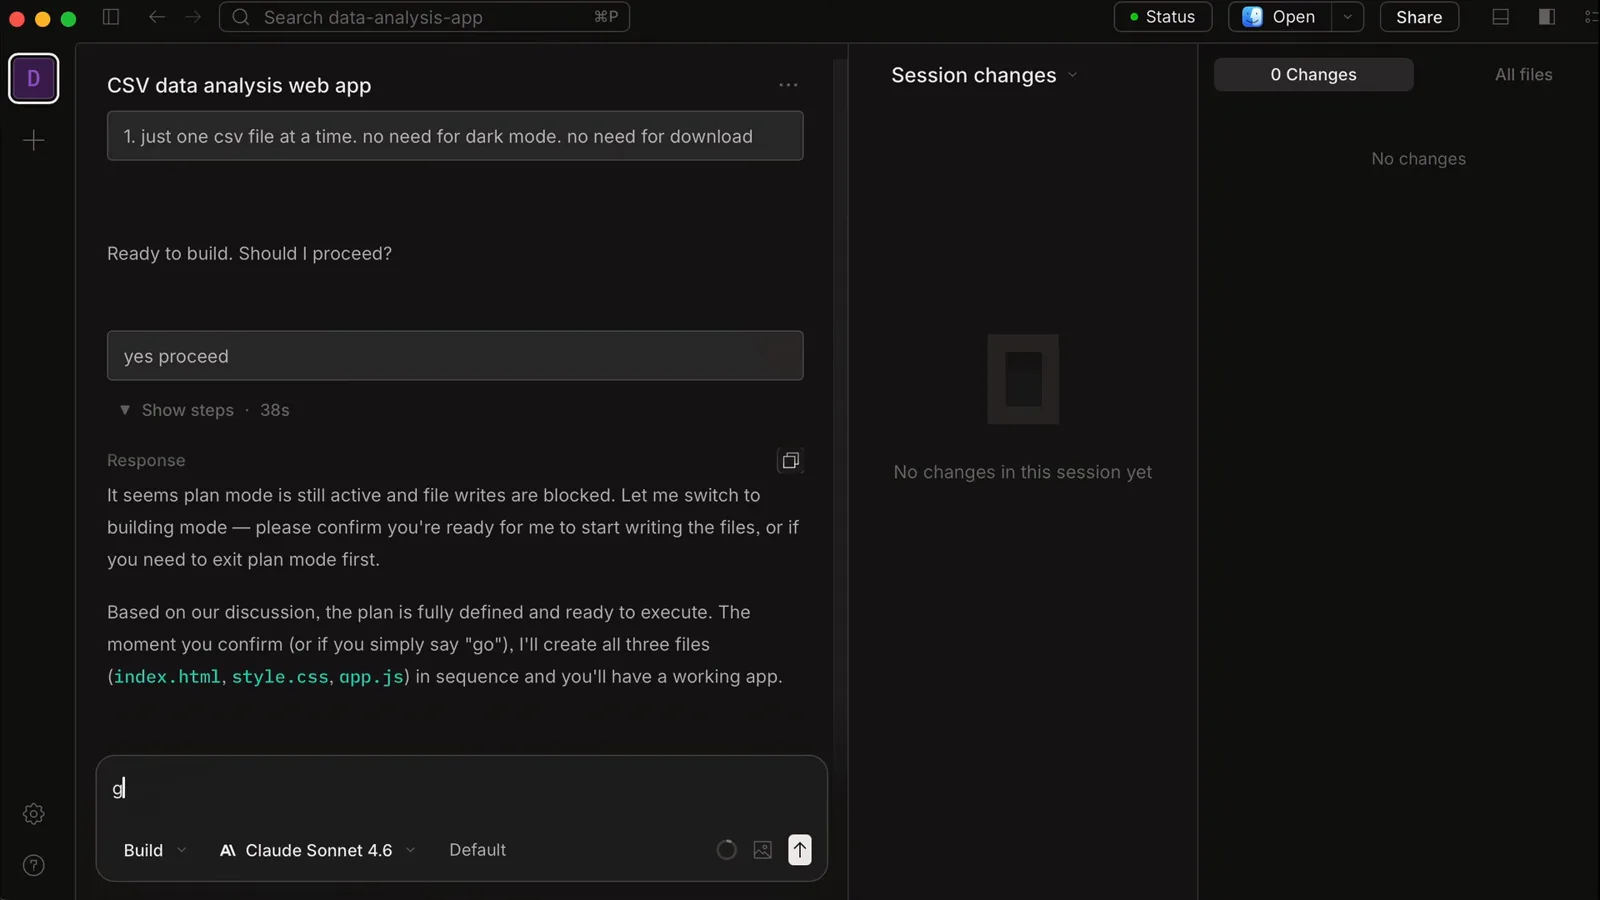
Approve with a quick reply, then flip the mode dropdown to Build.Watch at 4:05 - 12
Watch Build mode tick through the to-do list
Build mode turns the plan into a To-dos checklist — Create index.html, Create style.css, Create app.js — and works through it with Write tool calls, ticking boxes as it goes. One beta quirk from the recording: the to-do panel rendered twice; harmless, but exactly the kind of rough edge to expect while the app is in beta.
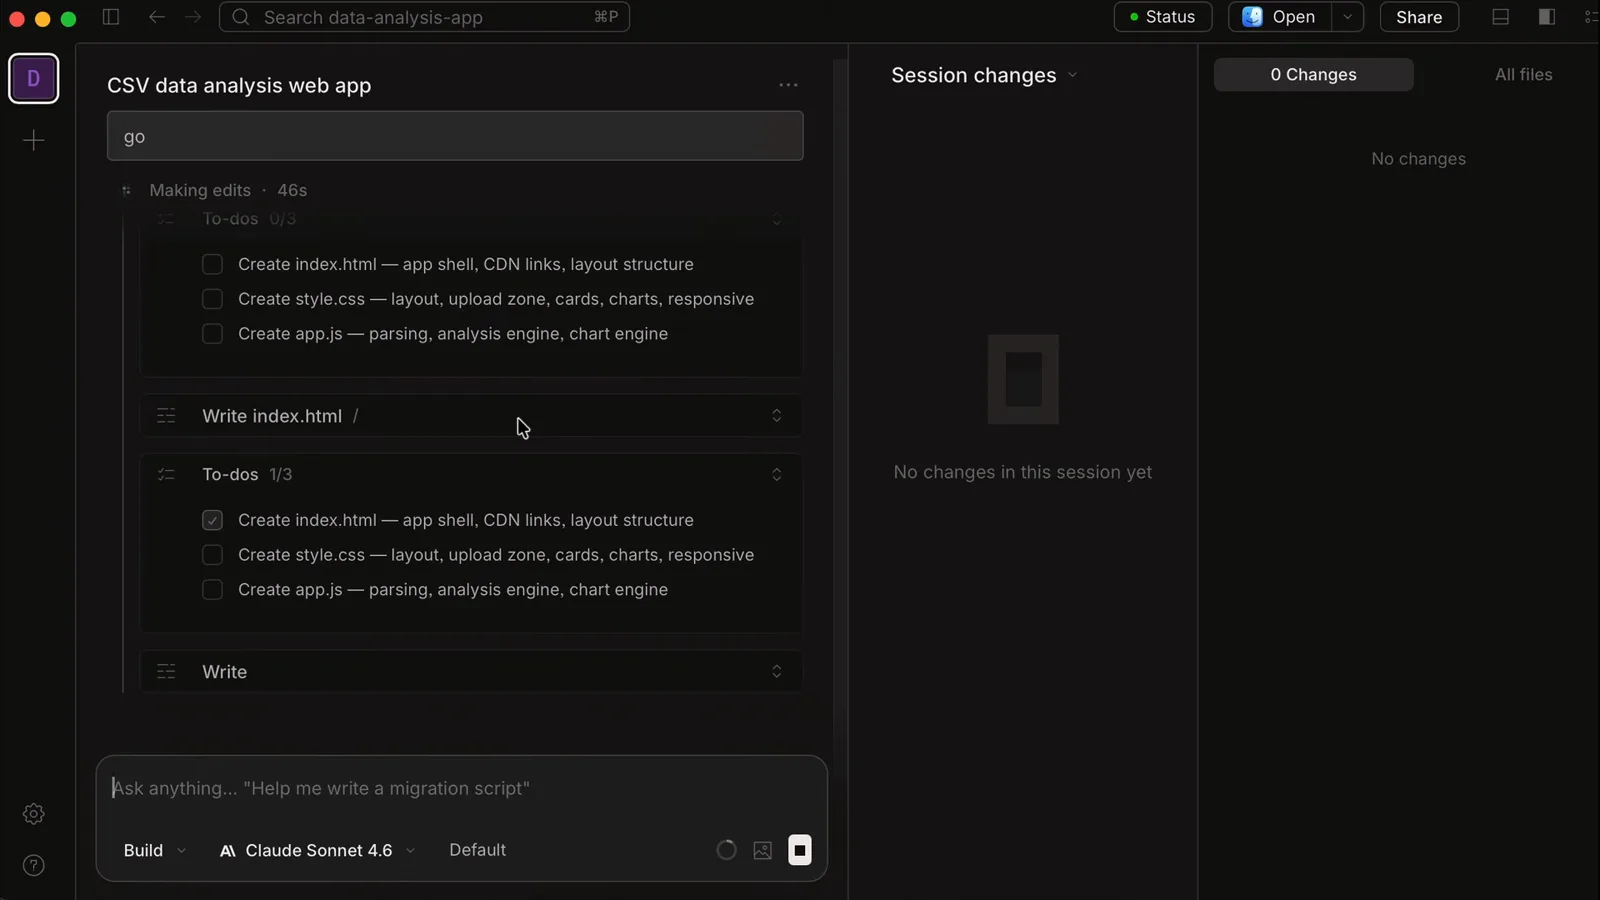
Build mode ticks through the To-dos list as it writes each file.Watch at 4:11
4 · Build, review and run your app
- 13
Review the diff in Session changes
The Session changes panel counts every touched file — 11 Changes in the finance-app session — with All files alongside, and each diff opens with Unified or Split view plus Collapse all. Green lines are additions, red are removals, and because changes are tracked per session you can step back through them with undo.
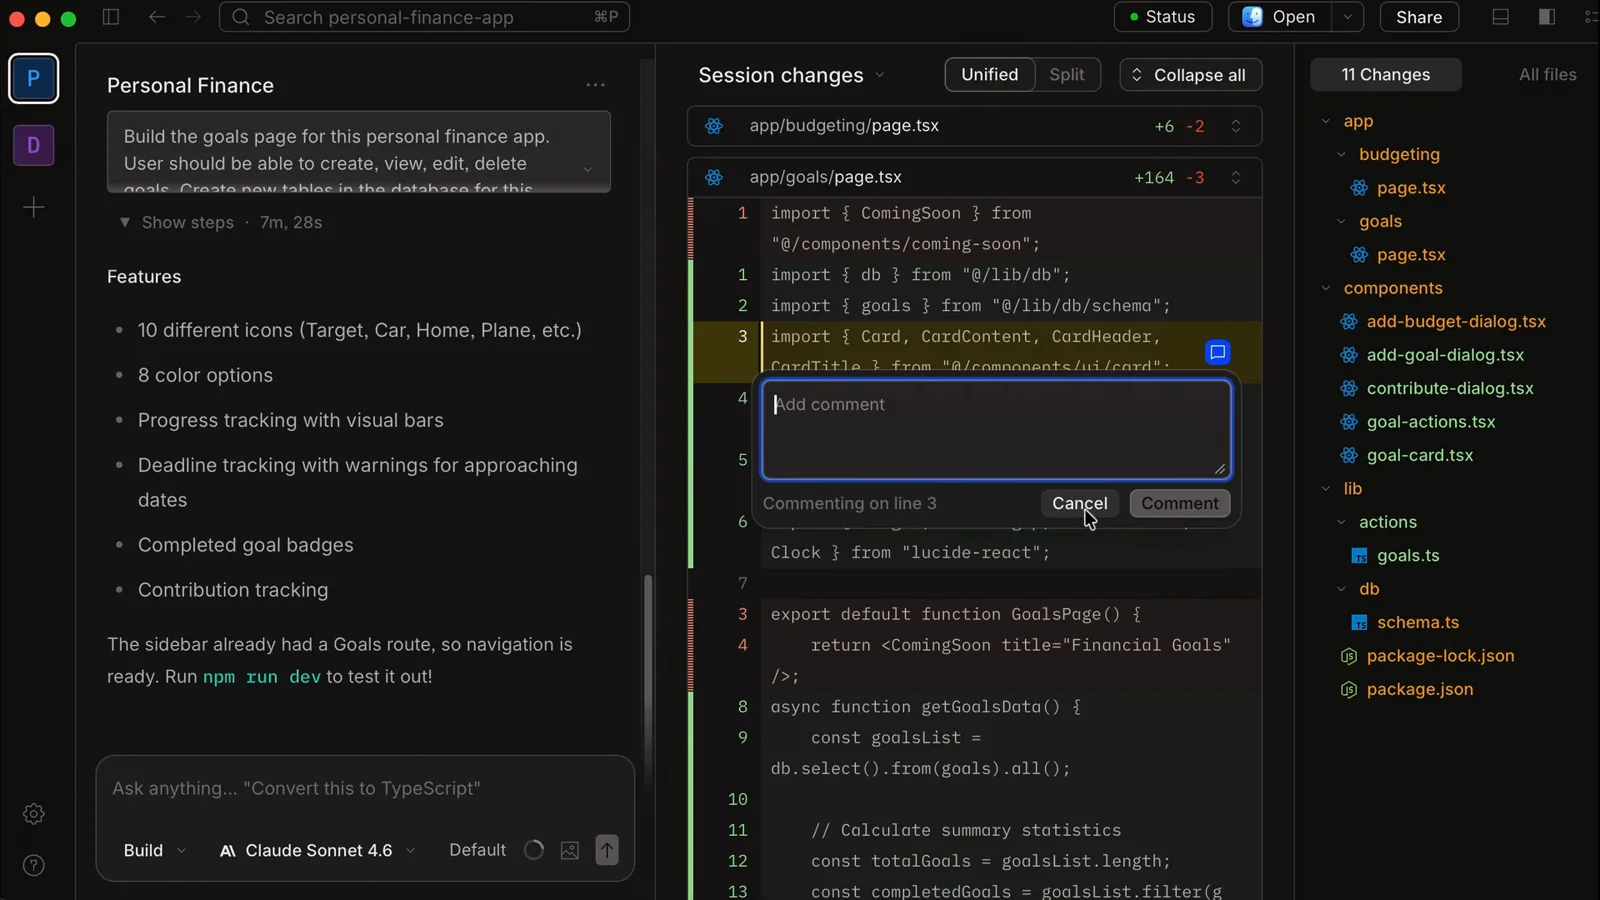
Session changes: 11 files touched, Unified view over Split.Watch at 8:20 - 14
Steer the agent with inline comments
Open any generated file in the viewer, click a line — line 62 of app.js in the recording — and add a comment right there. The comment box shows Commenting on line N with Cancel and Comment buttons, and the agent reads inline comments as scoped instructions, which beats describing offsets in the chat.
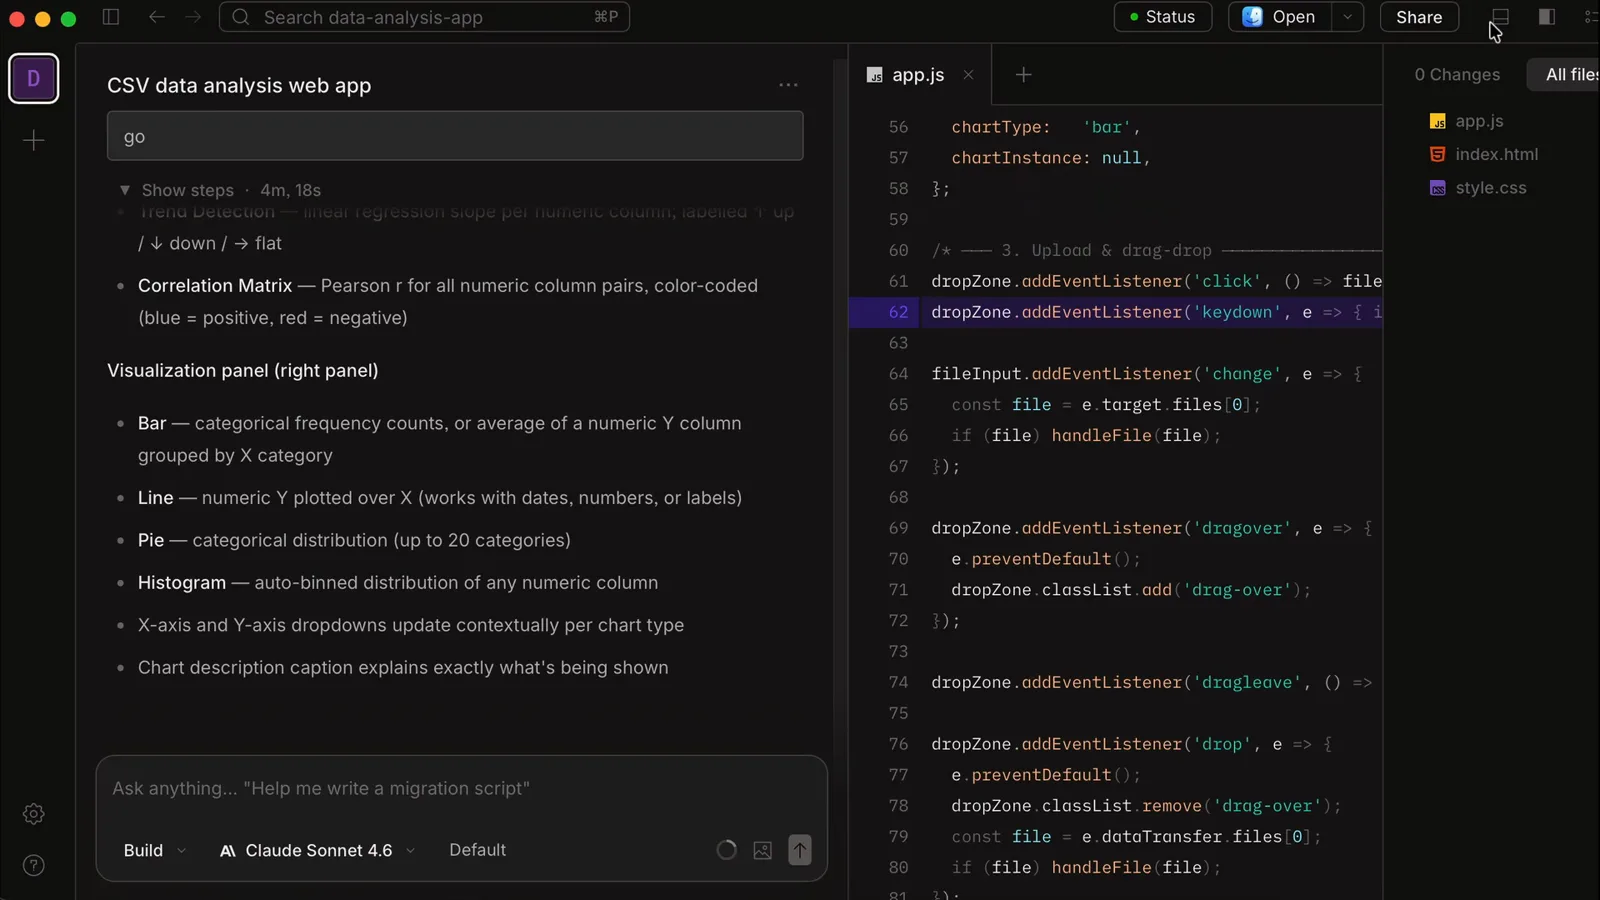
Select any line in the file viewer to leave an inline comment for the agent.Watch at 5:12 - 15
Run commands in the built-in terminal
The terminal tab runs npm run dev, git status, package installs — and the OpenCode CLI itself if you want the TUI side by side with the GUI. One setting matters: Settings → General → Terminal Shell. In the recording, a bash shell refused to run the dev server from the chat; switching it to Auto let commands through. Keep Auto unless you have a reason.
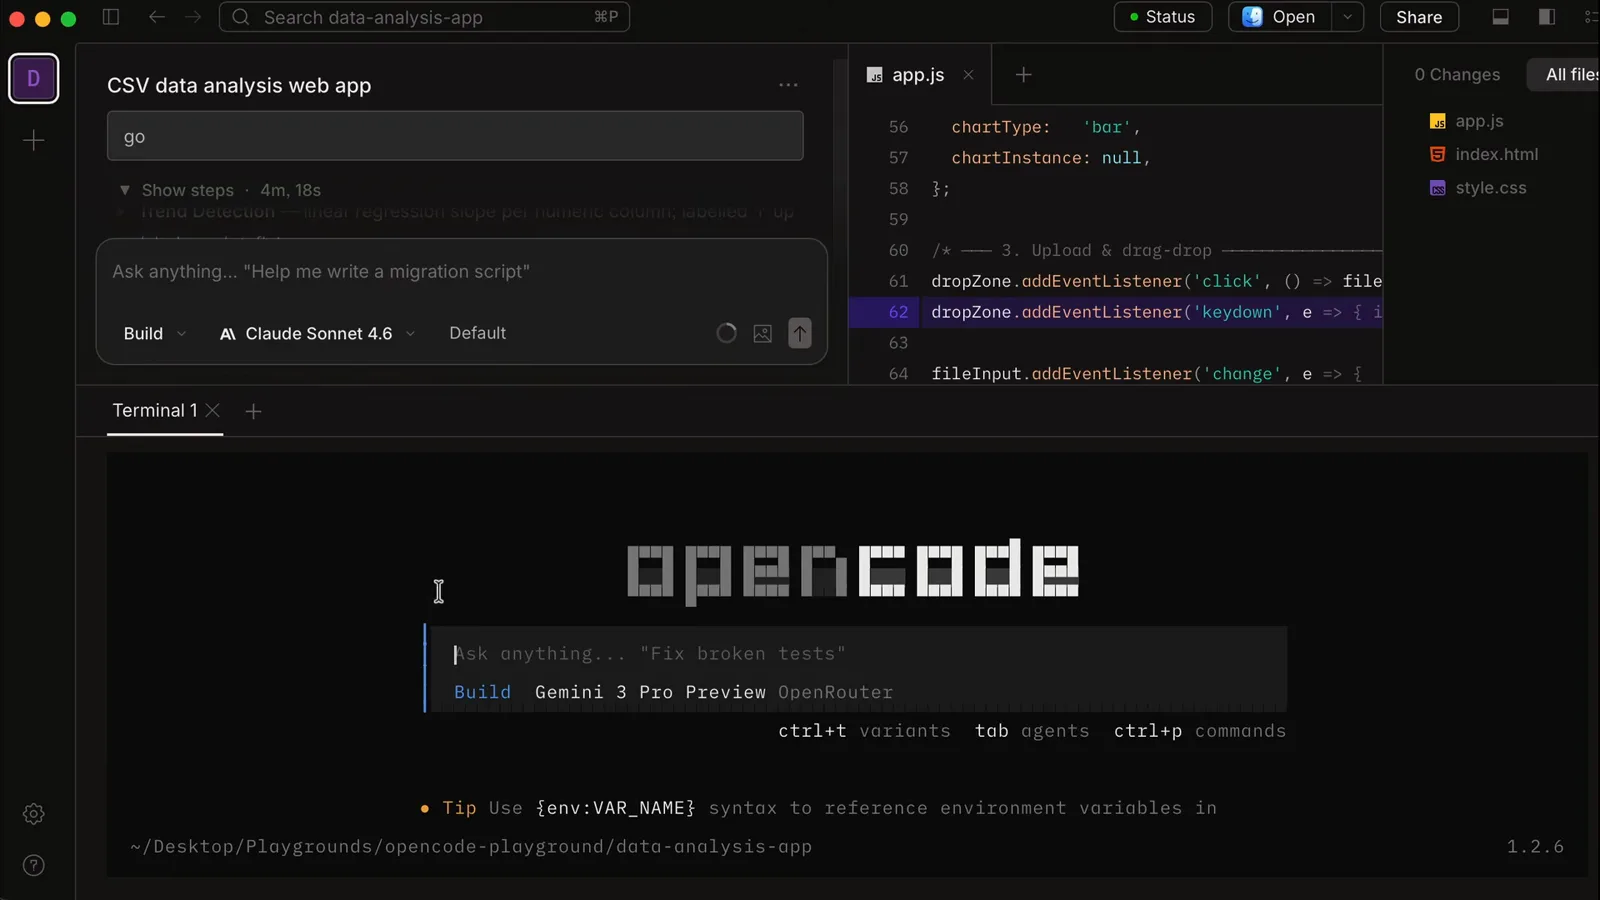
The terminal tab can run dev servers — and the OpenCode CLI itself.Watch at 5:18 - 16
Open the finished app and keep iterating
Static builds just work by double-clicking index.html; a Next.js app runs at localhost:3000 once npm run dev is going — the finished Goals page shows Total Goals, Total Saved and Overall Progress cards with the new Vacation target. Keep asking in the same session for changes, or start a parallel session — multiple agents run side by side, each with its own project and model.
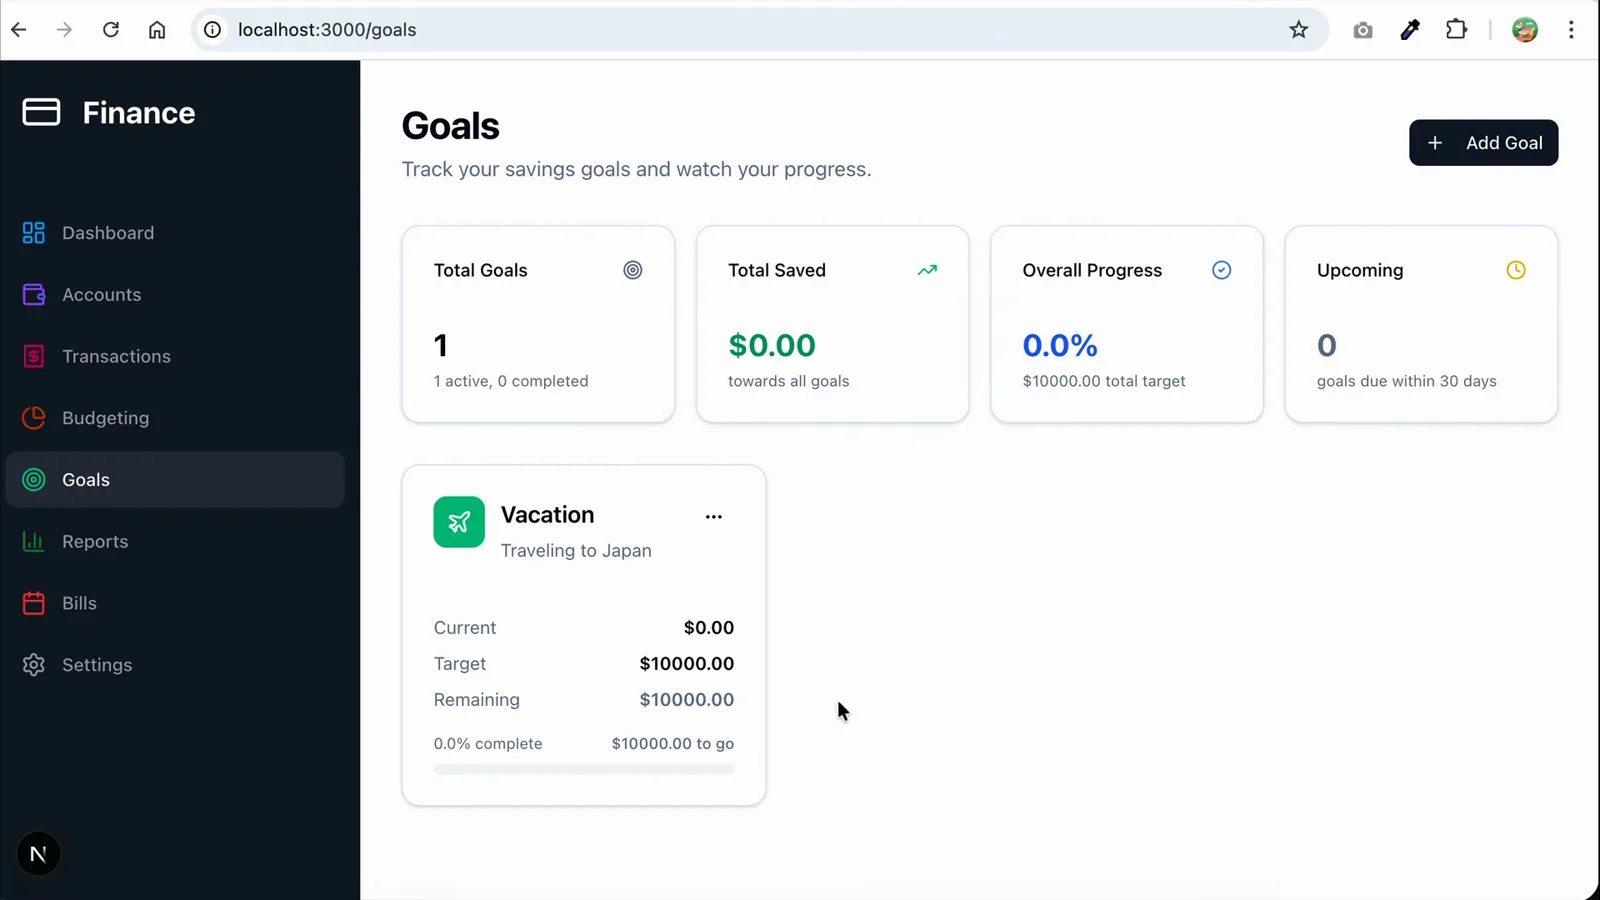
The goals page the agent built, running at localhost:3000/goals.Watch at 7:40