
Unity Codex Plugin Tutorial: Install Unity's 31 Skills in Codex
The official Unity plugin for Codex ships 31 skills — from unity-cli to in-app purchases — plus an MCP route into the live Editor. This illustrated walkthrough covers the install commands, the Unity CLI, editor control, and how the Codex plugin compares with the Claude Code one.
The short version
- Two terminal commands install it: codex plugin marketplace add Unity-Technologies/unity-agent-plugin, then codex plugin add unity@unity-agent-plugin. No Package Manager, no Asset Store.
- The unity-cli skill teaches Codex Unity's command line: check status, take screenshots, open scenes, enter play mode, even run C# snippets with unity exec without a domain reload.
- For live editor access, Unity 6's MCP Server exposes 52 tools and a one-click Configure button for Codex — a codex-mcp-client then shows up as Accepted under Connected Clients.
- Unity is rebuilding MCP on the CLI (unity mcp configure), and the same plugin repo serves Claude Code — install both and drive Unity with whichever agent you open.
Codex released a Unity plugin featuring over 30 skills
Channel:Vibegame3:38
Getting started with Unity CLI
Channel:Unity7:06
Get started with Unity MCP
Channel:Unity6:17
Unity's plugin for Codex — install and verification
Docs:docs.unity.comDocs
Frames come from three clean screen recordings (no camera overlays); install commands, skill counts, the Unity 6+ requirement and the MCP migration plan are cross-checked against Unity's docs and the unity-agent-plugin repo.
Screenshots credit the recording channels and Unity's official videos; each step deep-links to the exact timestamp.
All 15 steps, from an empty Codex to a wired-up Unity
Install Unity's plugin in Codex
- 1
Add Unity's plugin marketplace to Codex
In a terminal run codex plugin marketplace add Unity-Technologies/unity-agent-plugin, then codex plugin add unity@unity-agent-plugin. The plugin comes straight from Unity's own GitHub repo — it is not an Asset Store asset or a Package Manager package, and it never touches your project. Start a new Codex session and the Plugins section now lists Unity with a Try now button and three ready-made prompts, shown here.
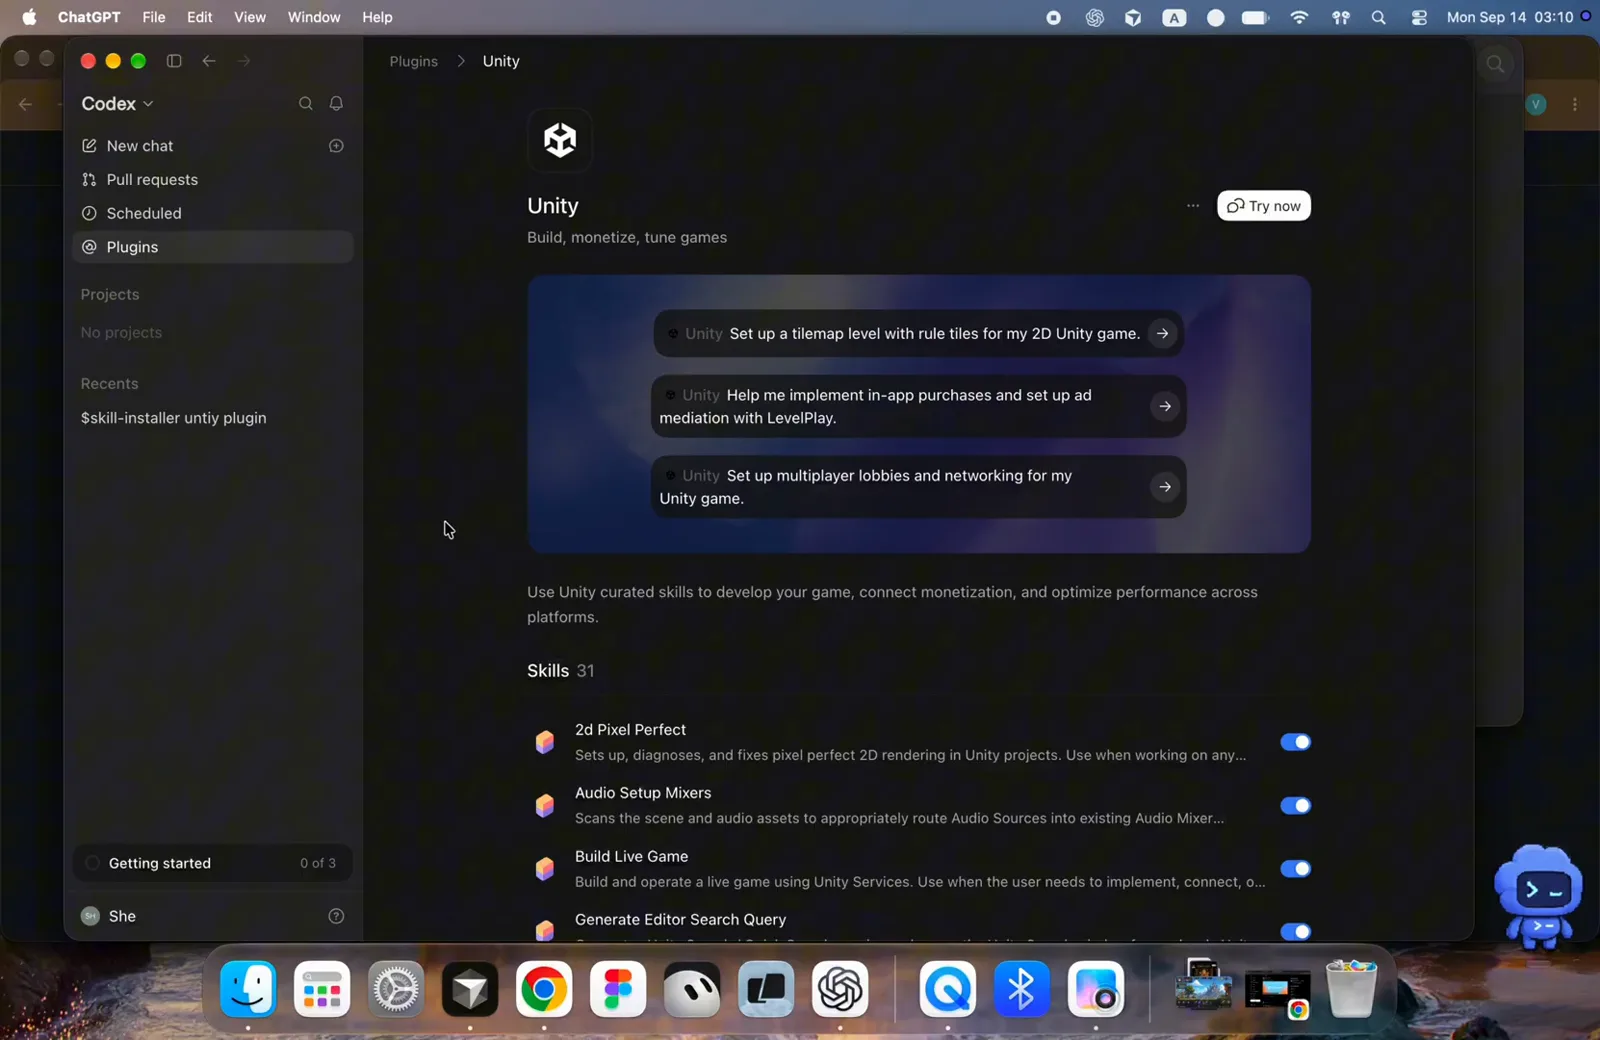
The Unity plugin's page inside Codex right after installing — Try now launches a chat with the plugin loaded.Watch at 1:28 - 2
Browse the 31 skills and toggle what you need
Open Plugins → Unity and scroll the Skills list. Unity ships 31 skills covering 2D and pixel-perfect rendering, audio mixers, live games, editor search, in-app purchases, AI navigation, LevelPlay ads, localization, sprite atlases, multiplayer, Vivox voice, UI (IMGUI, uGUI, UI Toolkit), tilemaps, shaders and more. Each one is a documented playbook the agent loads when your request matches — leave them all on, or toggle off the areas your game doesn't touch.
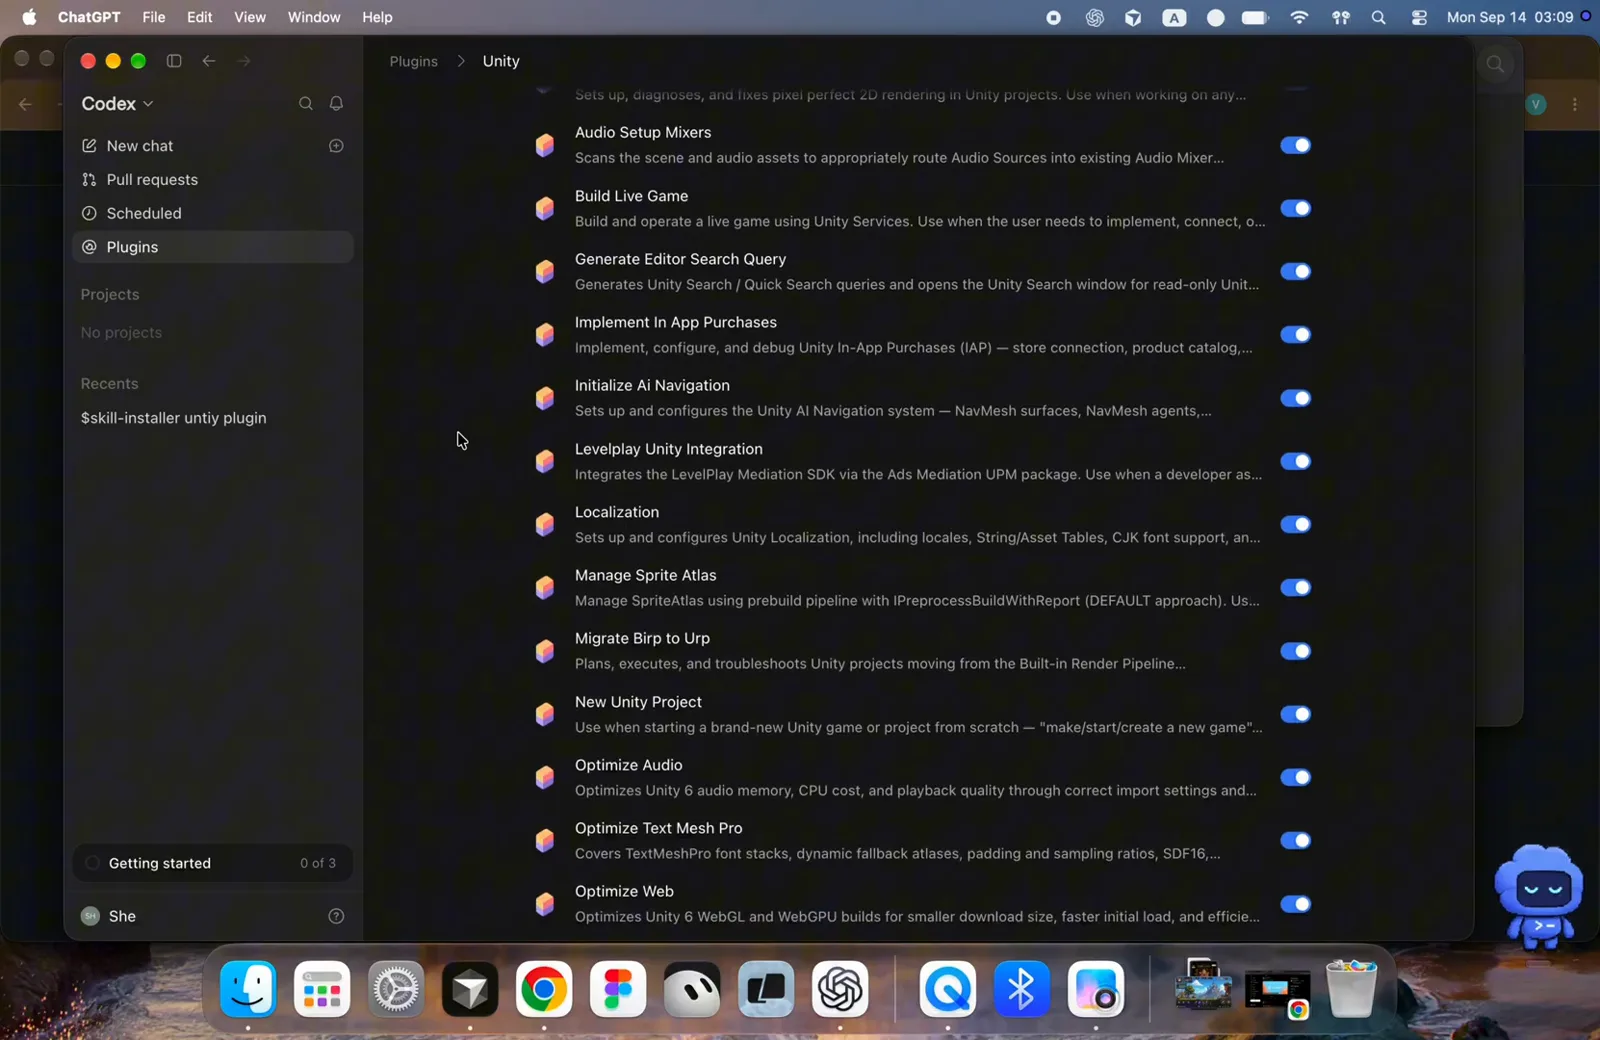
Every skill ships enabled by default; the toggles let you trim the context to your project.Watch at 1:00 - 3
Find the unity-cli skill — the bridge to the terminal
Keep scrolling and you reach Unity CLI ("Use when interacting with Unity CLI from the terminal, or to control a running/connected Unity Editor") plus Unity Package Management. The Information block below confirms you have the real thing: Capabilities Interactive, Read, Write and Developer Unity Technologies. This skill is what lets Codex drive the command-line half of this guide.
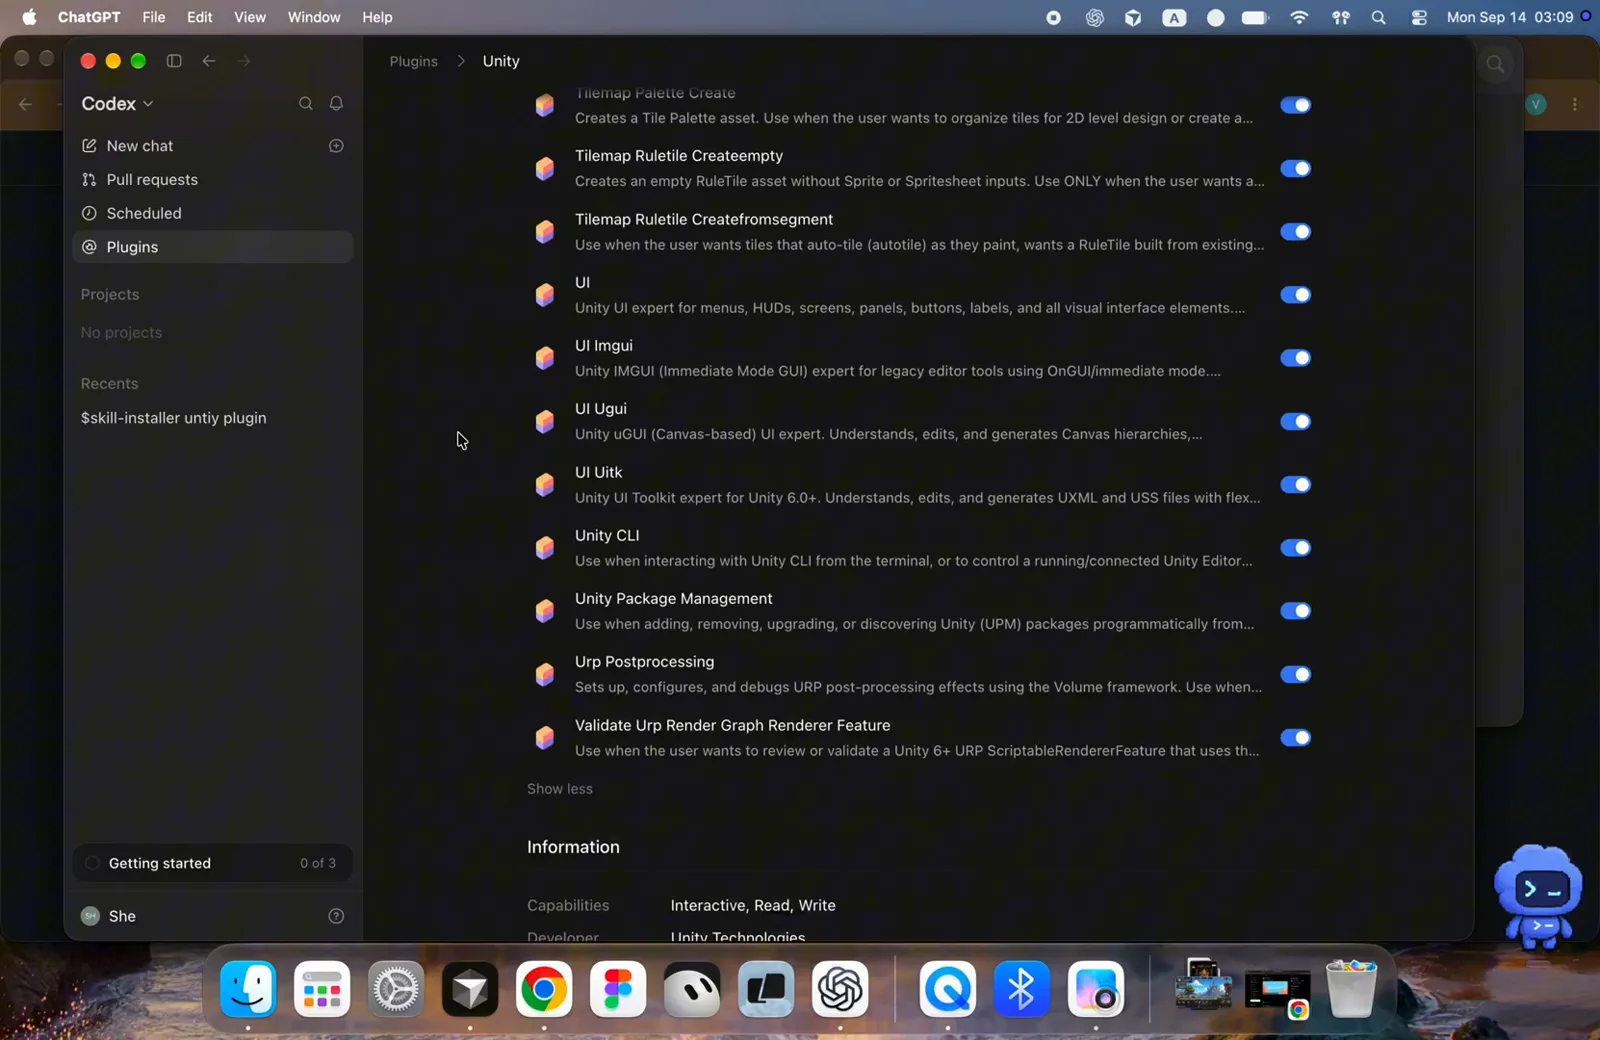
The list ends with the unity-cli and package-management skills; the Information section credits Unity Technologies as developer.Watch at 1:08 - 4
Invoke it from any chat
You don't have to launch anything special: type unity in a Codex chat — or use the @ mention, as shown here with "Unity game." — and describe the task in plain language. Skills also load automatically when your request matches one, and you can pick them explicitly from Codex's context menus. Try one of Unity's suggested prompts like "Set up a tilemap level with rule tiles for my 2D Unity game."
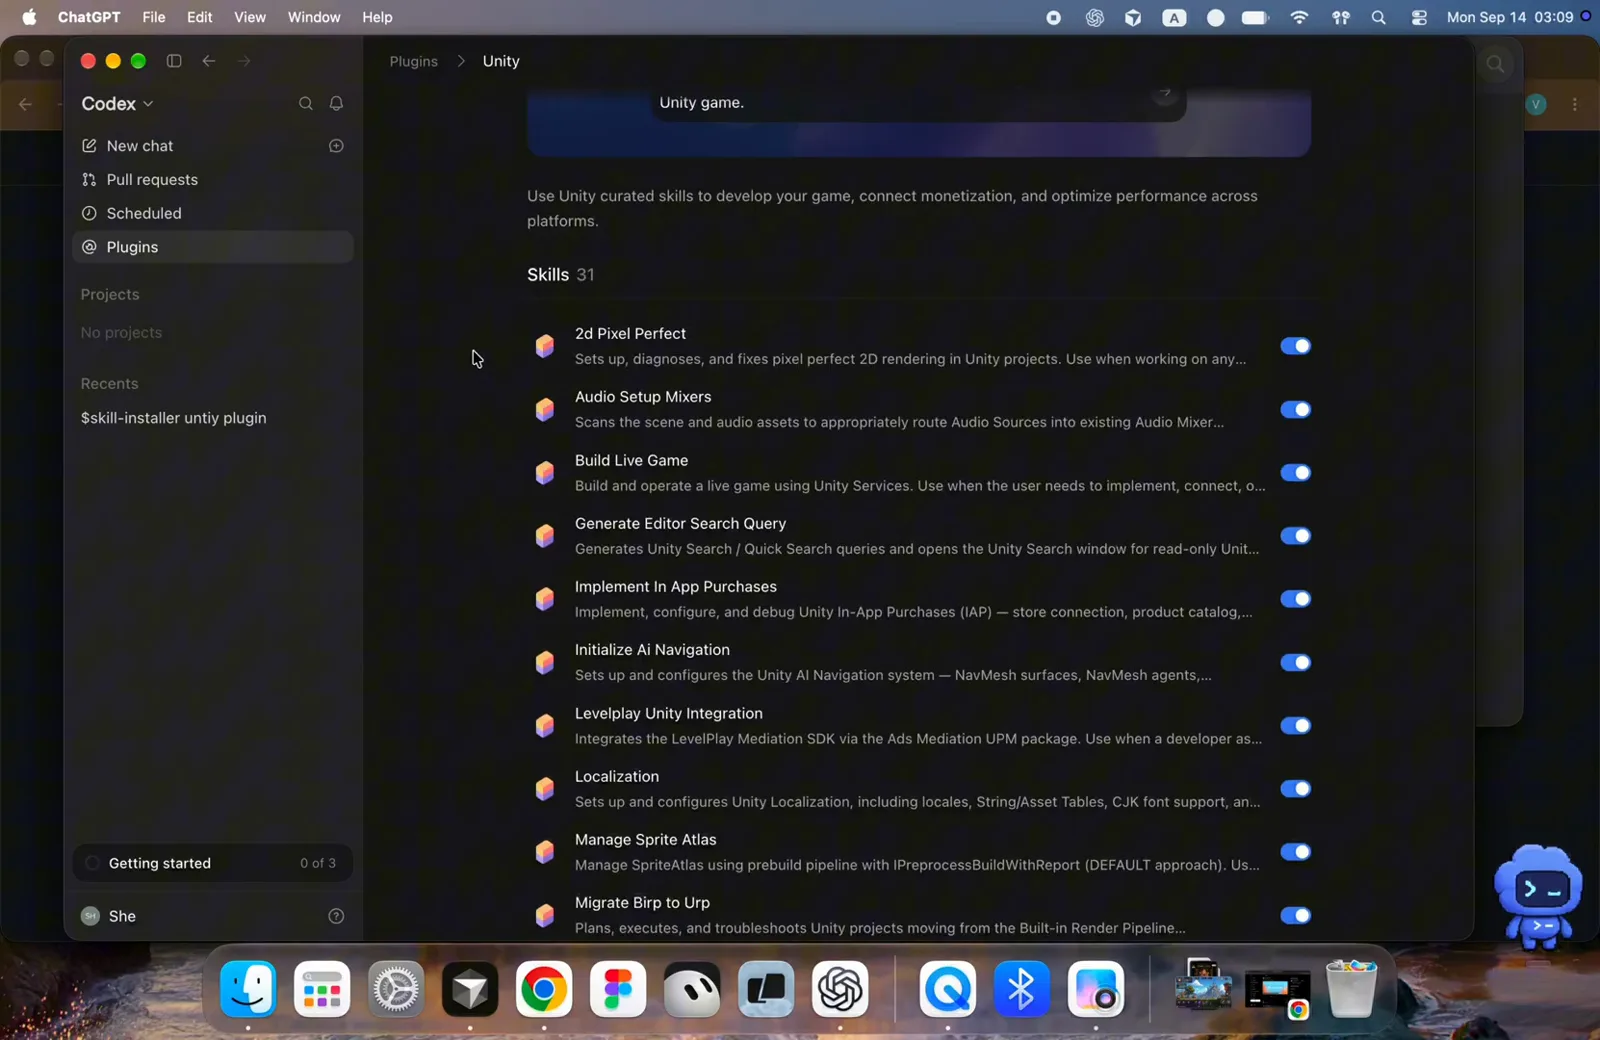
A plain "Unity game." prompt is enough for Codex to pull in the plugin's skills.Watch at 0:44
Teach Codex the Unity CLI
- 5
Install the Unity CLI
The plugin's knowledge works best with Unity's CLI installed. On Windows, run the one-line installer shown here: irm https://public-cdn.cloud.unity3d.com/hub/prod/cli/install.ps1 | iex. On macOS and Linux you can use Homebrew instead. The installer finishes with "Unity CLI 1.0.0-beta.6 installed!" and prints the getting-started commands — unity --help, unity editors list, unity install, unity upgrade.
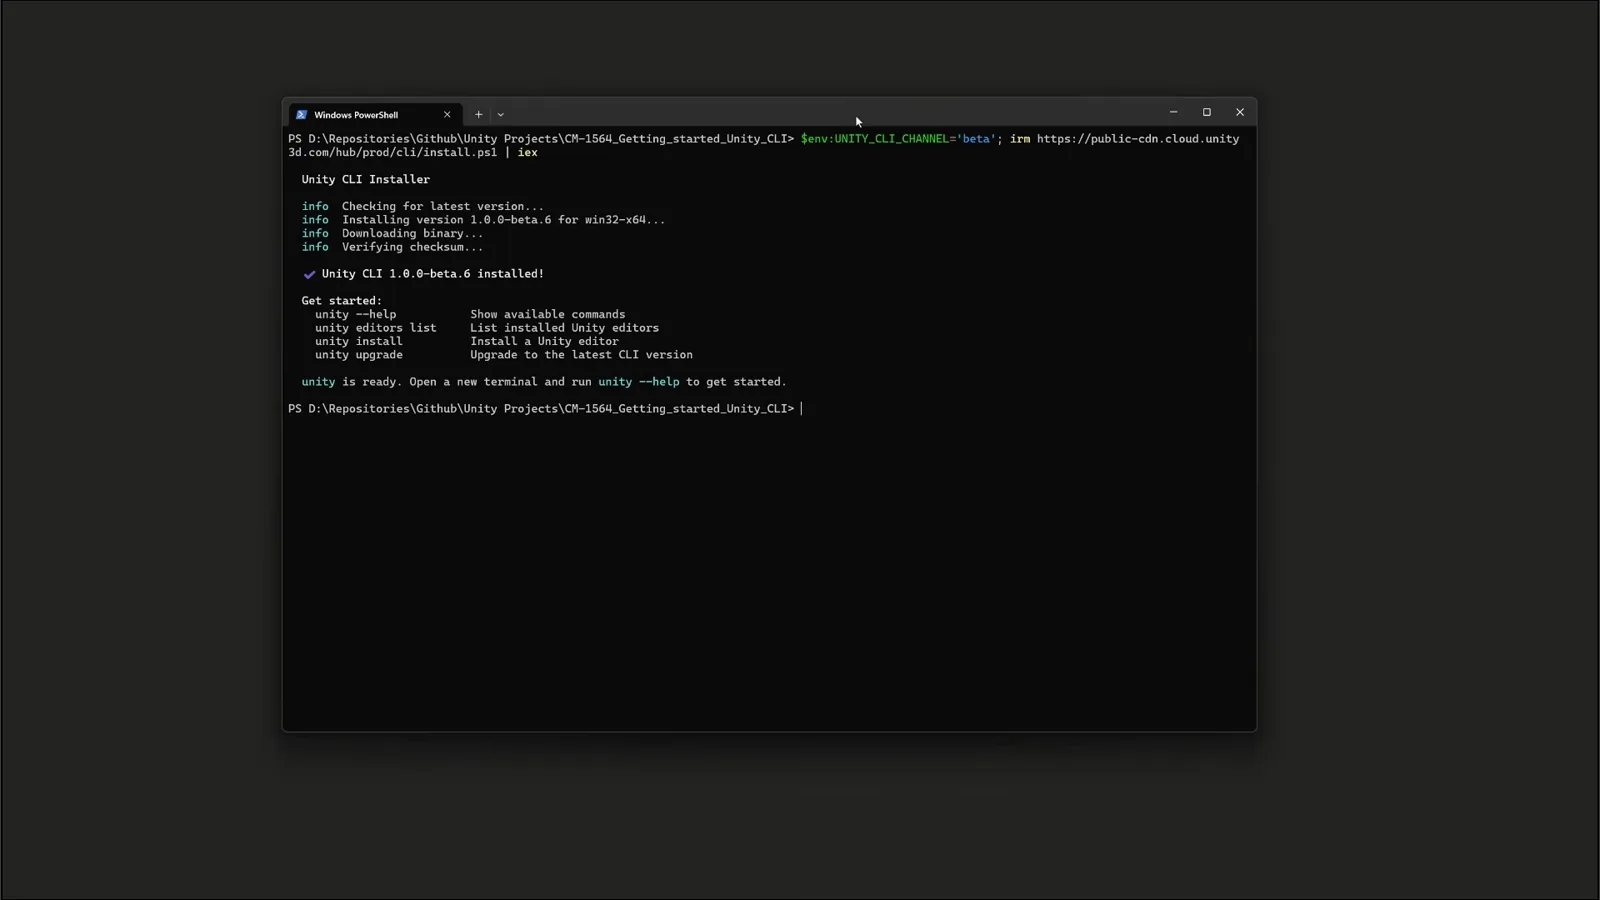
Unity CLI 1.0.0-beta.6 installed on Windows — the welcome text lists the four commands worth memorizing.Watch at 2:50 - 6
Know what the CLI is (and isn't)
Unity describes it best: $ unity — A Command Line Interface for managing Unity — with No GUI, built for automation, built for agents. It manages your environment: installing editors, managing licenses, creating and opening projects. It is not a build pipeline by itself — that's the pipeline package's job, next.
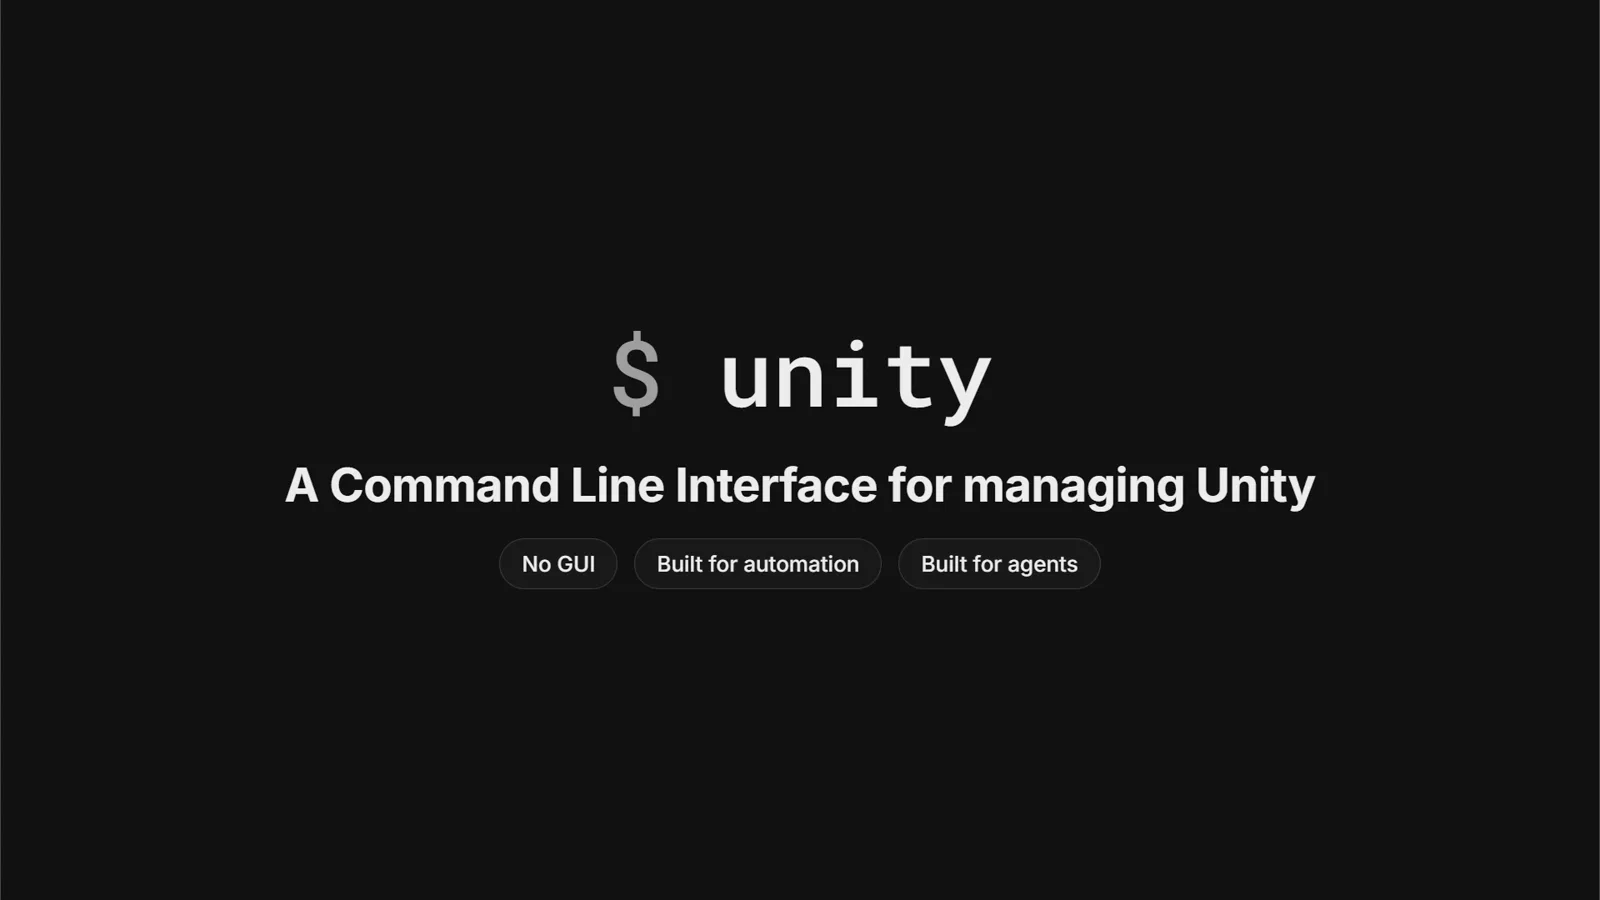
Unity's own intro slide: no GUI, built for automation, built for agents.Watch at 1:28 - 7
Run C# in the editor without a recompile
Pair the CLI with the pipeline package (unity pipeline install inside your project) and the running editor becomes a local server. The payoff: unity exec snippet.cs compiles your C# on the fly, runs it on Unity's main thread and returns the result — no project-wide recompile, no domain reload, results in milliseconds. These eval-style commands are the fastest way to let an agent tweak a scene and verify its work.
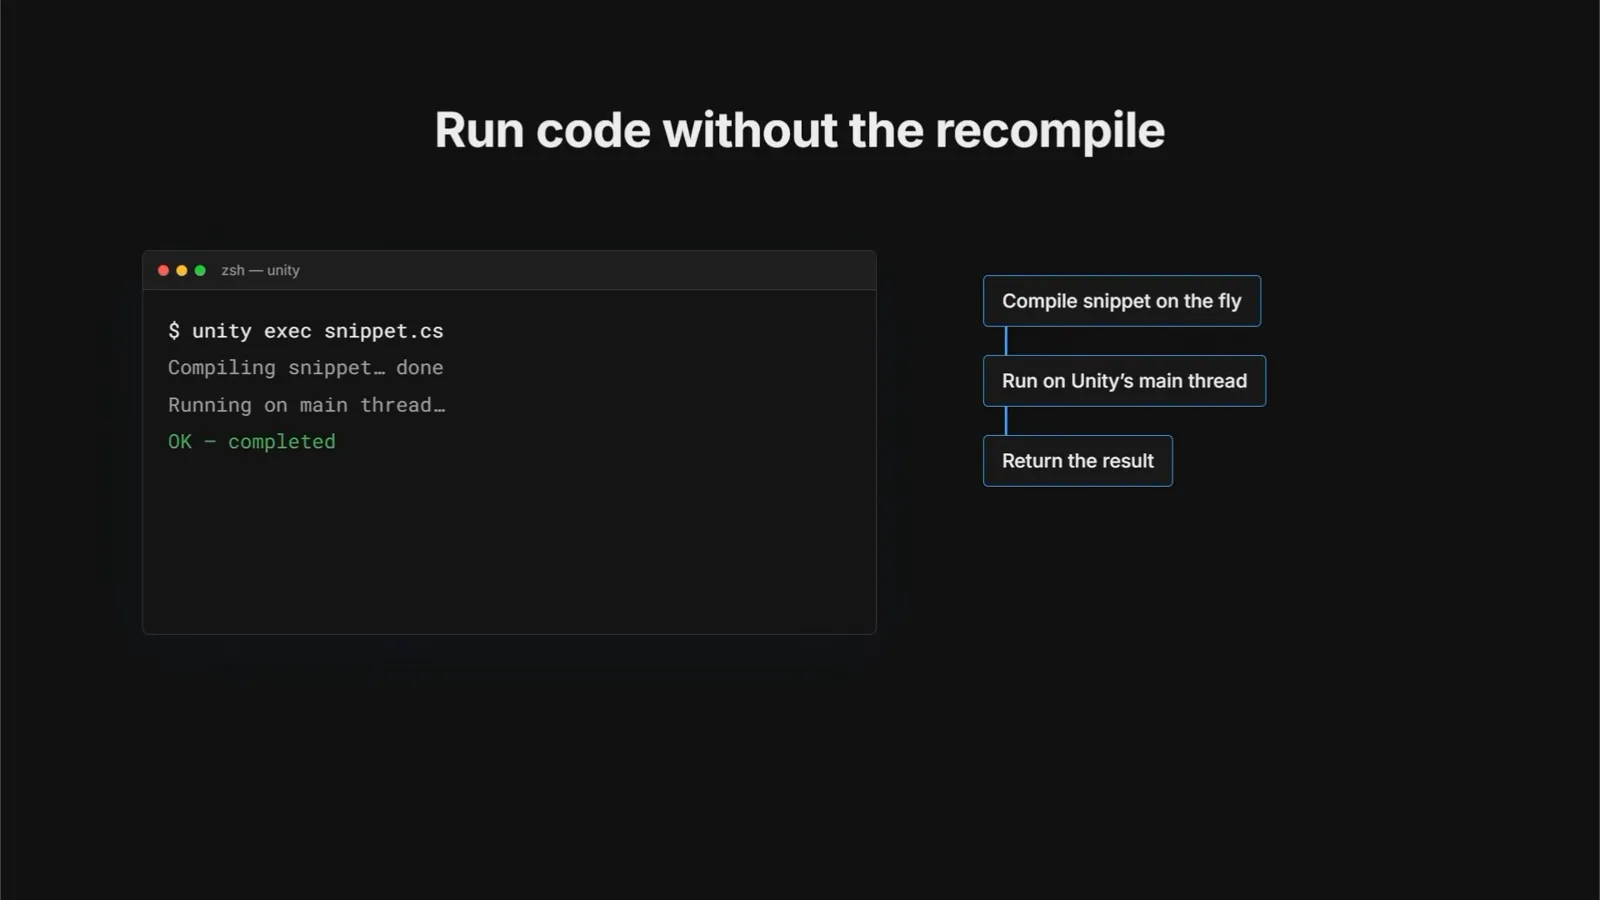
Compile snippet on the fly, run on Unity's main thread, return the result.Watch at 2:26 - 8
Point your agent at the CLI
Any agent that can run a shell command can drive Unity now — Claude, Codex, Cursor, Copilot. Unity's own demo builds a playable sphere scene from one prompt while a Claude Code session runs docked in the editor; with Codex the same commands work the same way. When in doubt, tell the agent to run unity --help: the help output teaches it the command grammar by itself.
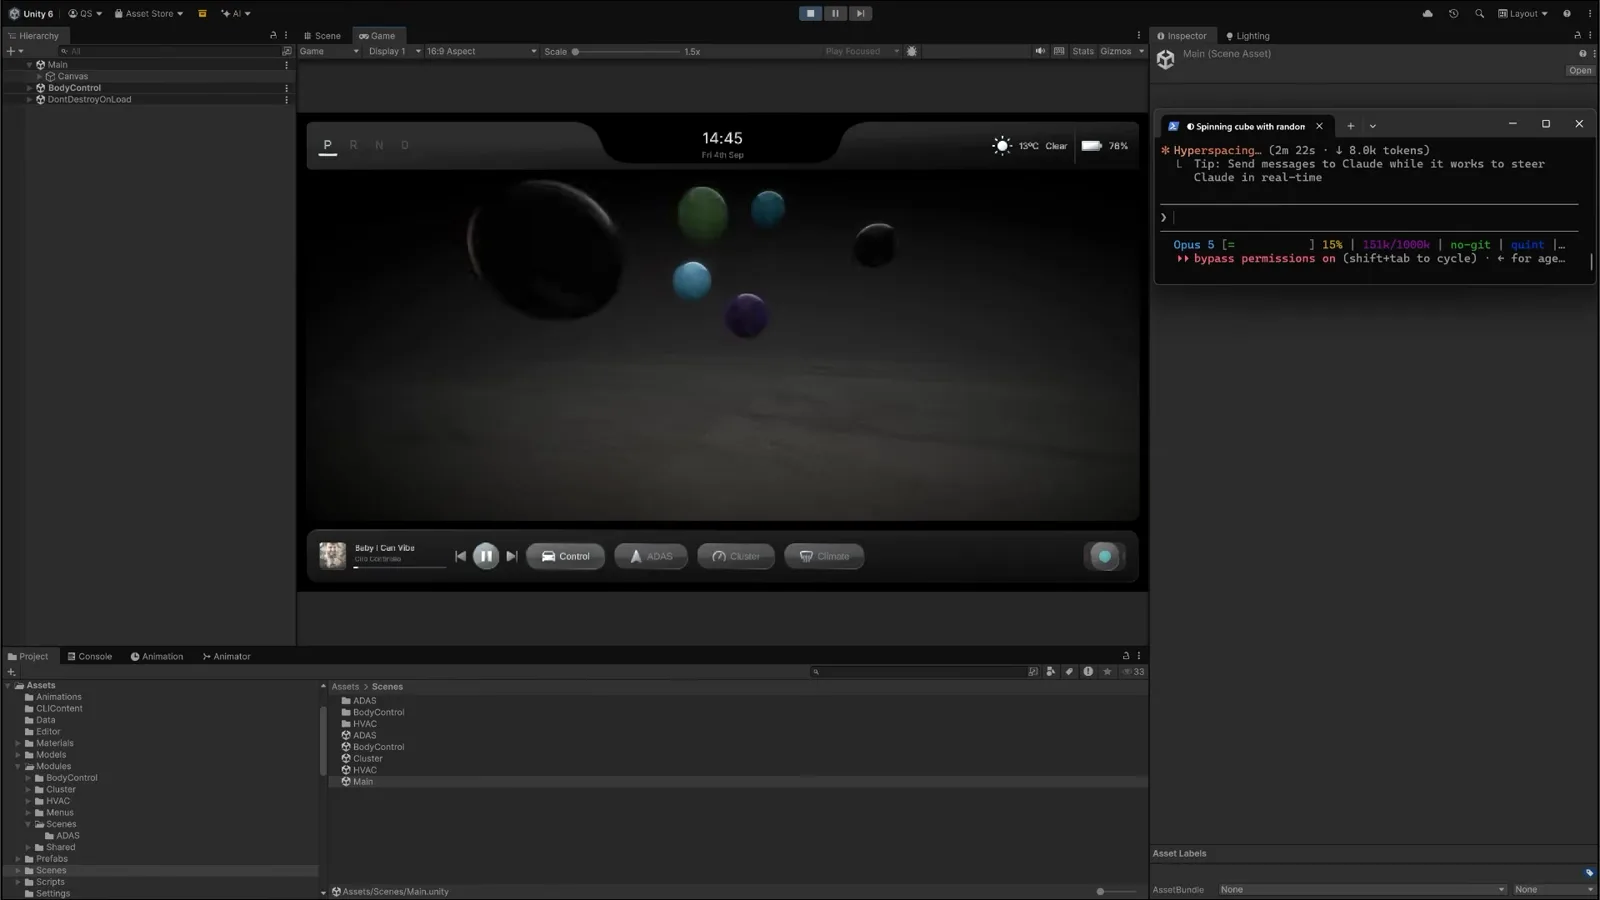
An agent-built scene in play mode — spheres, materials and a working music player, from a single prompt.Watch at 5:55
Open the editor with Unity MCP
- 9
Open Project Settings → AI → Unity MCP Server
For live editor access beyond the CLI, Unity 6 ships an MCP server in the AI Assistant package (Edit → Project Settings → AI). The panel confirms two things: Unity Bridge Status Running, and Connected Clients — here two codex-mcp-client entries from Codex already show as Accepted, alongside a cursor-vscode connection. This is where Codex's editor sessions will appear.
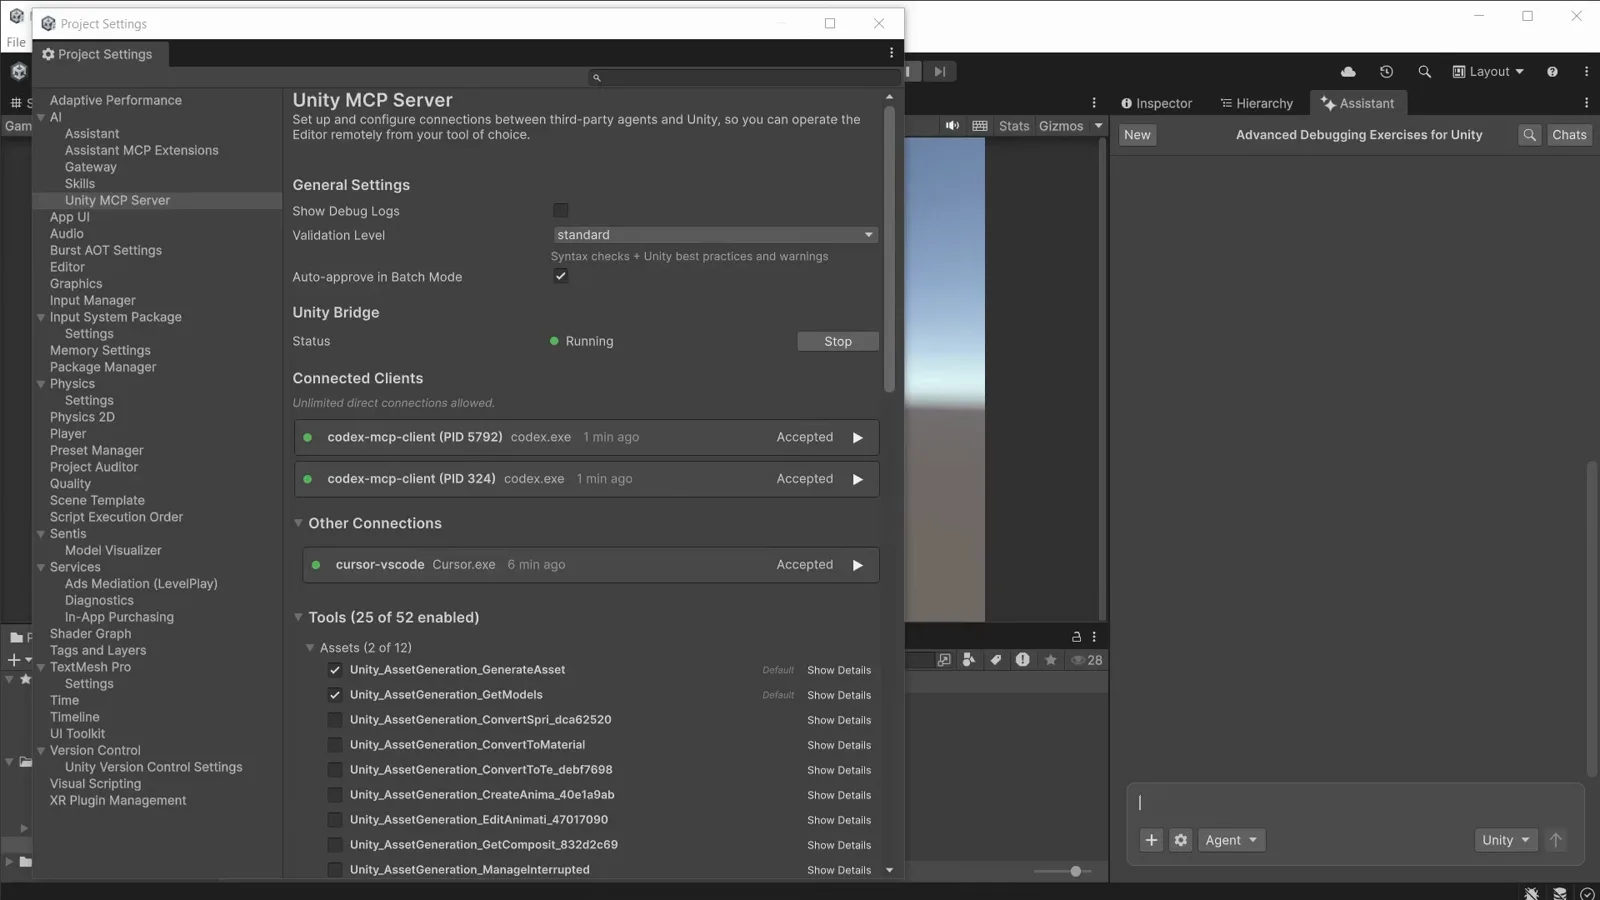
Unity Bridge running with codex-mcp-client entries accepted — Codex is talking to the editor.Watch at 0:10 - 10
Click Configure on the Codex row
Scroll to Integrations and you get one-click setup per agent: Cursor, Claude Code, Windsurf, Claude Desktop, VSCode GitHub Copilot, Kiro, Codex and Gemini. Clicking Configure writes the config file (an mcpServers entry pointing at Unity's relay) into that client. If your Codex build isn't listed, the CLI route in step 15 does the same job from the terminal.
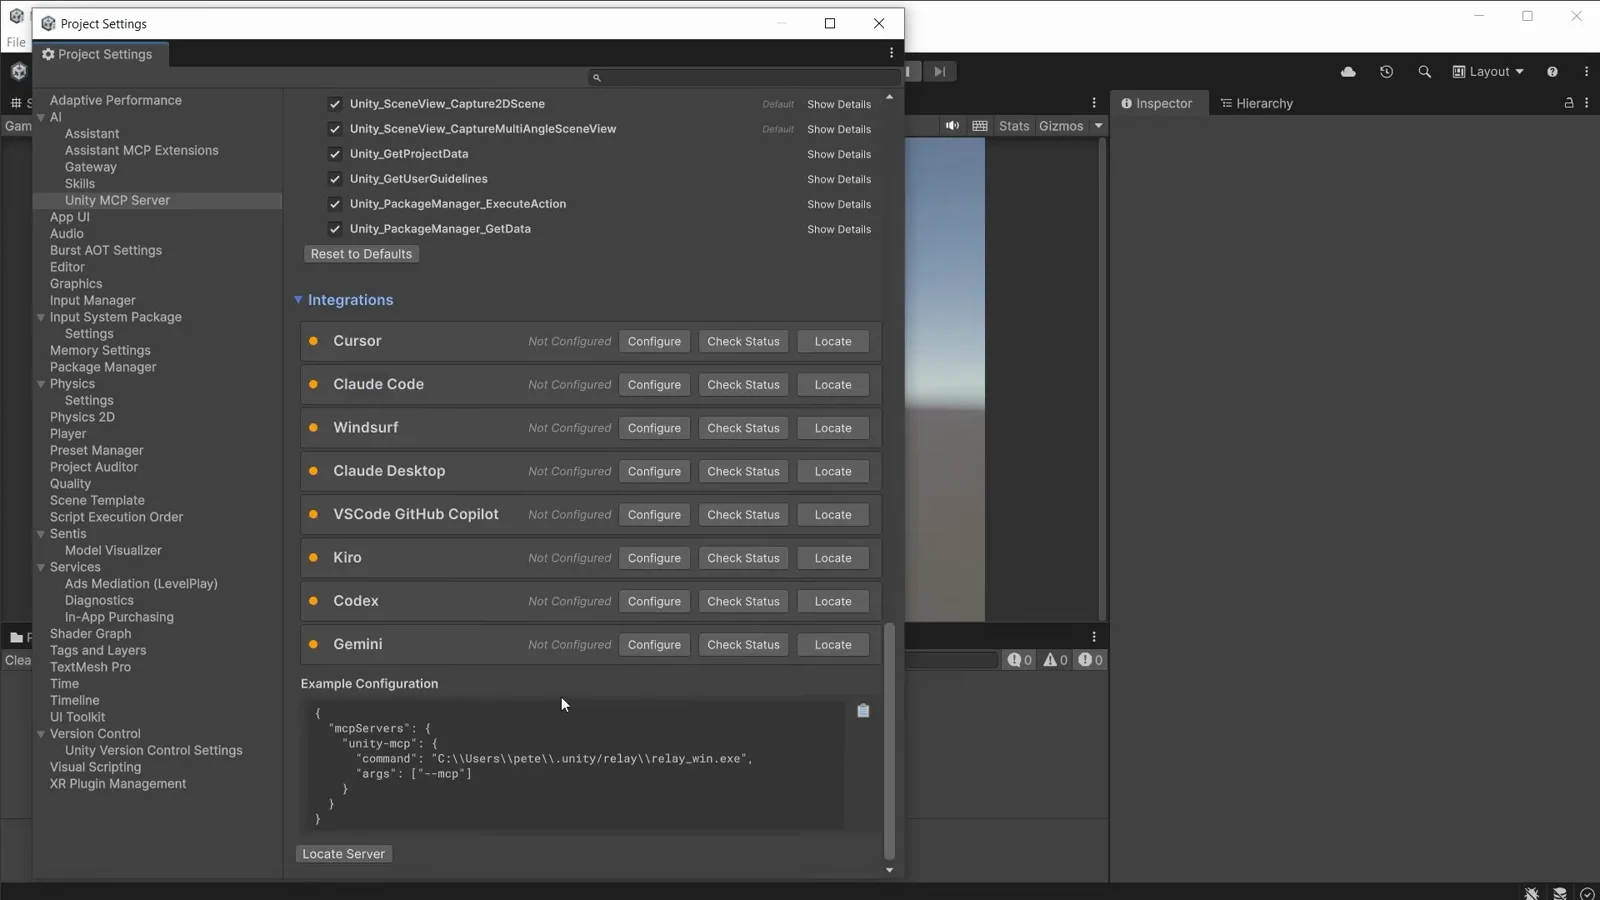
One Configure click per agent writes the mcpServers config — Codex sits in the same list as Claude Code.Watch at 1:56 - 11
Confirm the server on the agent side
Open your agent's MCP settings and check the registration took. In Cursor's Tools & MCPs page the new unity-mcp server shows "8 tools, 1 prompts enabled" right after configuring — Codex's equivalent lives in its config/mcp listing. Eight tools is the default set; Unity exposes far more, which you'll enable next.
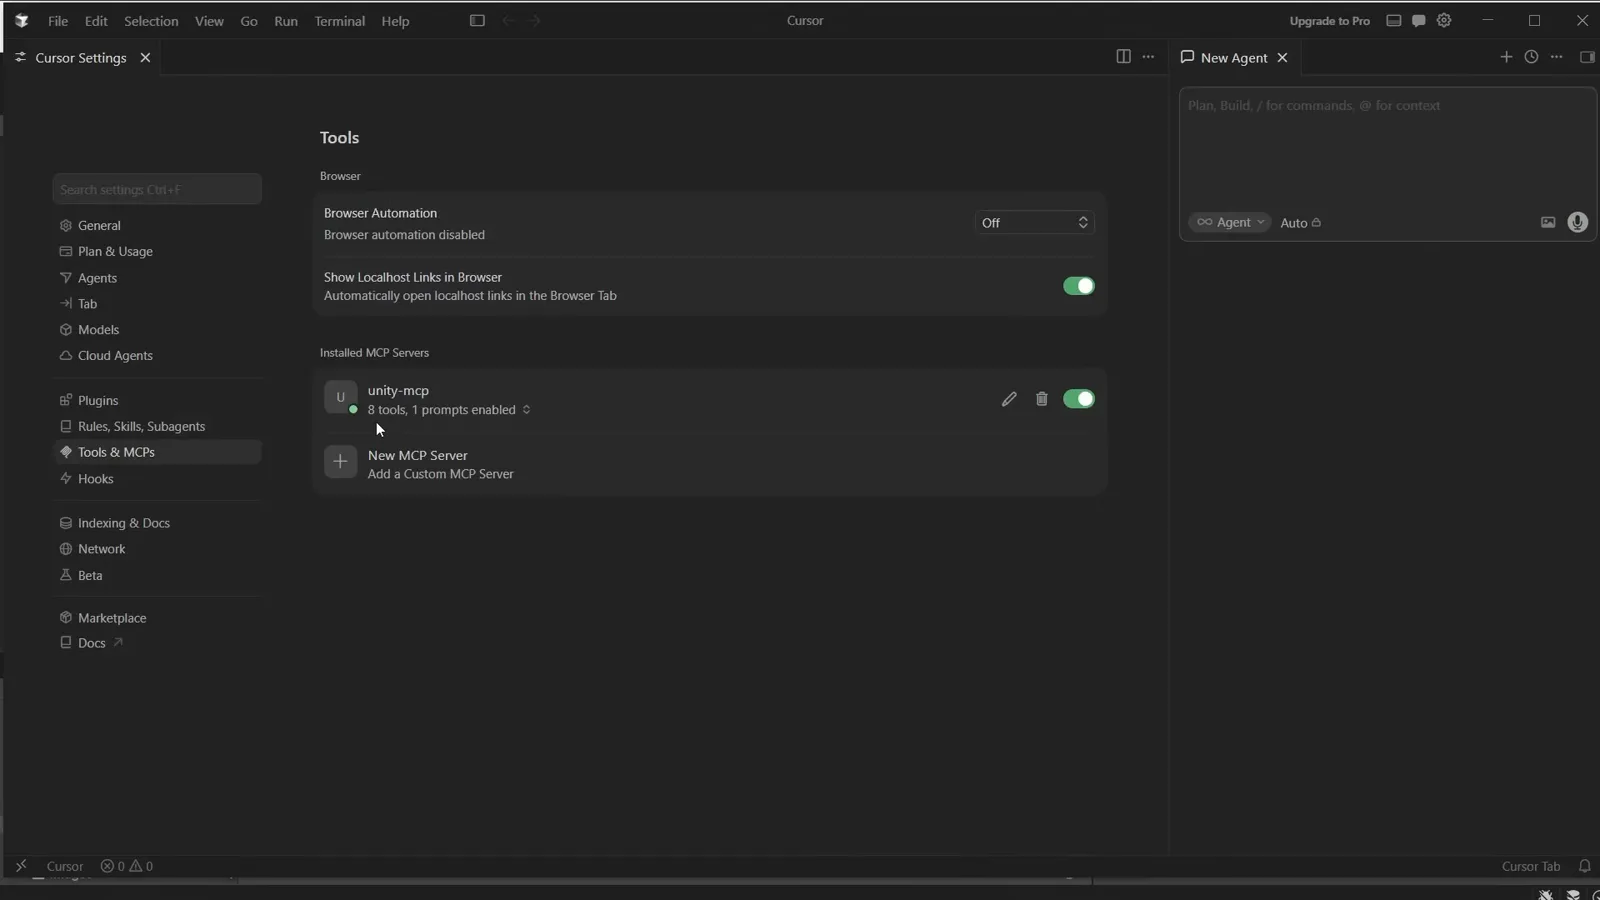
The unity-mcp server registered client-side with 8 default tools and 1 prompt.Watch at 3:08 - 12
Review the 52 tools Unity exposes
Back in Unity, the Tools section lists everything the server can do — this project shows 25 of 52 enabled across Assets, Assistant and Core groups: generate assets, get project data, run commands, create scripts, apply text edits and more. Enable the tools a task needs and use Show Details to read exactly what each one does before handing it to the agent.
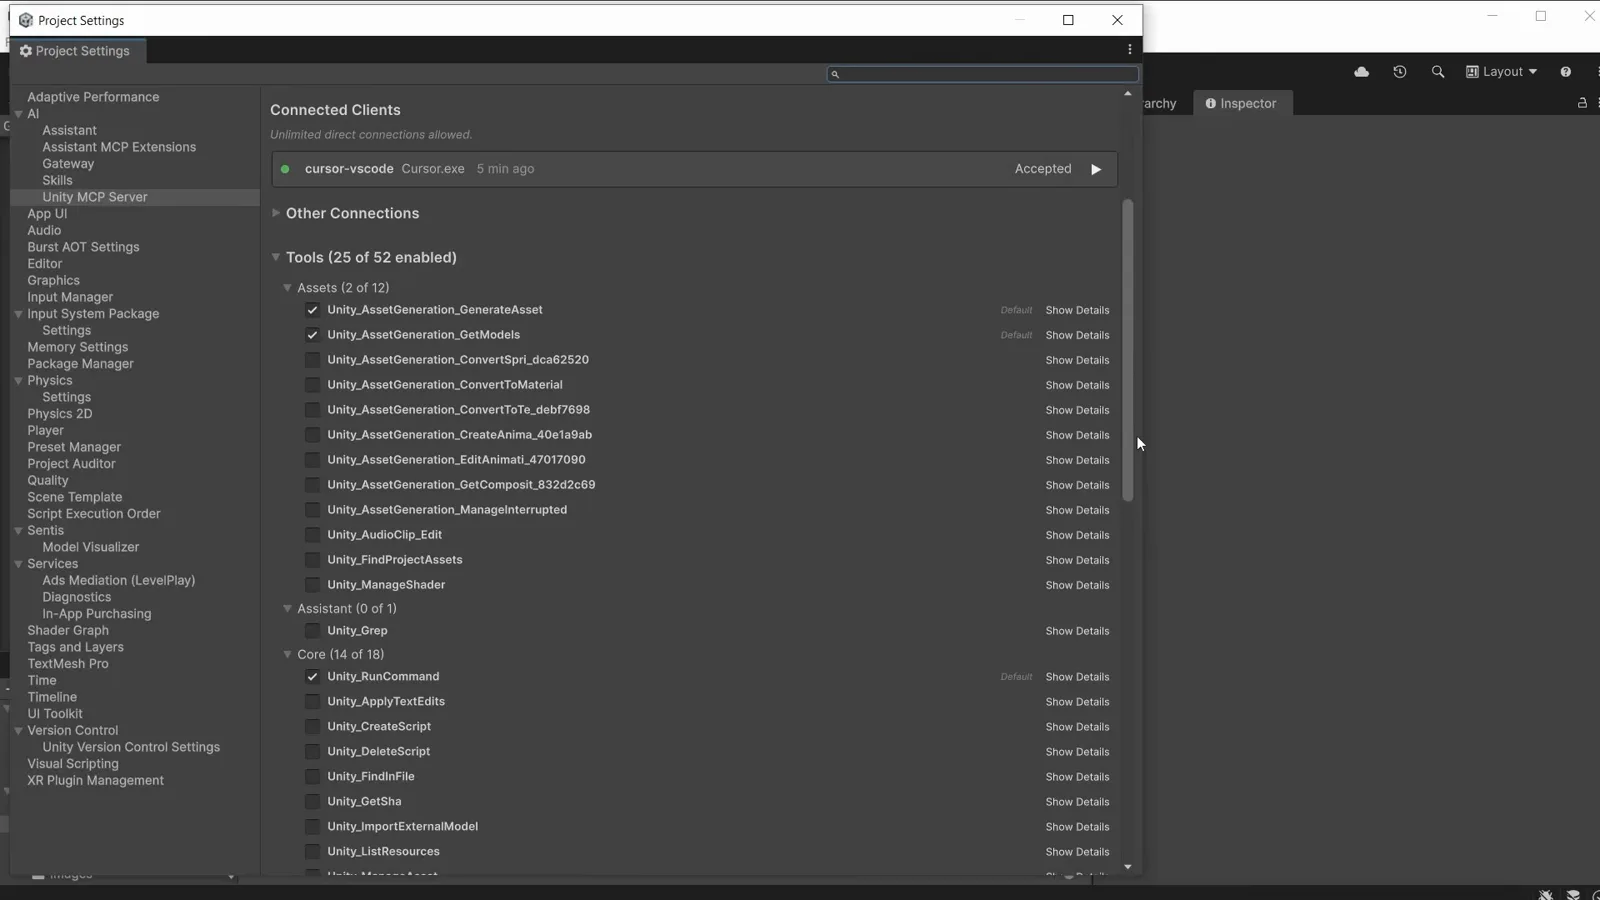
25 of 52 tools enabled here — expand Show Details to read a tool's contract before enabling it.Watch at 2:58 - 13
Ask the agent: am I connected to Unity?
The quickest sanity check is a question. The agent here answered by actually calling Unity_GetProjectData: "Yes — you're connected to Unity… it returned live project data (asset folders, scenes, scripts, materials, etc.)". The first tool call pops an allow prompt inside Unity; approve it and the client moves to Accepted in Connected Clients. From here, prompts like "create a script for the SpaceshipObject" end with the object really in your scene.
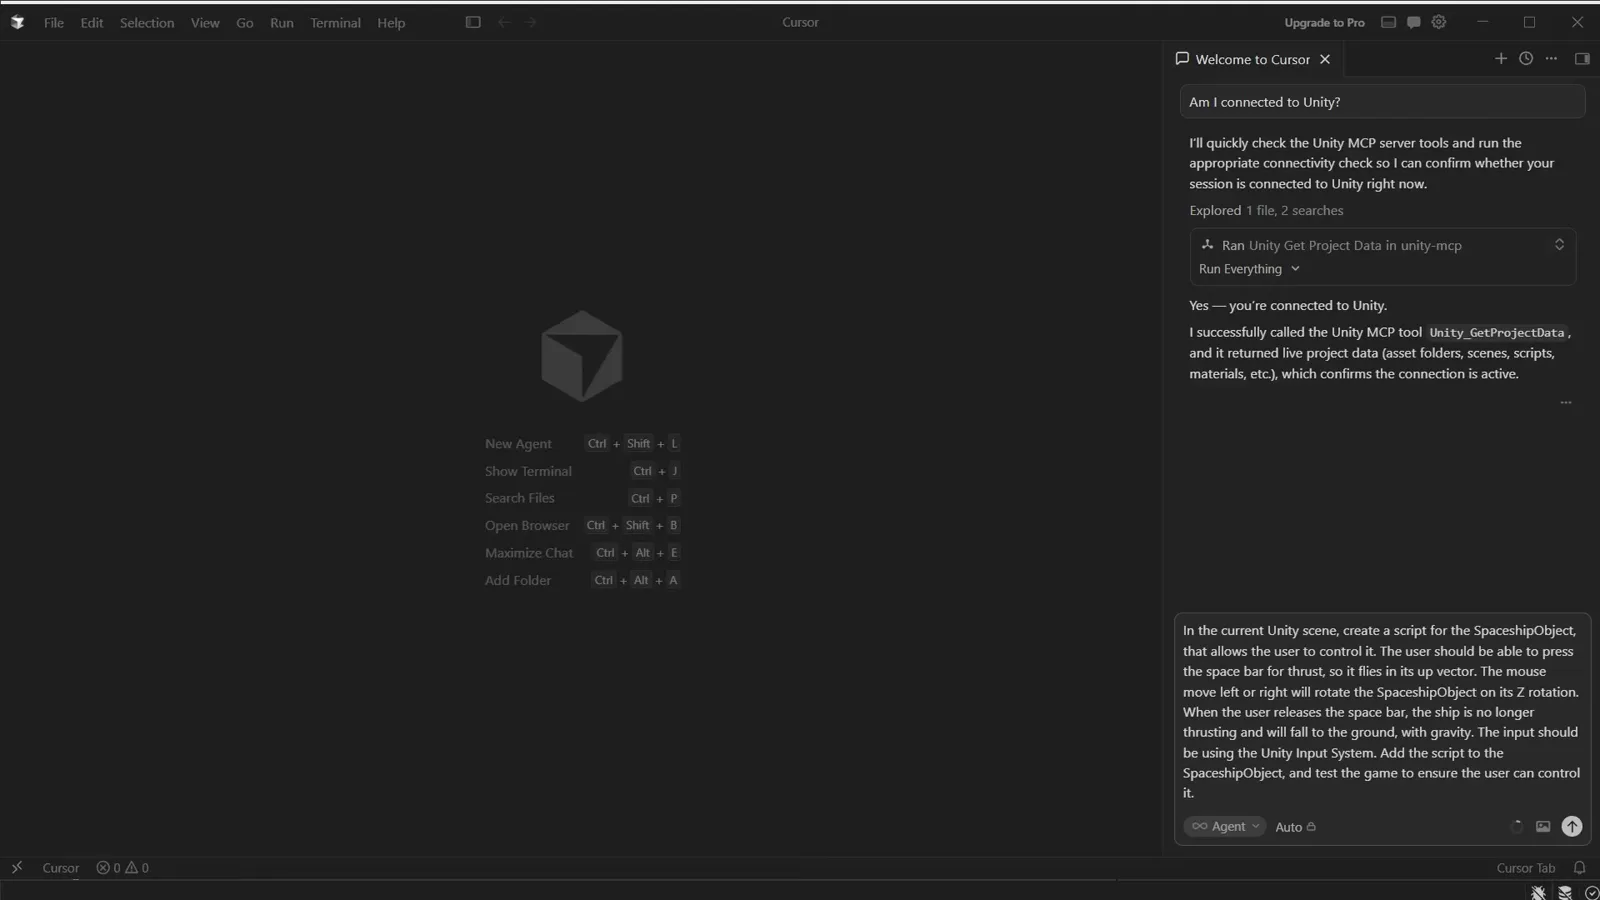
A live Unity_GetProjectData call settles it — the agent is reading the real project.Watch at 3:42
Codex or Claude Code — and what's next
- 14
Know where Unity MCP is heading
Unity's own answer to "is MCP going away?": support isn't being dropped, but the current implementation — the one that ran inside the Editor process — is retired in favor of the Unity CLI plus Pipeline package with built-in MCP mode. Same coverage, faster and more reliable. In practice: keep using the integrations above, and prefer the CLI commands for anything they cover.
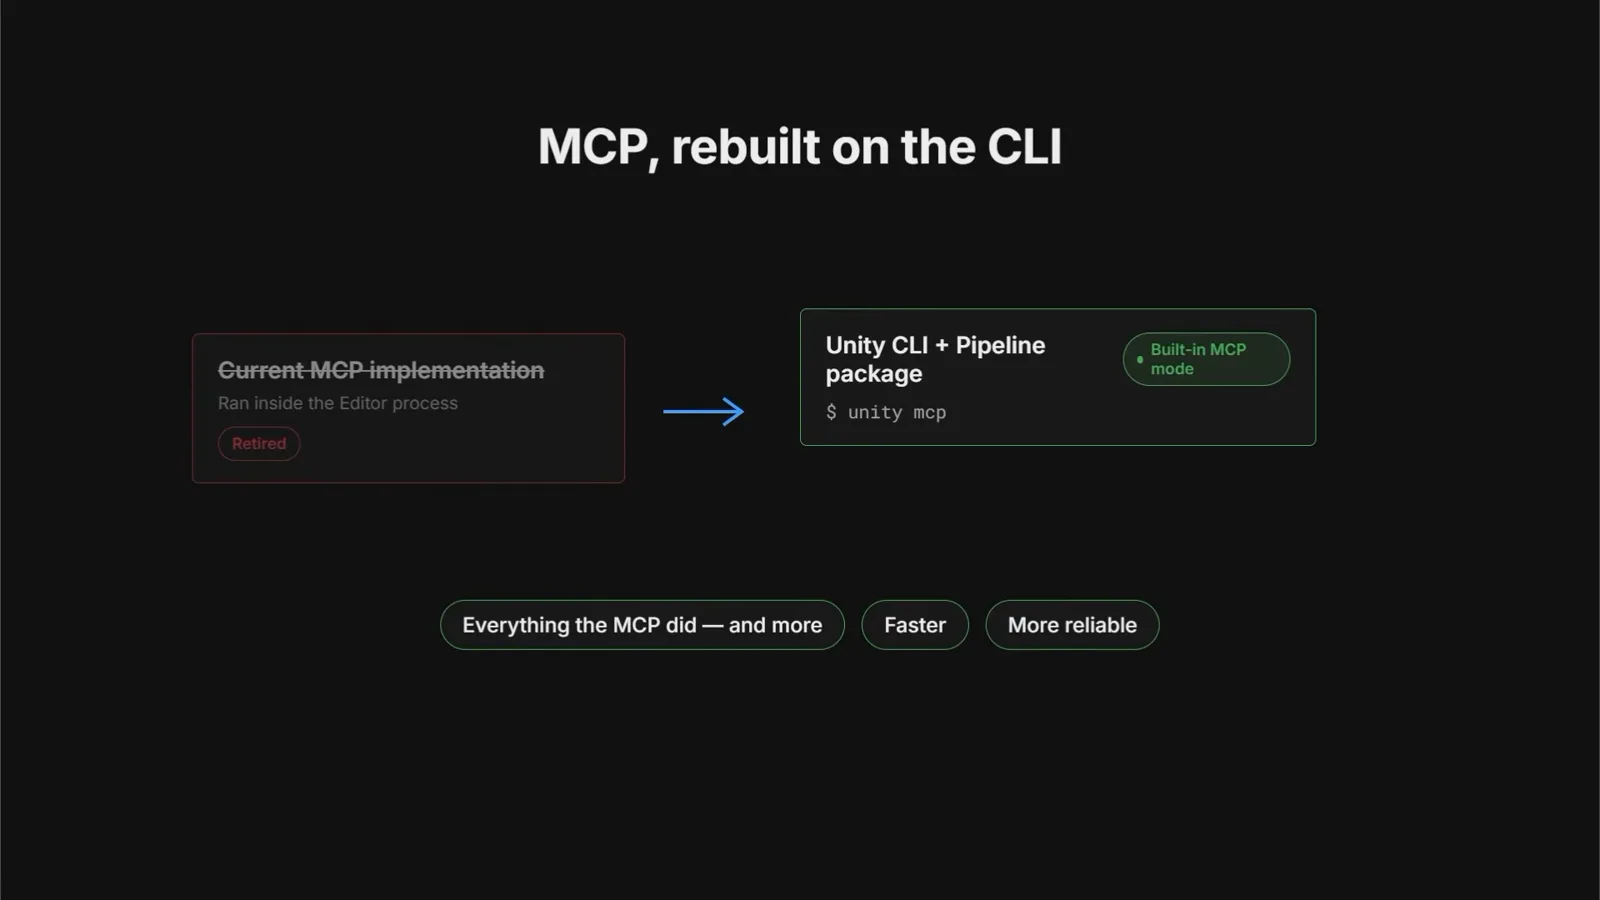
Current MCP implementation: retired. Unity CLI + Pipeline with built-in MCP mode replaces it.Watch at 6:24 - 15
One command wires any agent
Prefer the terminal? unity mcp configure lists every supported client — Codex, Claude Code, Claude Desktop, Cursor, VS Code, Windsurf, Kiro, Kimi, Zed and more — then unity mcp configure codex registers the server in one shot. Notice Codex and Claude Code sit in the same list: whichever you pick, the editor on the other end is the same, which is exactly why Unity could ship one plugin repo for both agents.
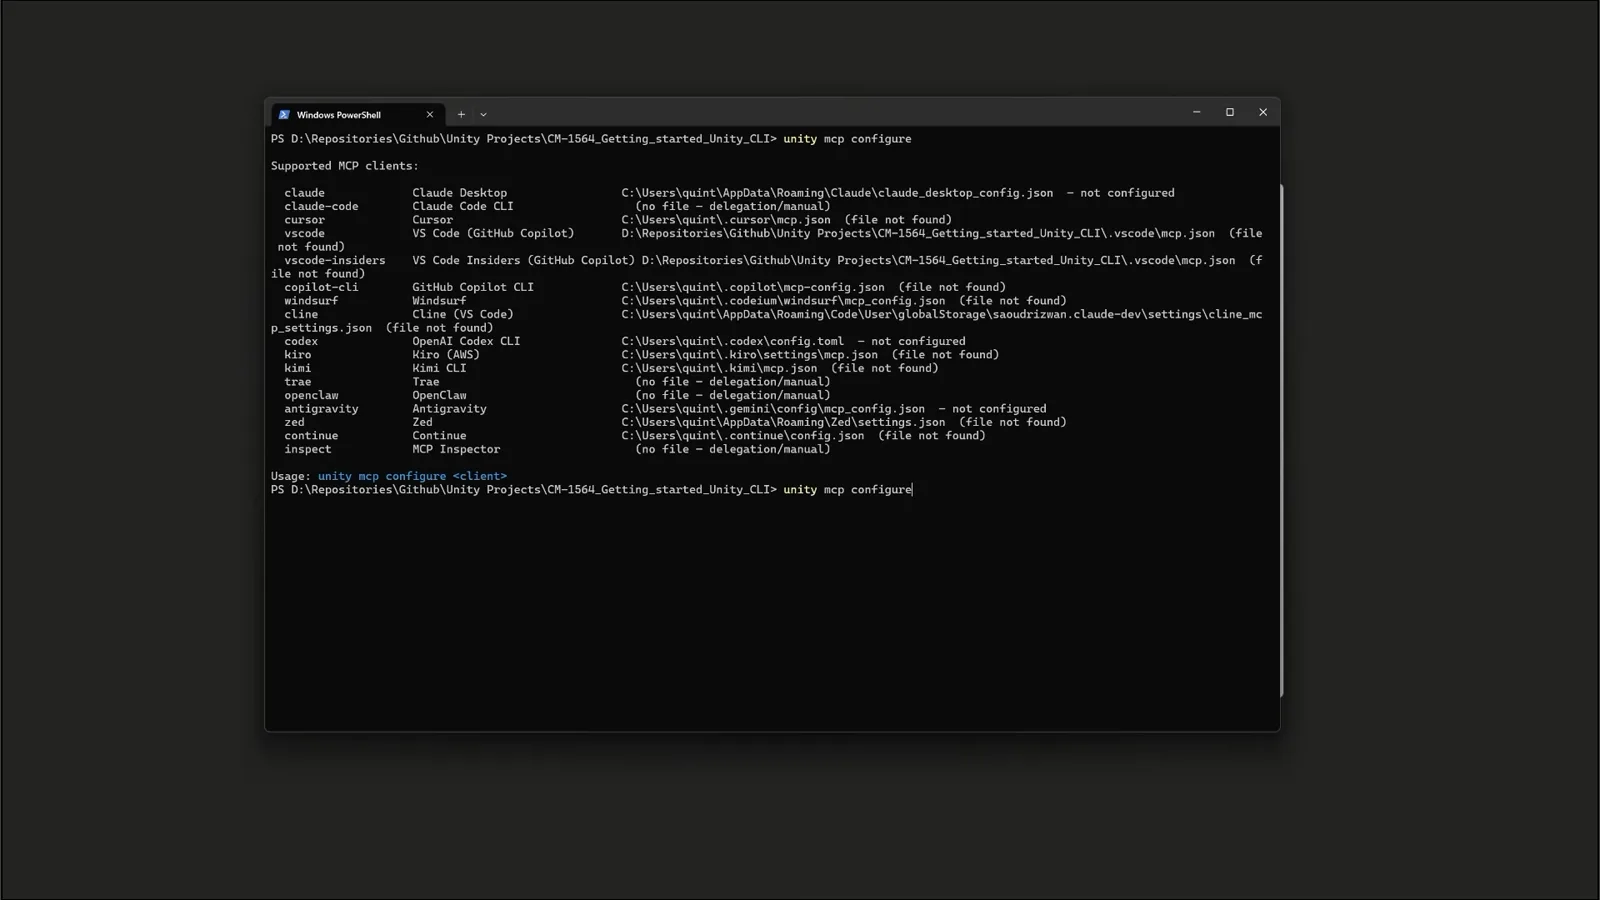
unity mcp configure enumerates every client it can wire — Codex and Claude Code side by side.Watch at 6:30