
太长不看版
- 两条终端命令装完:先 codex plugin marketplace add Unity-Technologies/unity-agent-plugin,再 codex plugin add unity@unity-agent-plugin。不走 Package Manager,也不进 Asset Store。
- unity-cli 技能让 Codex 学会 Unity 命令行:查状态、截屏、开场景、进 Play 模式,甚至用 unity exec 跑 C# 片段、不触发全量重编译。
- 要直连编辑器,Unity 6 的 MCP Server 暴露 52 个工具,还给 Codex 配了一个 Configure 一键按钮——配好后 codex-mcp-client 会以 Accepted 出现在 Connected Clients 里。
- Unity 正在把 MCP 重建到 CLI 上(unity mcp configure),同一份插件仓库也给 Claude Code 用——两个都装,用哪个 agent 就让哪个驱动 Unity。
Codex released a Unity plugin featuring over 30 skills
频道:Vibegame3:38
Getting started with Unity CLI
频道:Unity7:06
Get started with Unity MCP
频道:Unity6:17
Unity's plugin for Codex — install and verification
文档:docs.unity.comDocs
截图取自三段纯屏录视频(无摄像头画面);安装命令、技能数量、Unity 6+ 要求与 MCP 迁移计划均与 Unity 官方文档及 unity-agent-plugin 仓库交叉核对。
截图署名来源频道与 Unity 官方视频;每一步都附精确时间戳深链。
从空白的 Codex 到接好 Unity,完整 15 步
在 Codex 里装 Unity 官方插件
- 1
把 Unity 插件市场加进 Codex
终端里先跑 codex plugin marketplace add Unity-Technologies/unity-agent-plugin,再跑 codex plugin add unity@unity-agent-plugin。插件来自 Unity 官方 GitHub 仓库——不是 Asset Store 资源,也不是 Package Manager 包,不会碰你的工程。开一个新的 Codex 会话,Plugins 区就会出现 Unity,带 Try now 按钮和三条现成提示词,如题图。
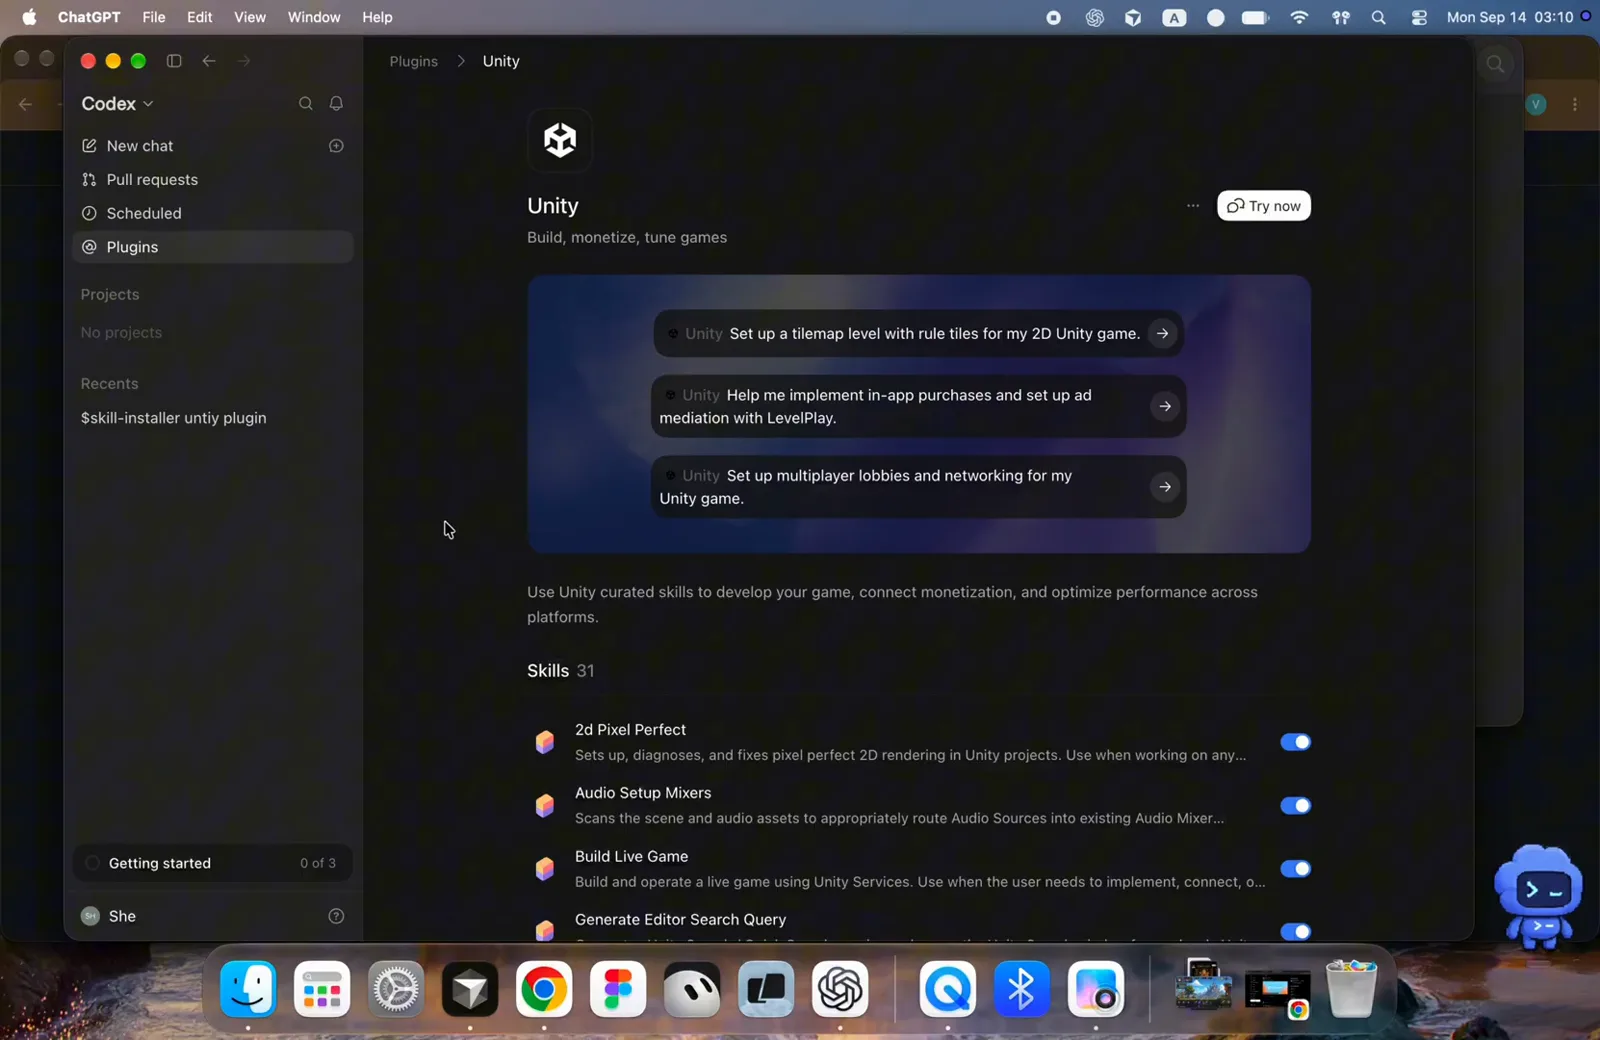
装完后的 Codex 内 Unity 插件页——点 Try now 直接开一个加载好插件的会话。看视频 1:28 - 2
过一遍 31 个技能,按需开关
打开 Plugins → Unity,滚动 Skills 列表。Unity 首发带 31 个技能:2D 与像素级渲染、音频 Mixer、live 游戏、编辑器搜索、内购、AI 寻路、LevelPlay 广告、本地化、Sprite Atlas、多人、Vivox 语音、三套 UI(IMGUI、uGUI、UI Toolkit)、Tilemap、Shader 等。每个技能都是一份文档化的成熟打法,请求命中时 agent 自动加载——全开着也行,用不到的方向随手关掉。
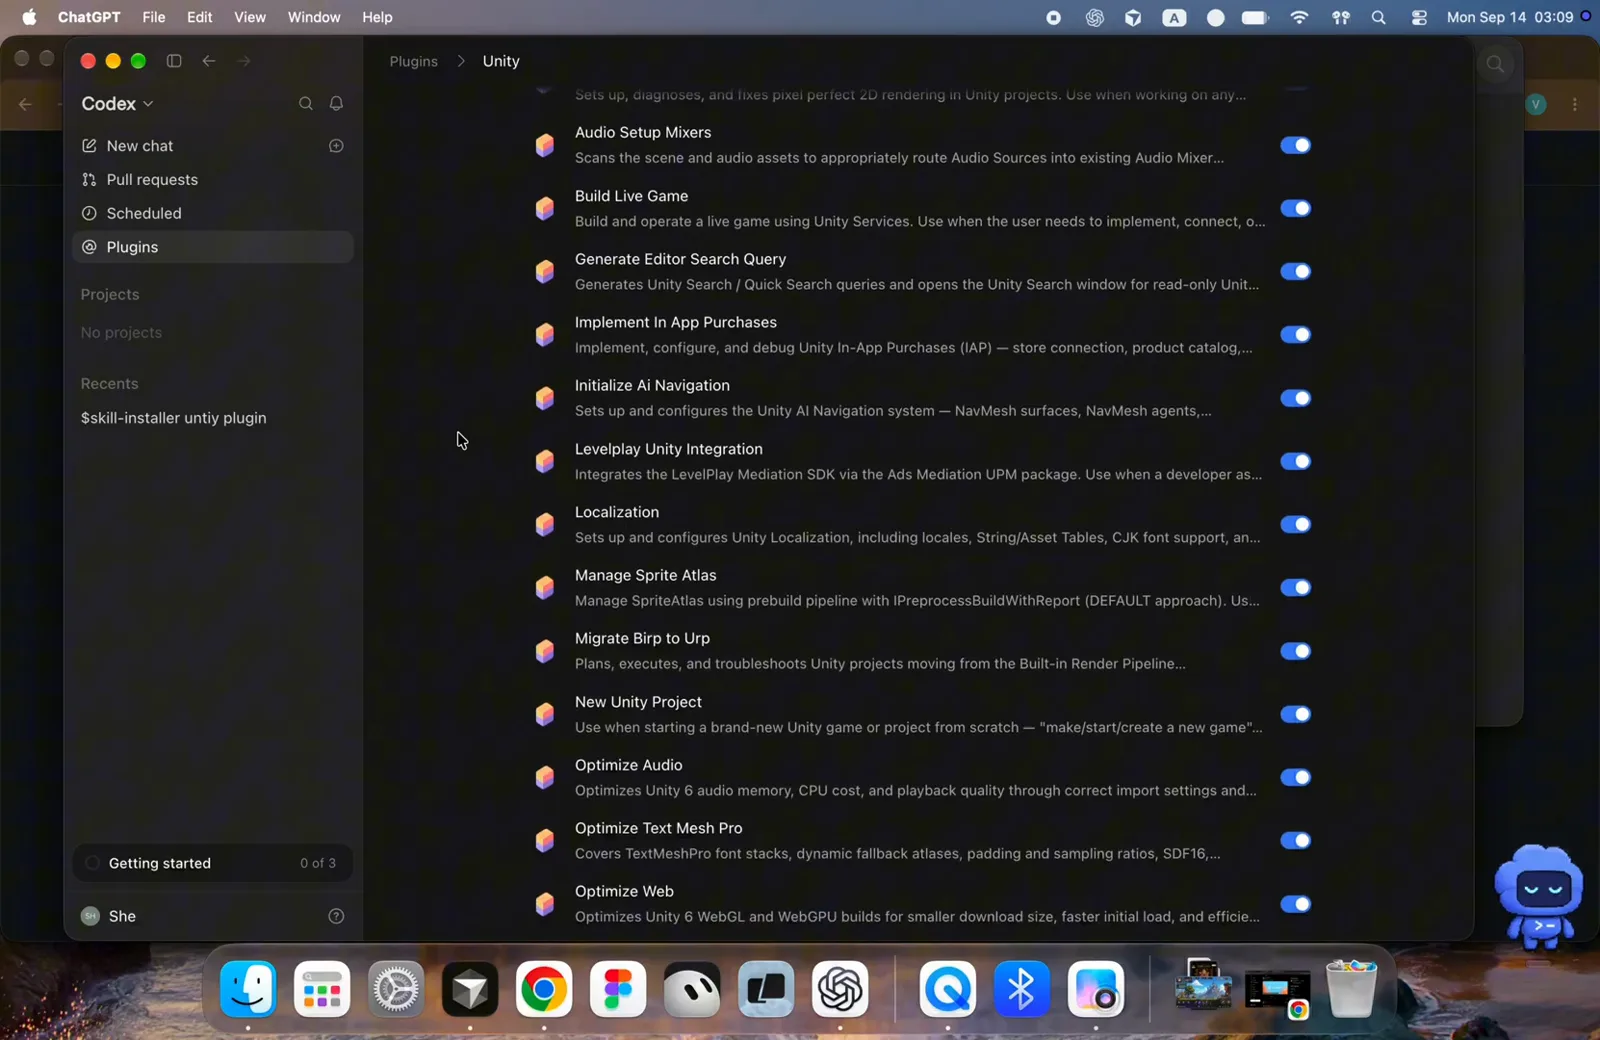
技能默认全开;用开关把上下文裁剪到你的项目范围。看视频 1:00 - 3
找到 unity-cli 技能:通往终端的桥
继续往下是 Unity CLI(描述写着「在终端与 Unity CLI 交互、或控制运行中/已连接的 Unity Editor 时使用」)和 Unity Package Management。下方 Information 区能确认这是正品:Capabilities 为 Interactive、Read、Write,Developer 是 Unity Technologies。本教程后半段的命令行部分靠的就是这个技能。
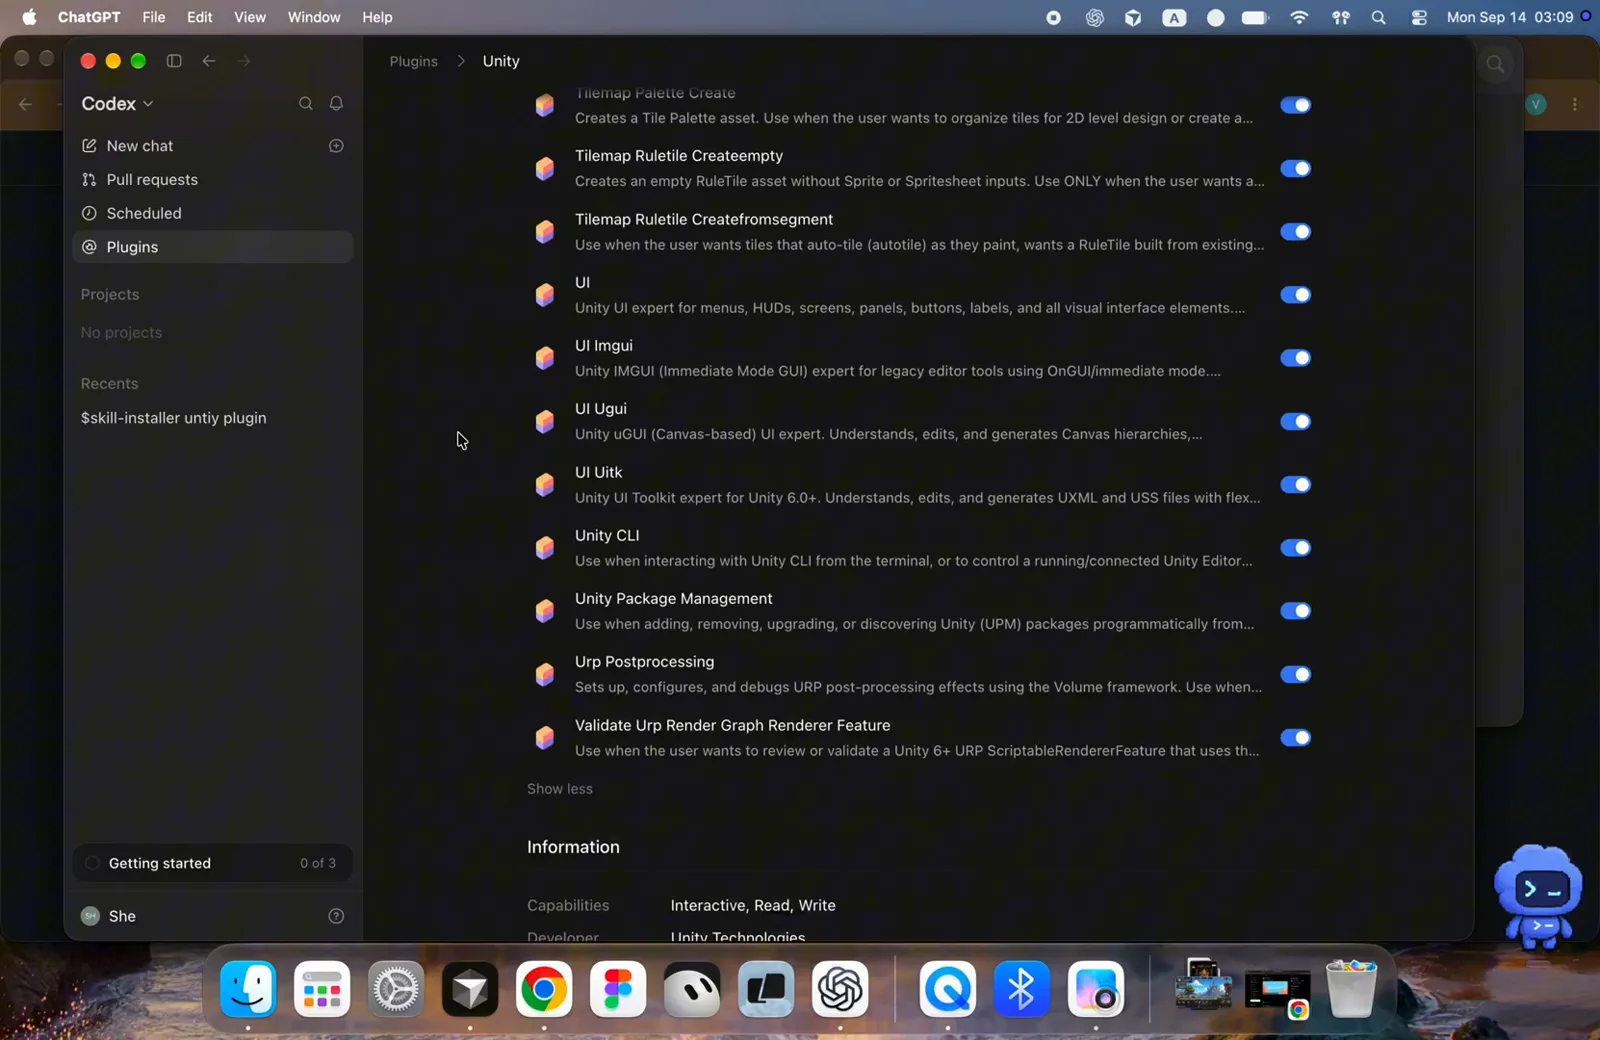
列表末尾是 unity-cli 和包管理技能;Information 区标注开发者为 Unity Technologies。看视频 1:08 - 4
在任何聊天里直接召唤
不用专门开什么:在 Codex 聊天里敲 unity——或者像图里这样用 @ 提及(输入了「Unity game.」)——再用自然语言描述任务。请求命中技能时会自动加载,也可以在 Codex 的上下文菜单里手动指定。可以直接试 Unity 给的示例提示,比如「给我的 2D Unity 游戏用 rule tiles 搭一个 tilemap 关卡」。
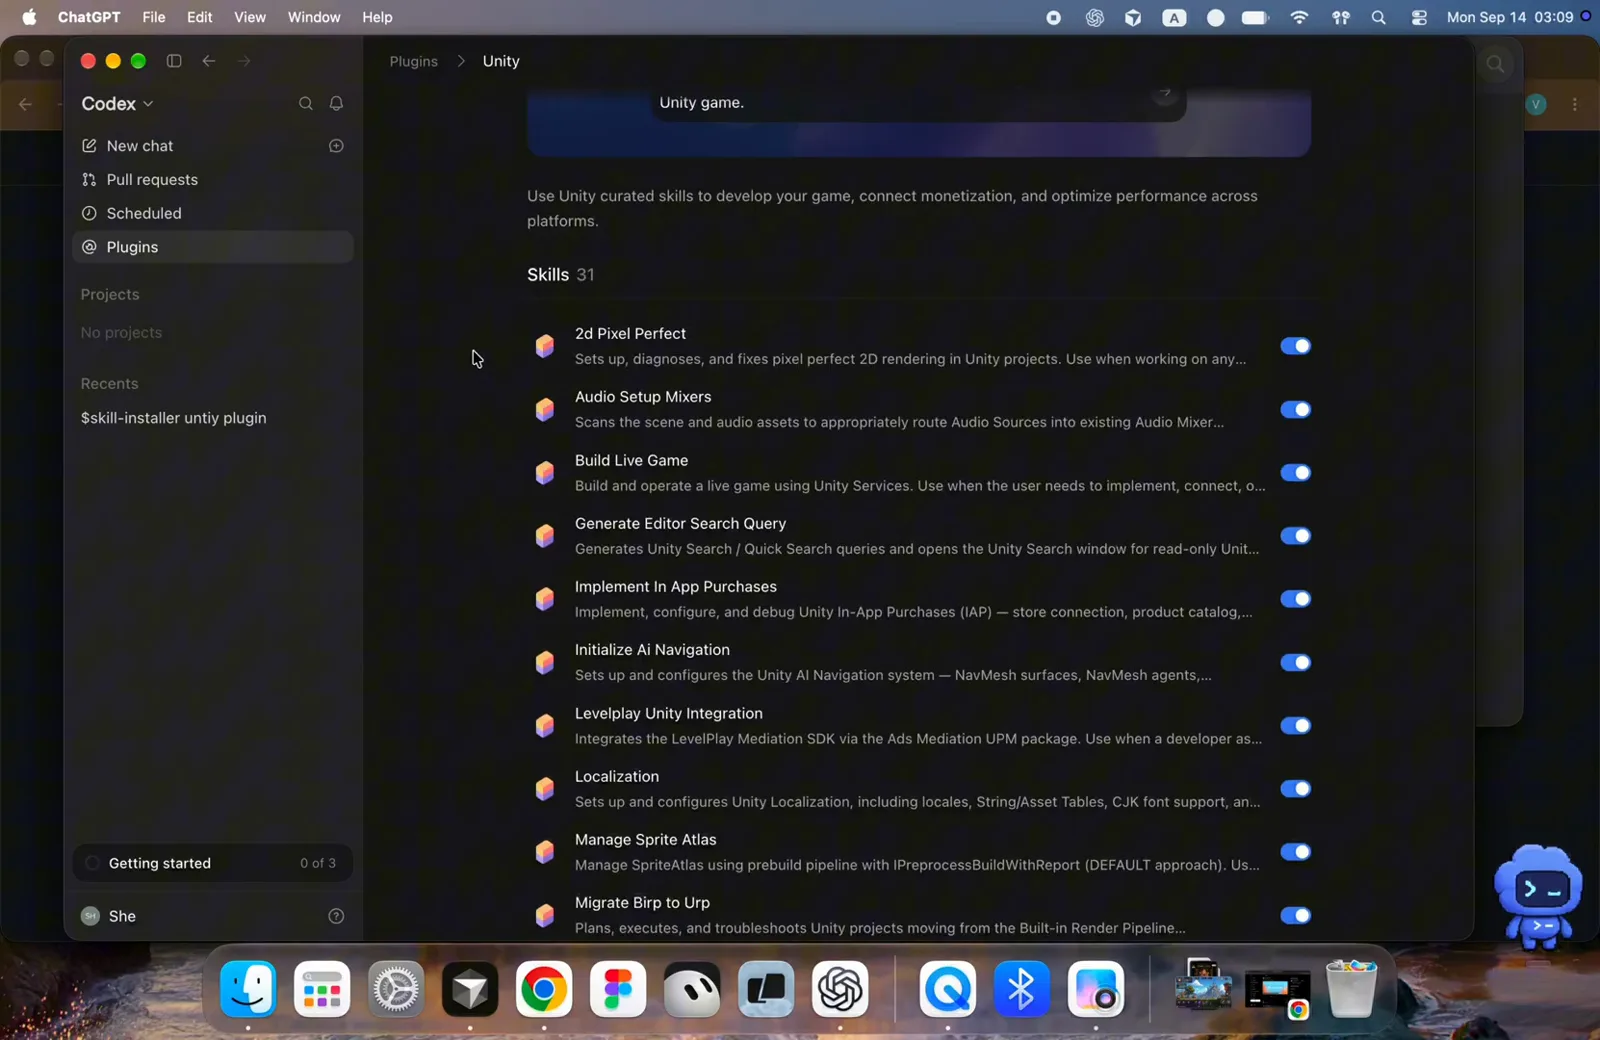
一句「Unity game.」就足以让 Codex 挂上插件的技能。看视频 0:44
教 Codex 用 Unity CLI
- 5
安装 Unity CLI
插件的知识配合 Unity CLI 最好用。Windows 用图中这条一行式安装命令:irm https://public-cdn.cloud.unity3d.com/hub/prod/cli/install.ps1 | iex;macOS 和 Linux 可以走 Homebrew。装完打印「Unity CLI 1.0.0-beta.6 installed!」,并给出入门命令——unity --help、unity editors list、unity install、unity upgrade。建议在工程目录里使用。
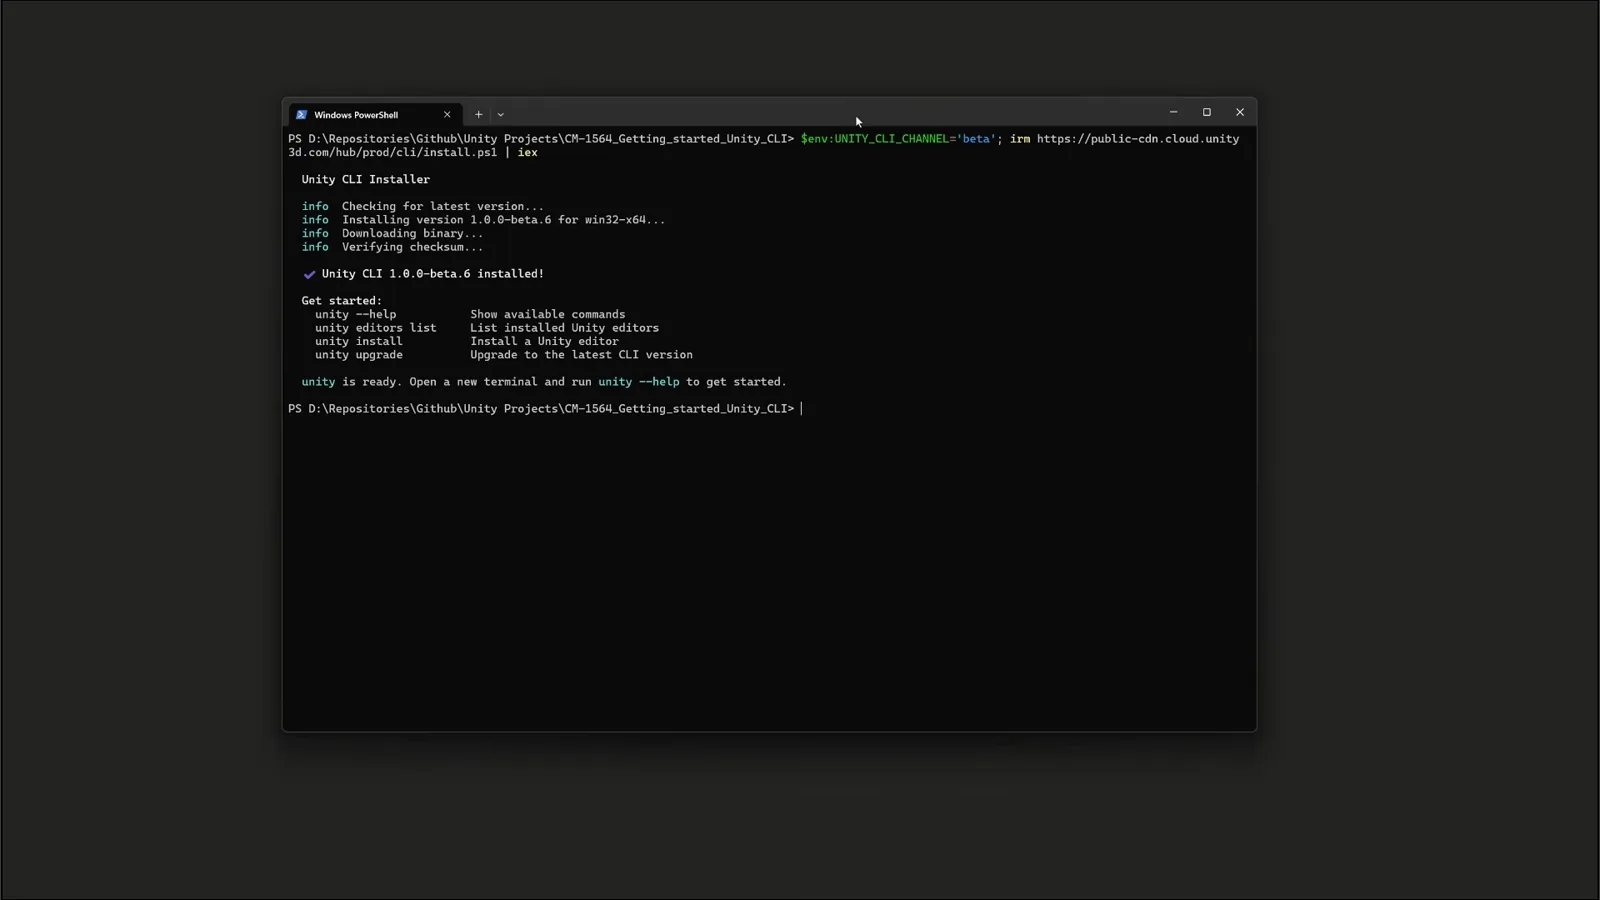
Windows 上装好 Unity CLI 1.0.0-beta.6——欢迎语列出四条最值得记的命令。看视频 2:50 - 6
搞清楚 CLI 是什么、不是什么
Unity 自己的介绍最准确:$ unity——管理 Unity 的命令行接口,No GUI、为自动化而生、为 agent 而生。它管的是环境:装编辑器、管许可证、建工程和开工程。它本身不是构建流水线——那是 pipeline package 的活,见下一步。
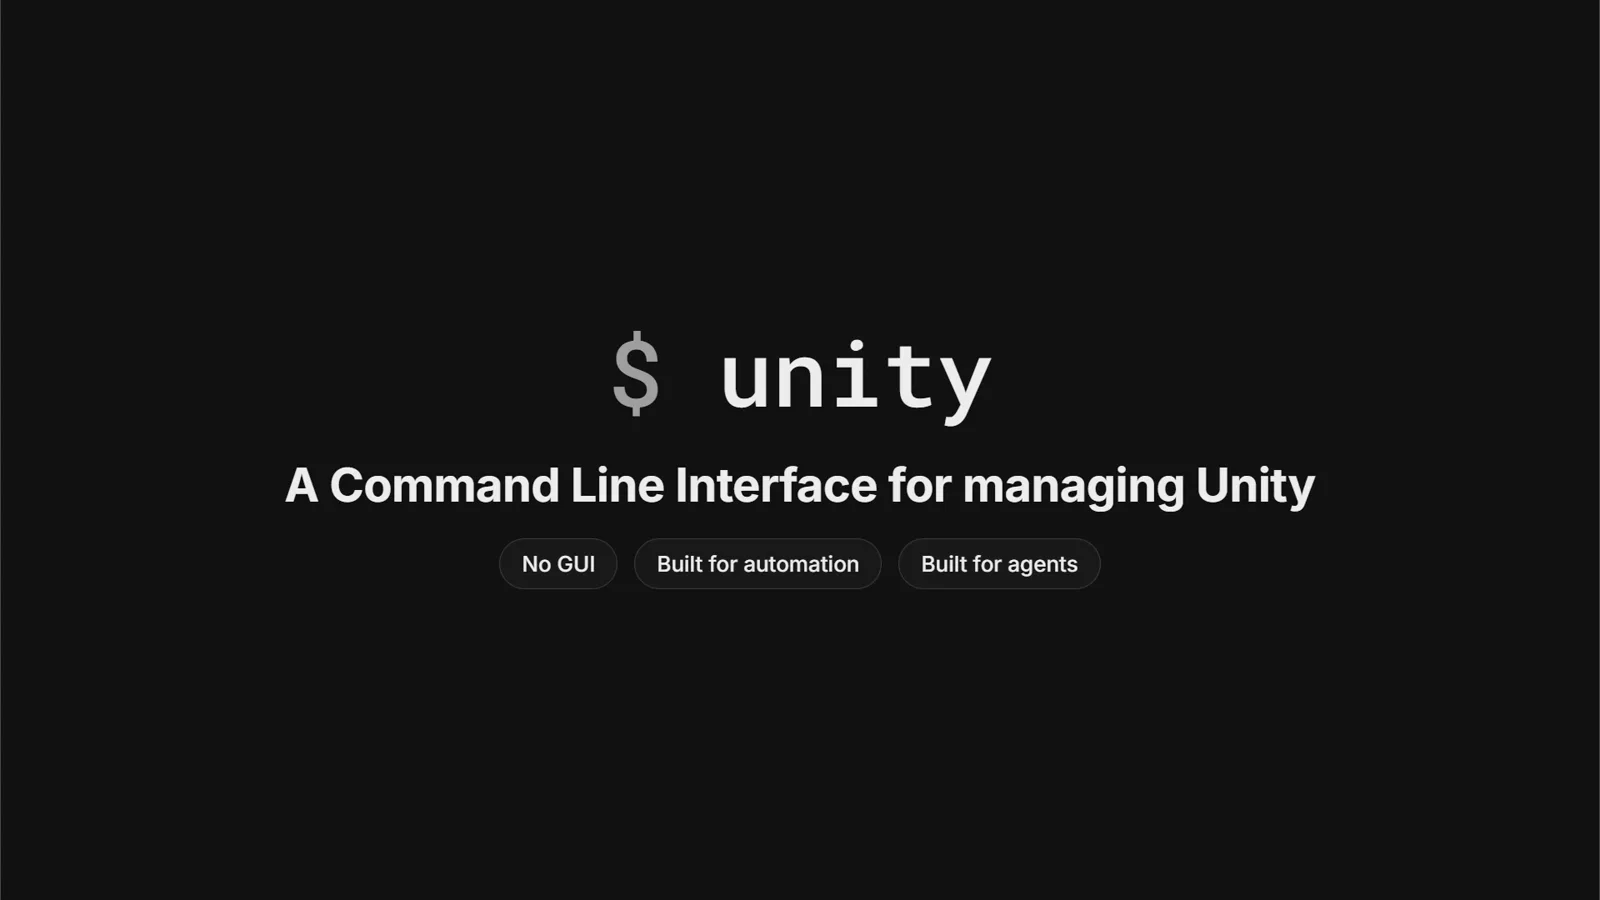
Unity 官方介绍页:无 GUI、为自动化、为 agent。看视频 1:28 - 7
不重编译,直接在编辑器里跑 C#
在工程里执行 unity pipeline install 装上 pipeline 包,运行中的编辑器就变成一台本地服务器。好处是:unity exec snippet.cs 现场编译你的 C#、丢到 Unity 主线程执行并返回结果——没有全量重编译、没有 domain reload,毫秒级返回。这类 eval 式命令是让 agent 改场景并自查的最快路径。
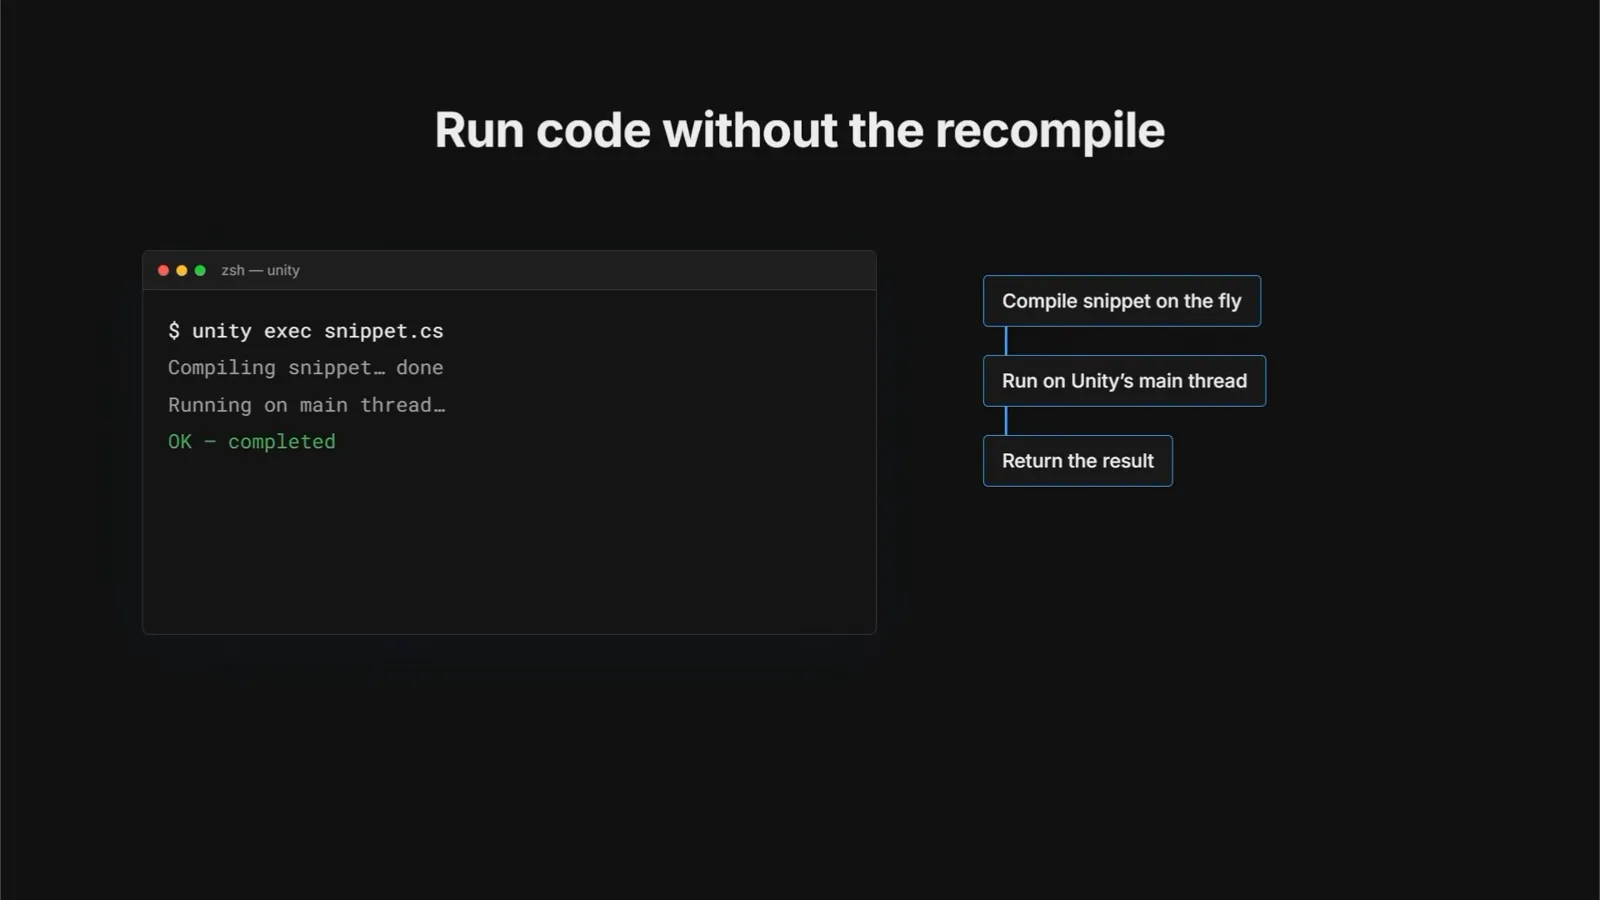
现场编译片段、主线程执行、返回结果,三步走完。看视频 2:26 - 8
把 agent 指向 CLI
任何能跑 shell 命令的 agent 现在都能驱动 Unity——Claude、Codex、Cursor、Copilot 都行。Unity 官方演示里,一句提示词就生成了可玩的球体场景,编辑器里挂着的正是一个 Claude Code 会话;换成 Codex,同样的命令同样的用法。拿不准时让 agent 跑 unity --help——帮助输出自己就能教会它命令语法。
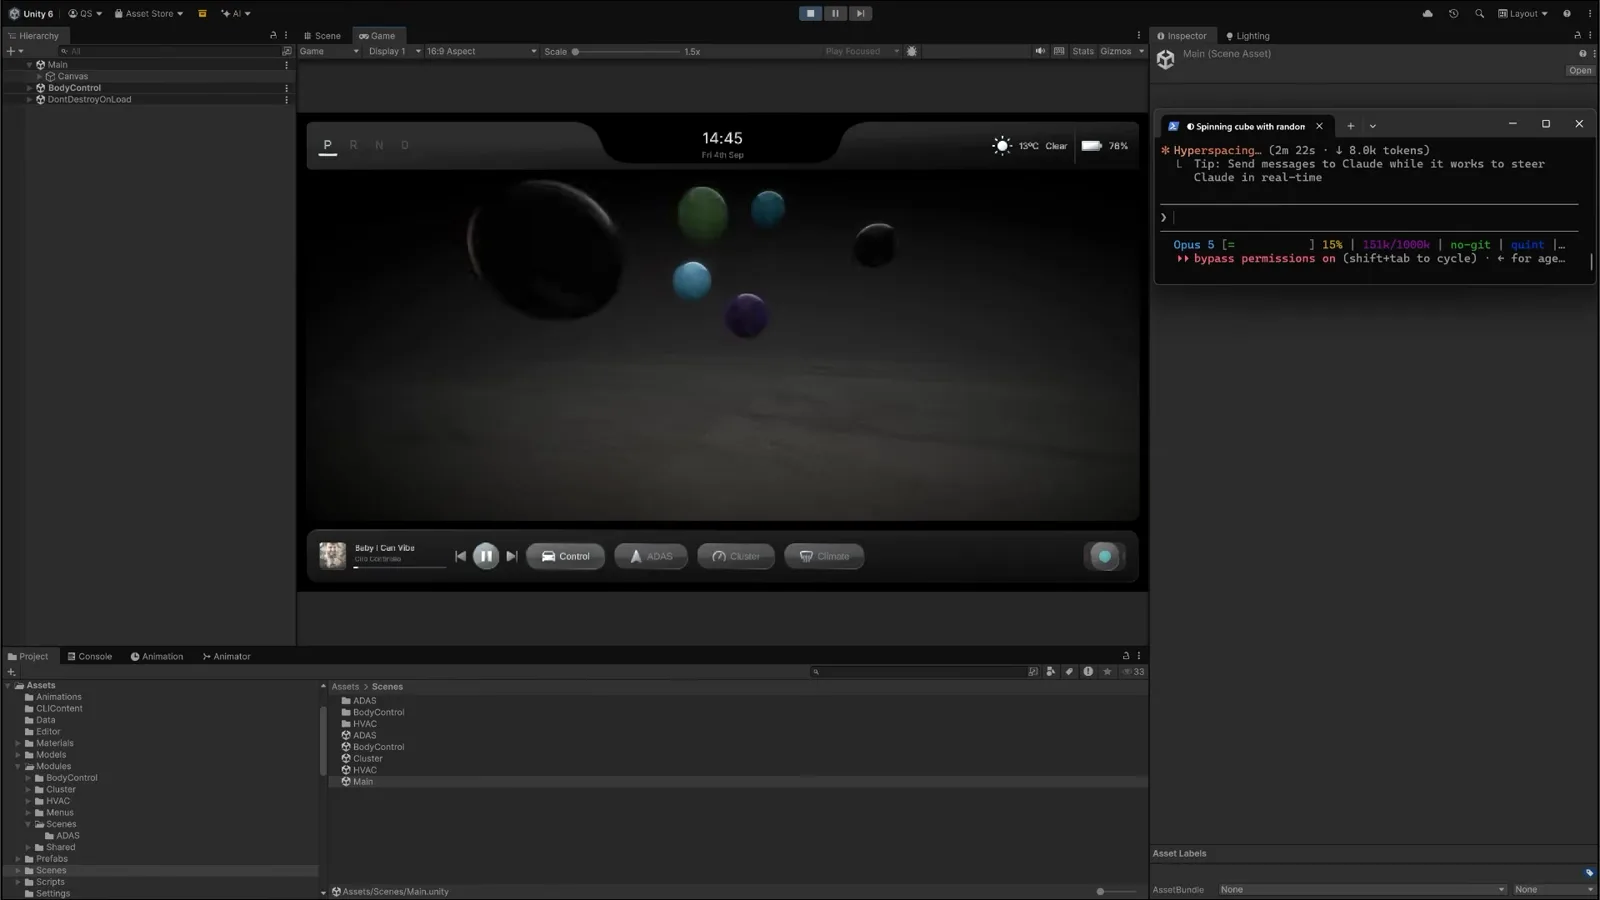
Play 模式下的 agent 生成场景——球体、材质和一个能放歌的播放器,全来自一句提示词。看视频 5:55
用 Unity MCP 打开编辑器
- 9
打开 Project Settings → AI → Unity MCP Server
要越过 CLI 直接操作编辑器,Unity 6 在 AI Assistant 包里自带 MCP 服务器(Edit → Project Settings → AI)。这个面板确认两件事:Unity Bridge 状态 Running,以及 Connected Clients——图里两条来自 Codex 的 codex-mcp-client 已经是 Accepted,旁边还有一条 cursor-vscode。Codex 的编辑器会话以后就出现在这里。
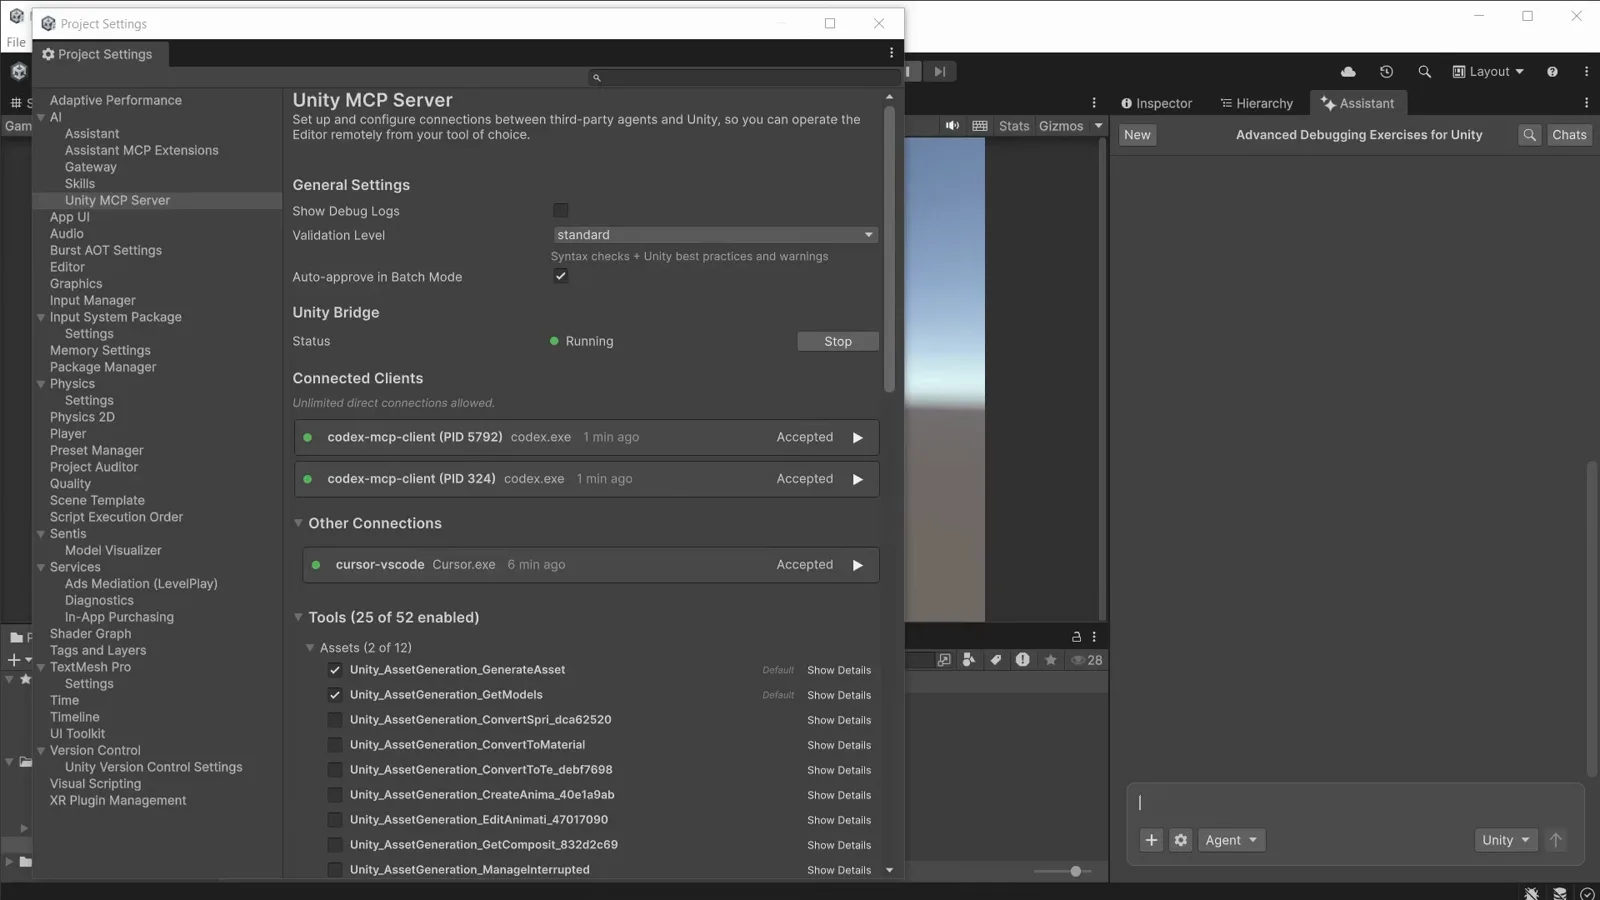
Unity Bridge 运行中,两条 codex-mcp-client 已接受——Codex 已经连上编辑器。看视频 0:10 - 10
在 Codex 那一行点 Configure
往下滚到 Integrations,每个 agent 一键配置:Cursor、Claude Code、Windsurf、Claude Desktop、VSCode GitHub Copilot、Kiro、Codex、Gemini。点 Configure 会把配置文件(指向 Unity relay 的 mcpServers 条目)写进对应客户端。如果你的 Codex 版本不在列表里,第 15 步的 CLI 方式能在终端里完成同样的事。
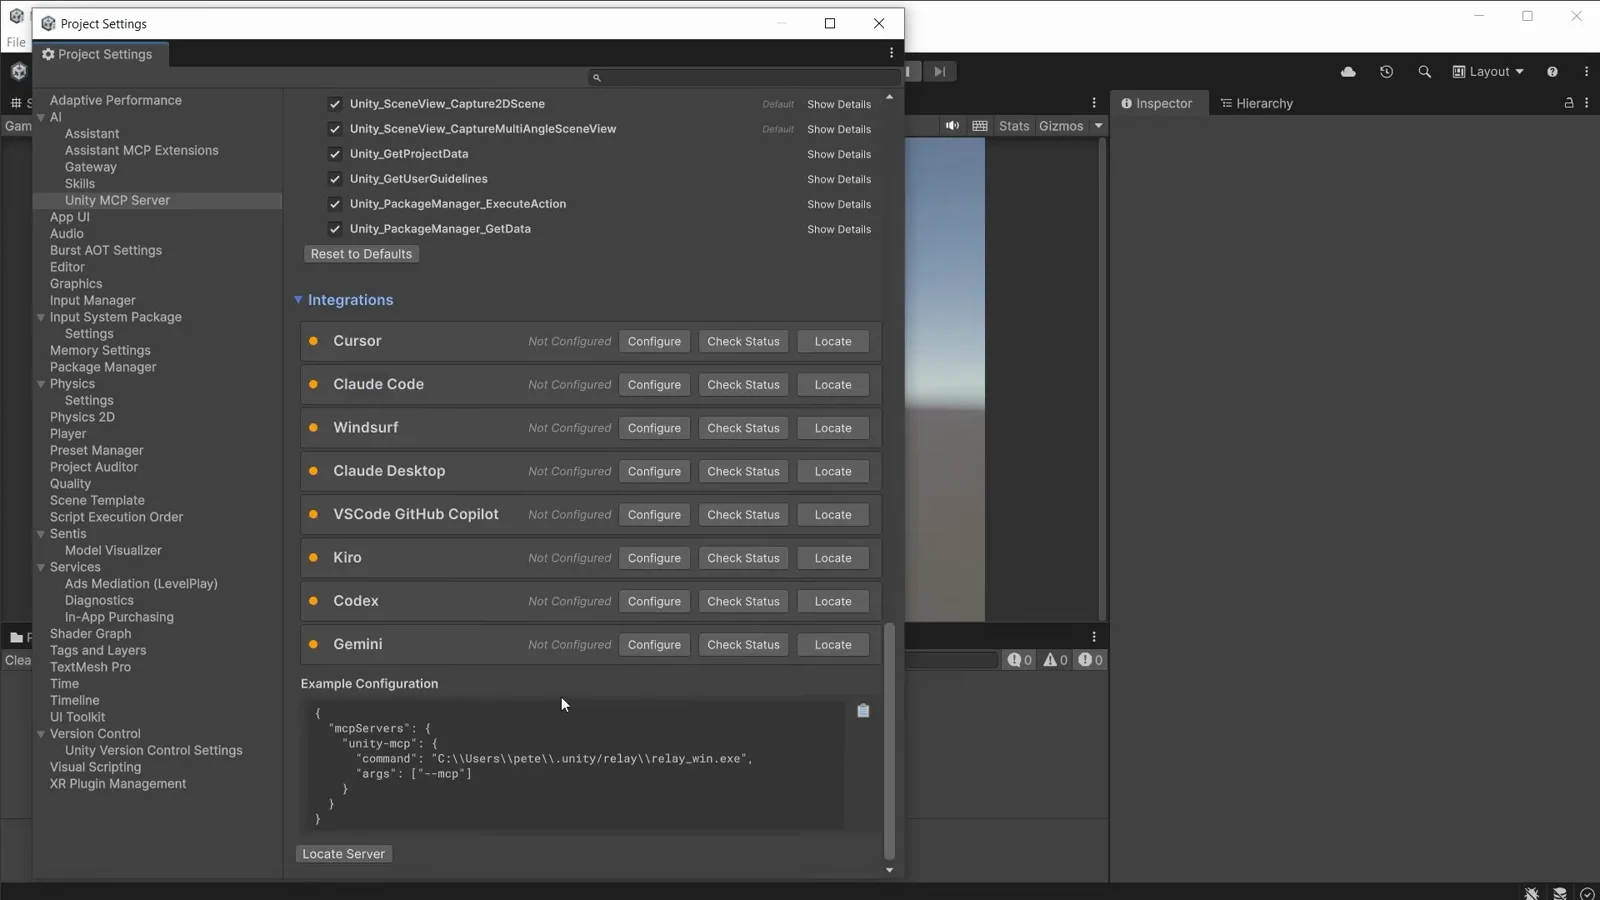
每个 agent 一次 Configure 点击就写好 mcpServers 配置——Codex 和 Claude Code 在同一个列表里。看视频 1:56 - 11
回 agent 侧确认注册成功
打开你 agent 的 MCP 设置,检查注册结果。图中 Cursor 的 Tools & MCPs 页在配置完成后立刻显示 unity-mcp 服务器「8 tools, 1 prompts enabled」;Codex 侧对应的是它的 config/mcp 列表。8 个是默认工具集,Unity 暴露的远不止这些,下一步展开。
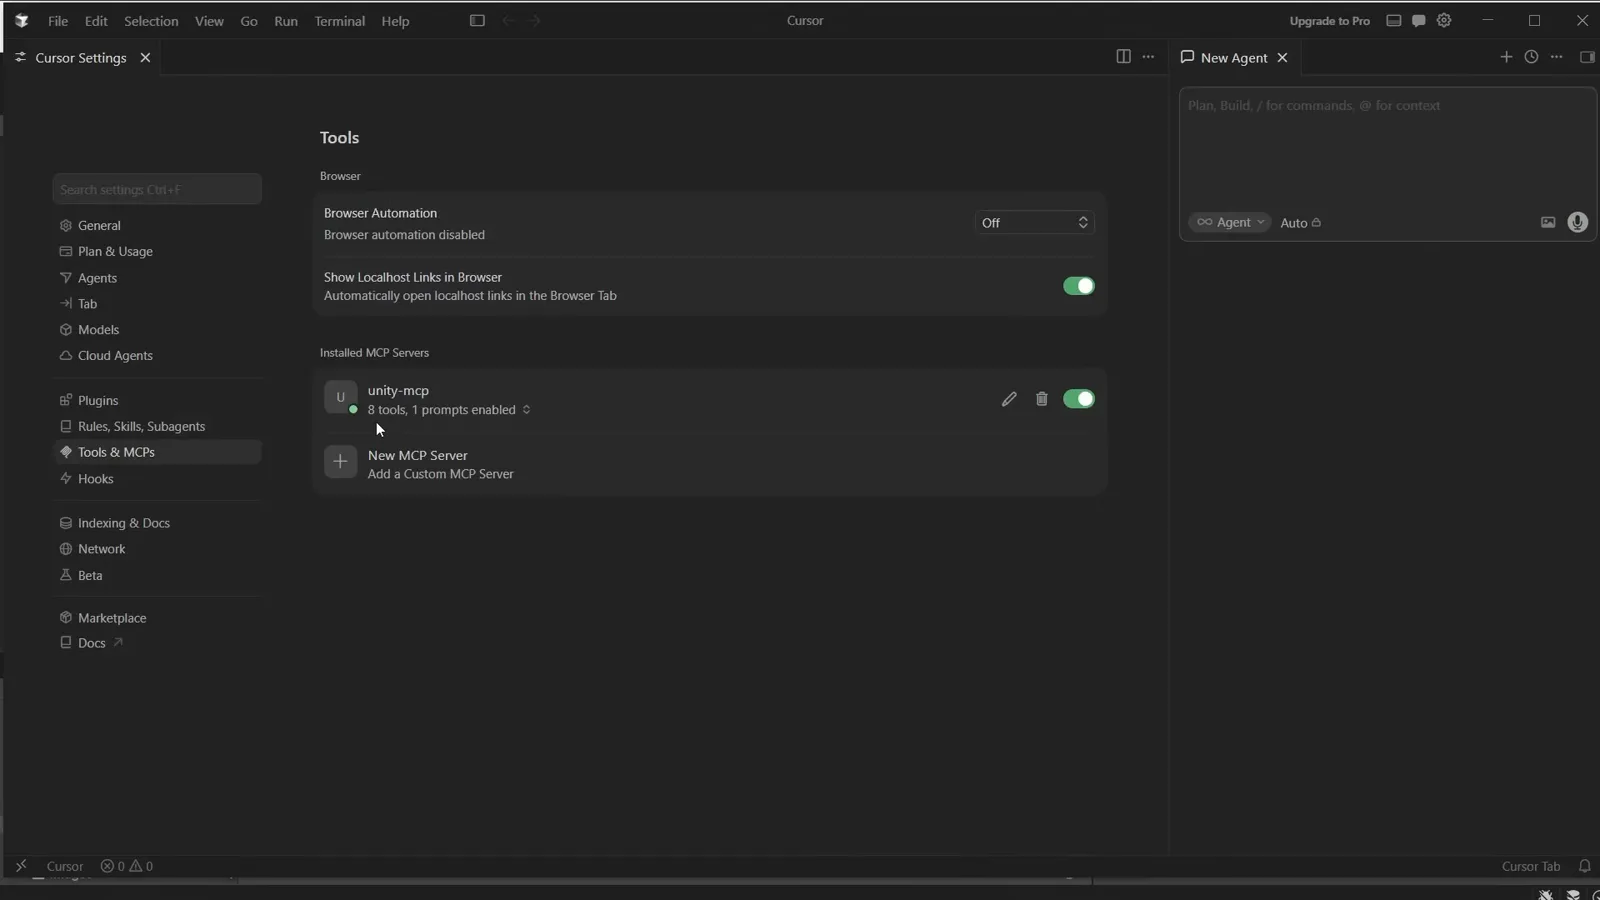
客户端侧的 unity-mcp 服务器注册成功:默认 8 个工具、1 个 prompt。看视频 3:08 - 12
过一遍 Unity 暴露的 52 个工具
回到 Unity,Tools 区列出服务器能做的一切——图中工程 25/52 已启用,横跨 Assets、Assistant、Core 三组:生成资源、读工程数据、执行命令、建脚本、改文本等等。按任务需要开工具,开之前用 Show Details 看清每个工具的职责,再交给 agent。
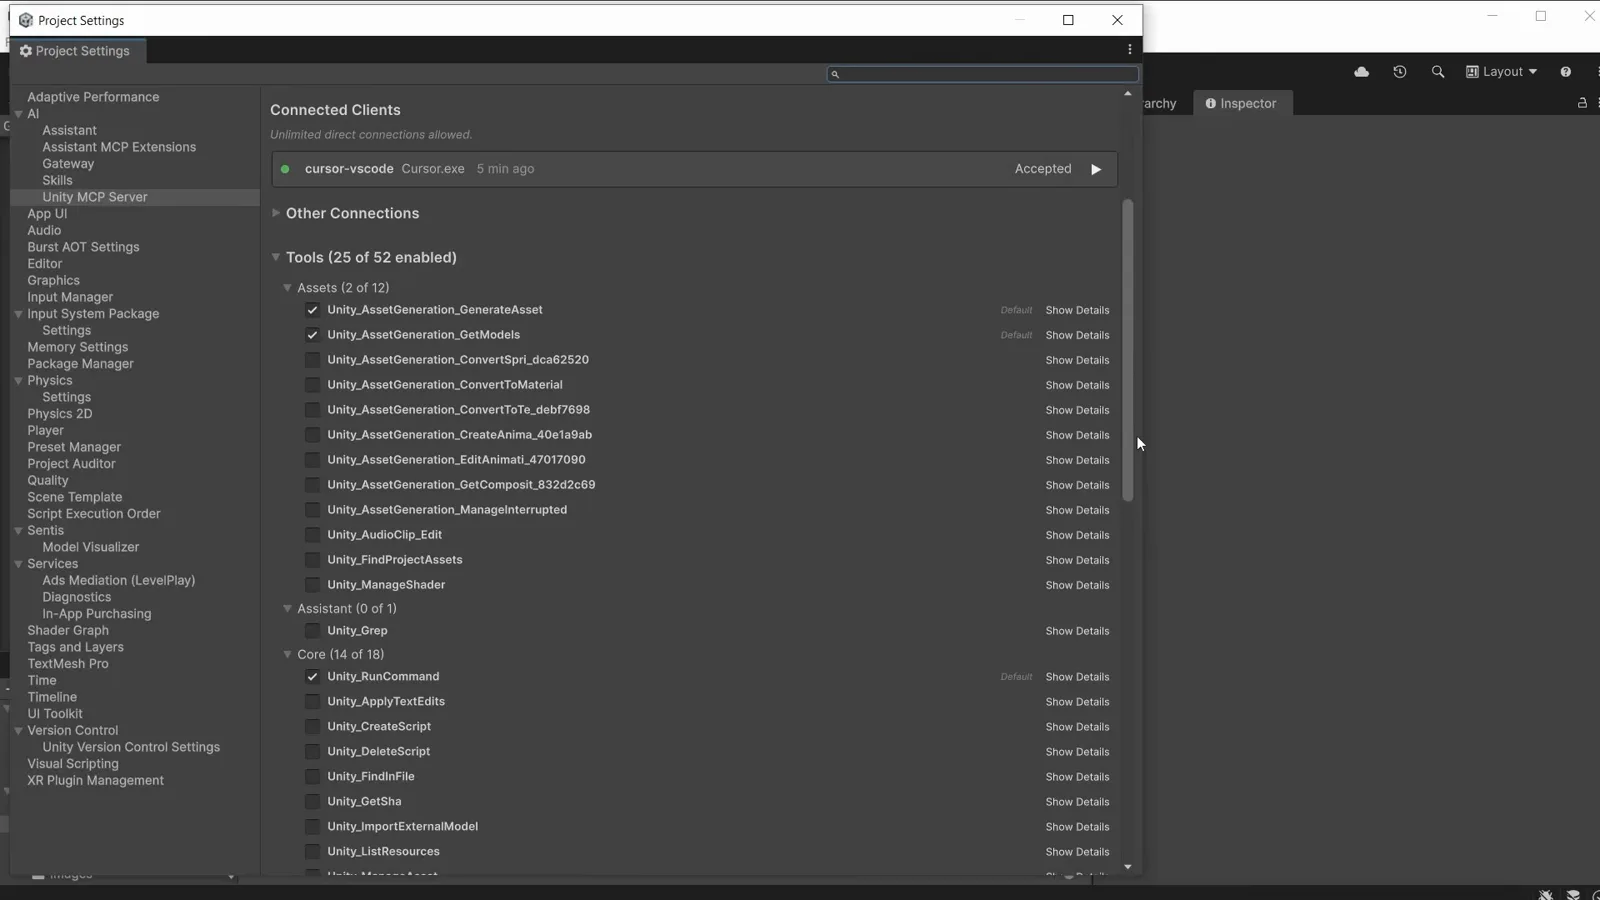
这里启用了 52 个工具中的 25 个——先用 Show Details 看清工具契约再开启。看视频 2:58 - 13
问一句:am I connected to Unity?
最快的检验方式是直接问。图里的 agent 真的调了 Unity_GetProjectData 然后回答:「Yes — you're connected to Unity…返回了实时工程数据(资源目录、场景、脚本、材质等)」。首次调用工具时 Unity 内会弹允许框,批准后该客户端在 Connected Clients 里变成 Accepted。之后再说「给 SpaceshipObject 写个脚本」,对象就真的会出现在场景里。
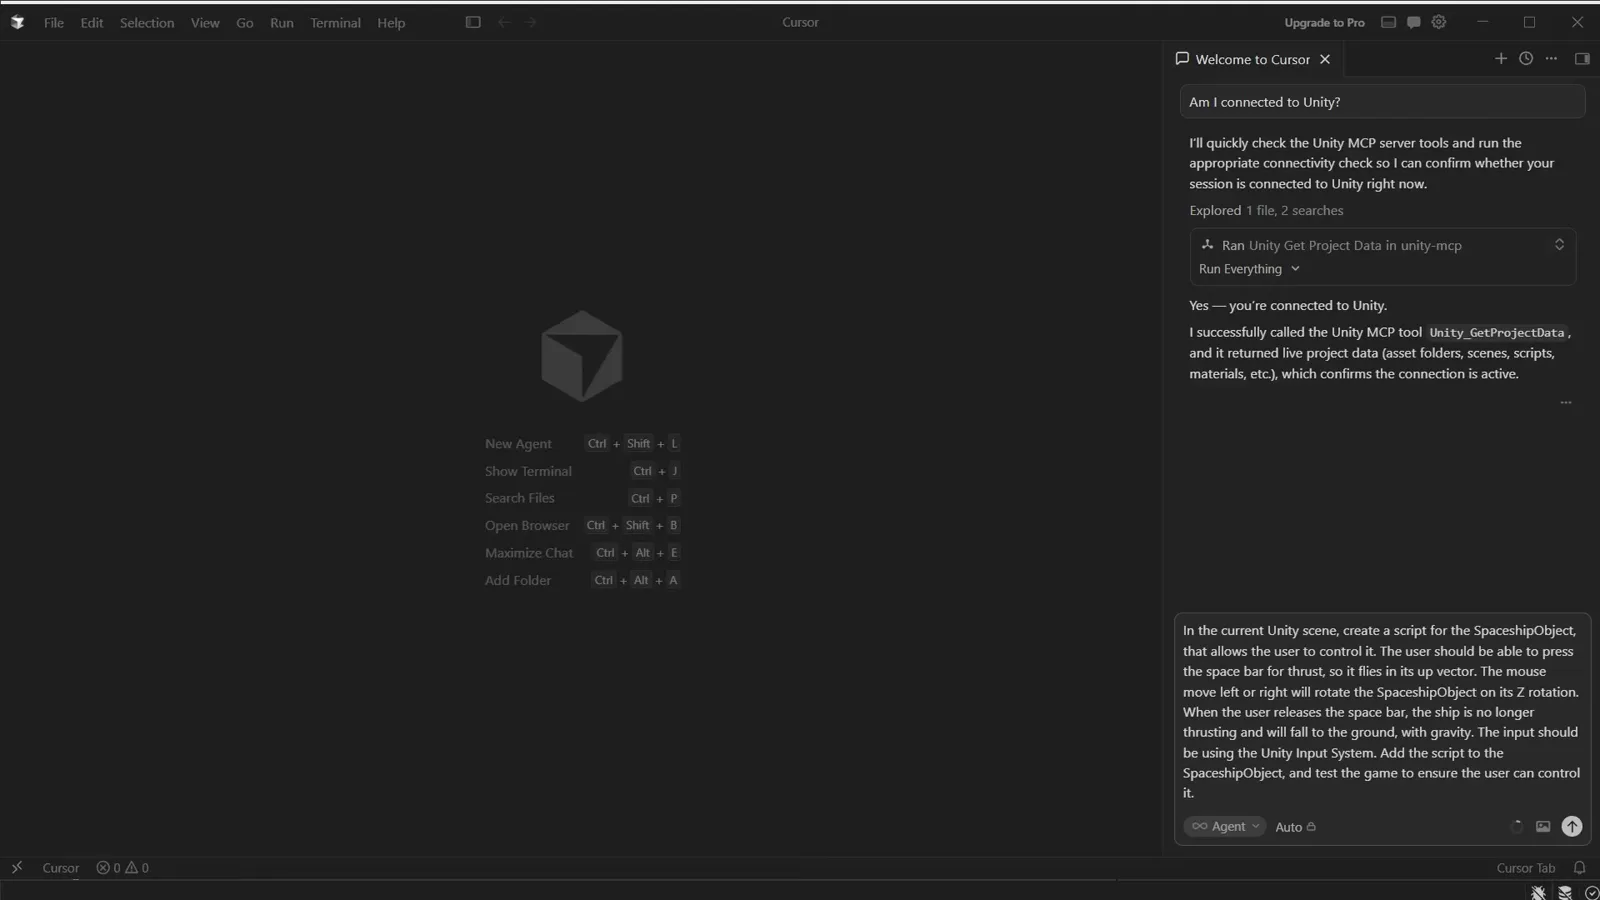
一次实打实的 Unity_GetProjectData 调用——agent 读到的就是真实工程。看视频 3:42
Codex 还是 Claude Code,以及下一步
- 14
看清 Unity MCP 的走向
对「MCP 是不是要没了」这个问题,Unity 官方的回答是:支持不会砍,但现有实现——跑在编辑器进程里的那套——退役,由 Unity CLI 加 pipeline package 接管,内置 MCP 模式。覆盖面不变,更快更稳。实操建议:上面的集成照用,它们覆盖不到的部分优先走 CLI 命令。
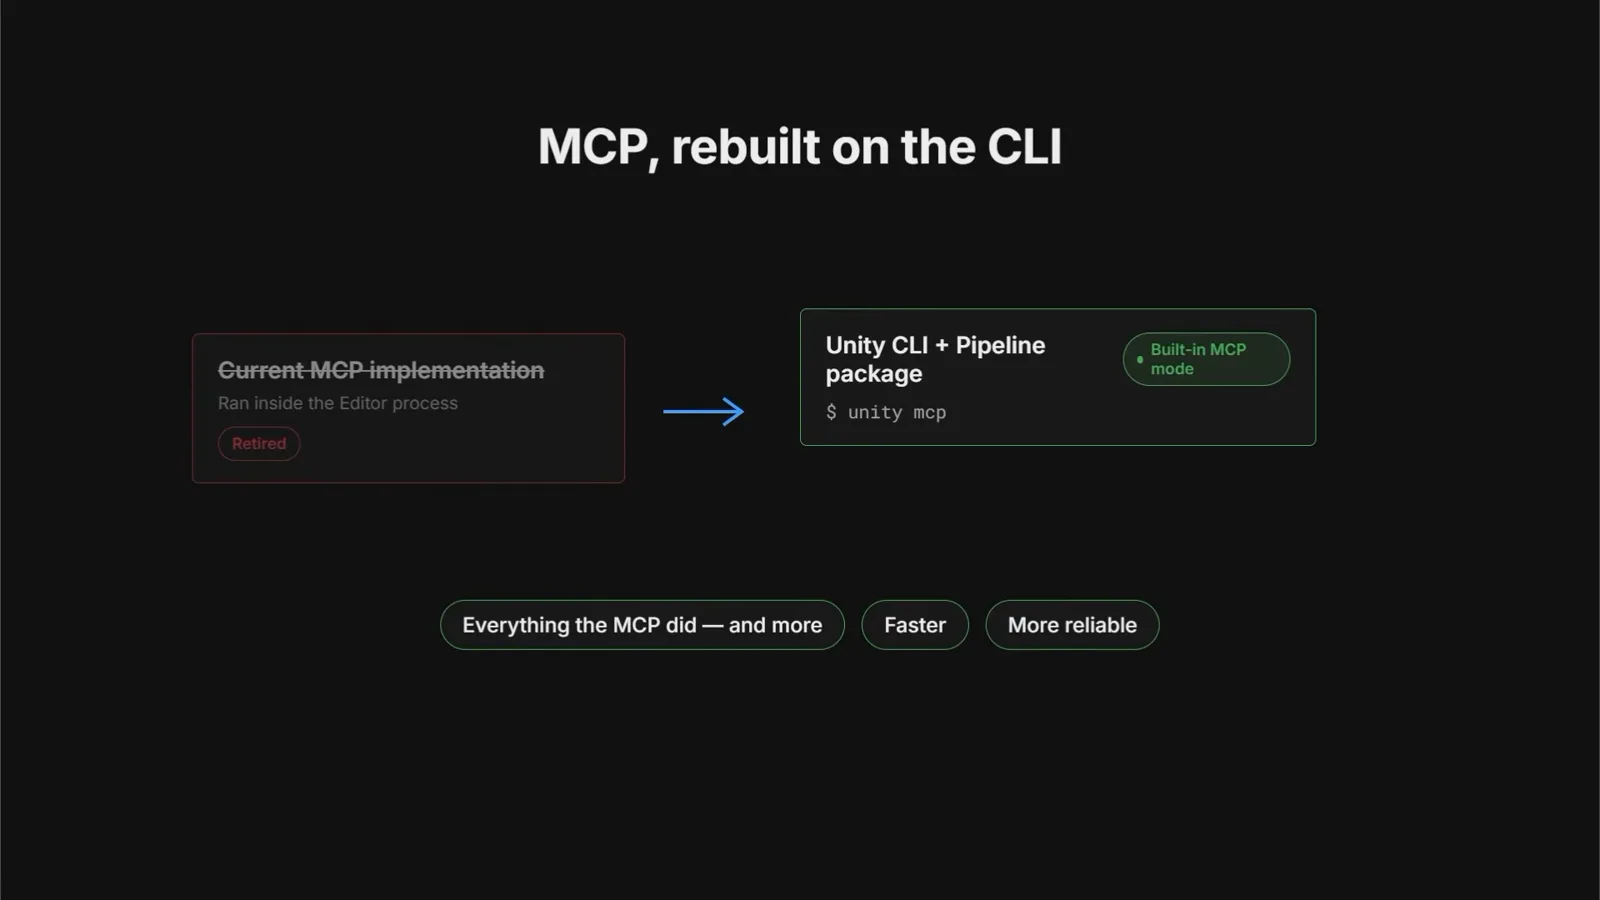
现有 MCP 实现已标 Retired,由内置 MCP 模式的 Unity CLI + Pipeline 接替。看视频 6:24 - 15
一条命令接上任意 agent
喜欢终端的话:unity mcp configure 会列出所有支持的客户端——Codex、Claude Code、Claude Desktop、Cursor、VS Code、Windsurf、Kiro、Kimi、Zed 等——然后 unity mcp configure codex 一条命令完成注册。注意 Codex 和 Claude Code 就排在同一张表里:选哪个,另一头的编辑器都是同一个——这也正是 Unity 能用一份插件仓库同时服务两个 agent 的原因。
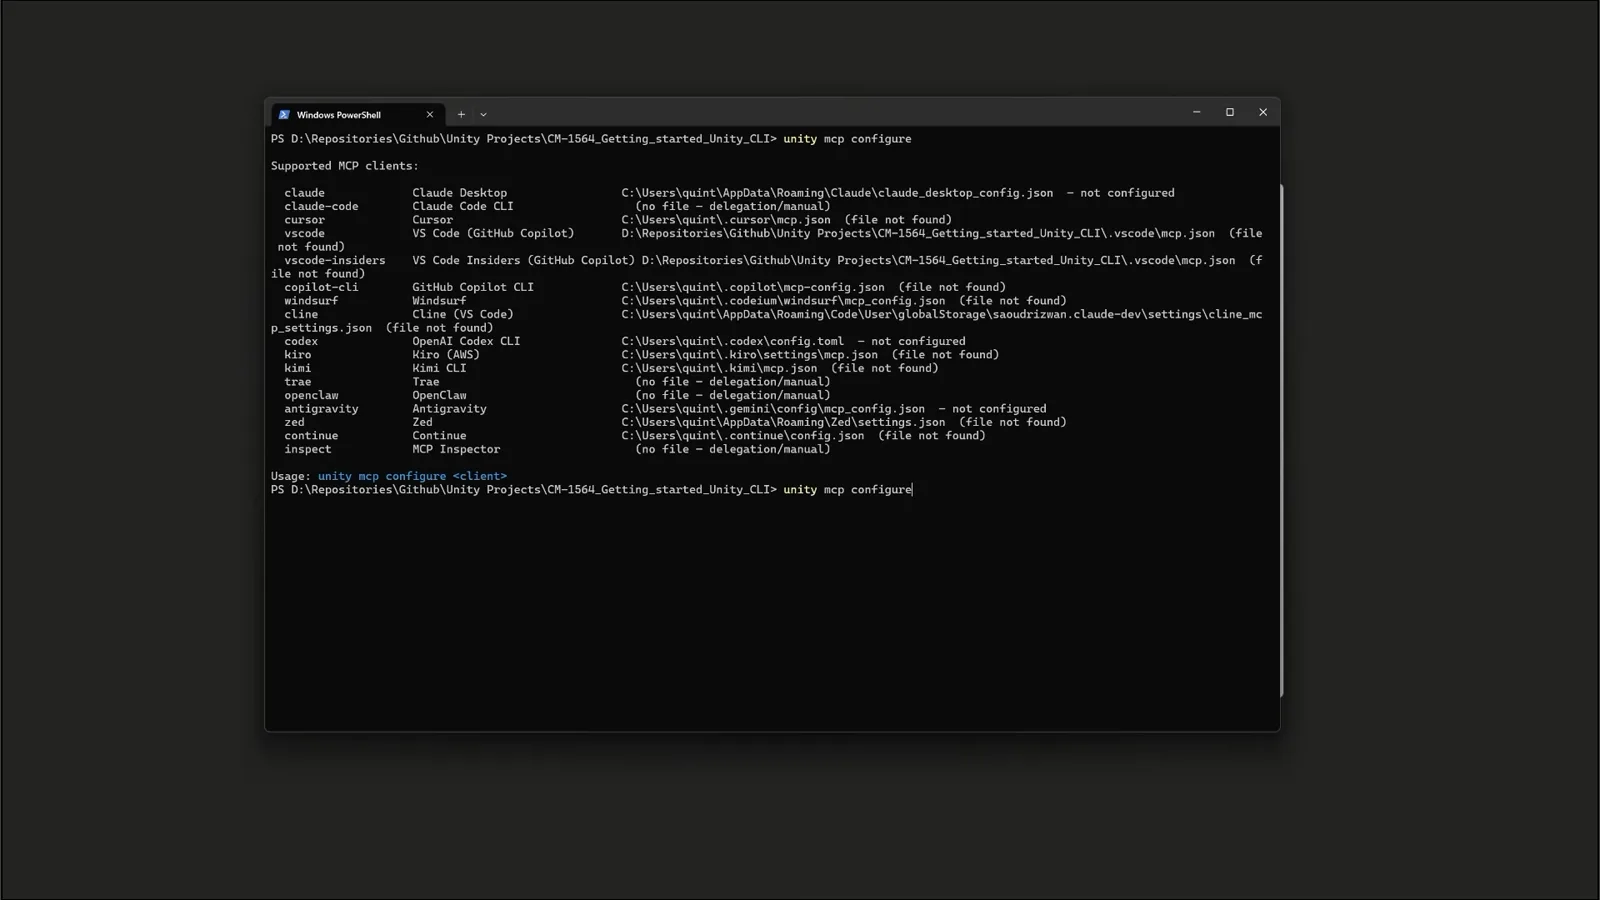
unity mcp configure 列出它能接的全部客户端——Codex 与 Claude Code 比邻而列。看视频 6:30