
速览 —— OpenCode 桌面版是什么
- OpenCode Desktop 是 OpenCode 编码智能体的图形界面版——和 CLI 同一个智能体,只是装进了带文件浏览器、diff 审查和终端标签页的窗口里。opencode.ai/download 上它仍标注为 OpenCode Desktop (Beta),提供 macOS(Apple Silicon 和 Intel)、Windows x64、Linux(.deb/.rpm)安装包,也支持 Homebrew:brew install --cask opencode-desktop。
- 你不必一开始就选定模型厂商。Select model 对话框自带免费模型(Big Pickle、DeepSeek V4 Flash Free、MiMo V2.5 Free、Nemotron 3 Ultra Free、North Mini Code Free),Popular providers 覆盖 OpenCode Zen、OpenCode Go、Anthropic、GitHub Copilot、OpenAI、Google 等——Copilot 订阅走设备登录即可接入,无需额外 API key。
- 工作节奏是 Plan → Build → 审查。Plan 模式先提澄清问题、在不写文件的前提下起草方案;确认后切到 Build 模式,智能体按待办清单逐项执行。Session changes 展示 11 个文件的统一 diff,可以逐行写评论,终端标签页能直接跑 dev server。
- 2026 年的版本背景:OpenCode 2.0 系列于 9 月落地(tag 从 v2.0.0 一路发到 9 月 20 日的 v2.0.11),桌面版在春天从 Tauri 迁移到了 Electron,两者迭代都很快——哪一步对不上界面,就先去下载页更新。
How to Download, Install & Use OpenCode Desktop App | Vibe Coding Machine | Build Two Apps
视频来源:WebStylePress7:51
OpenCode Desktop: Great UI/UX + Run Multiple AI Agents (Free)
视频来源:AI With Nathan9:32
OpenCode Desktop App — 75+ Providers, Parallel Sessions, File Browser & More
视频来源:AI Stack Engineer8:22
How to Install OpenCode Desktop App on Windows 10/11 2026
视频来源:United Top Tech2:46
OpenCode Download & Docs — OpenCode Desktop (Beta), v2 install
产品事实:opencode.aiDownload page
步骤 1-3、6、8、9 取自 WebStylePress 的 Windows 实操录像;步骤 4 取自 United Top Tech 的安装录像;步骤 5、7 取自 AI Stack Engineer 的服务商配置演示;步骤 10-16 取自 AI With Nathan 的 plan-to-build 完整流程。安装命令与 2.0 发布信息引自 opencode.ai/download 和 anomalyco/opencode 仓库。
所有截图均来自上述视频并署名,每张图都带时间戳深链。本文文字为原创;事实来自这些录像以及官方下载页、文档和代码仓库。
OpenCode 桌面版,逐步实操
1 · 安装 OpenCode 桌面版
- 1
打开下载页,拿到 OpenCode Desktop (Beta) 安装包
访问 opencode.ai/download,滚动到第 2 节 OpenCode Desktop (Beta)。macOS 上用 Homebrew 可以直接执行 brew install --cask opencode-desktop;其他情况点对应的 Download 按钮——macOS(Apple Silicon)、macOS(Intel)、Windows(x64)、Linux(.deb)或 Linux(.rpm)。Windows 安装包约 116 MB。同一页面的第 3 节还提供 VS Code、Cursor、Zed、Windsurf 扩展,之后想接 IDE 再装不迟。
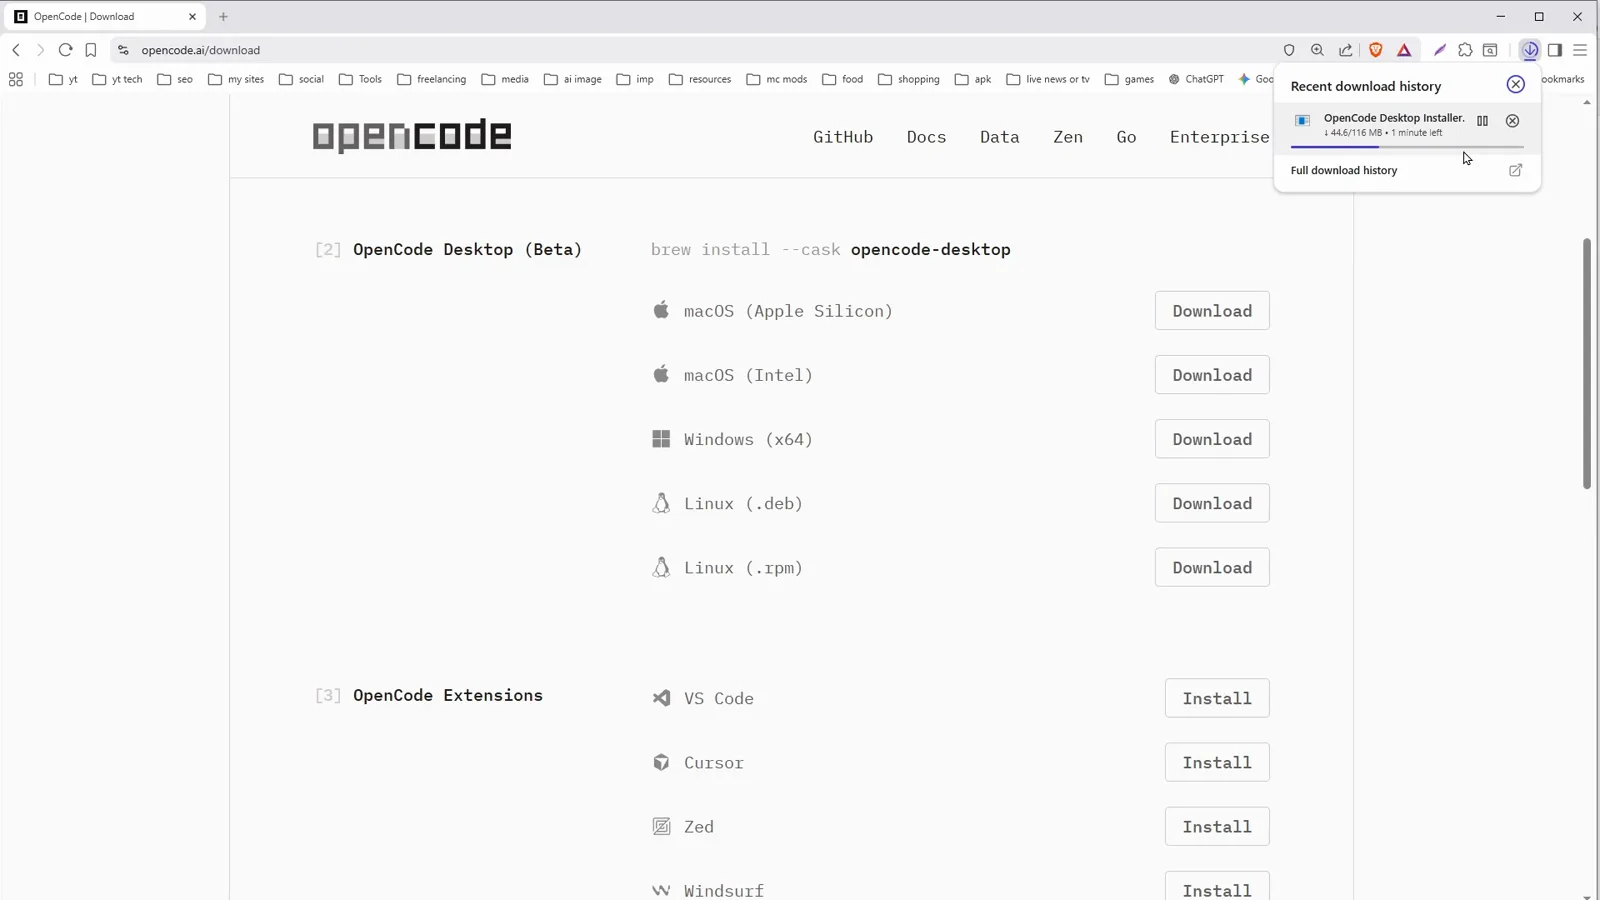
opencode.ai/download 的 OpenCode Desktop (Beta) 区块与 Homebrew cask 命令。看视频 0:25 - 2
用 More info 过掉 Windows SmartScreen
桌面版还是 Beta 软件、签名方也比较新,所以 Microsoft Defender SmartScreen 会弹出经典的“Windows protected your PC”警告并拦下这个未识别应用。点警告上的 More info——对话框会展开,显示文件签名方和一个 Run anyway 按钮。macOS 和 Linux 没有这一步:直接挂载 .dmg 或安装 .deb/.rpm 包即可。
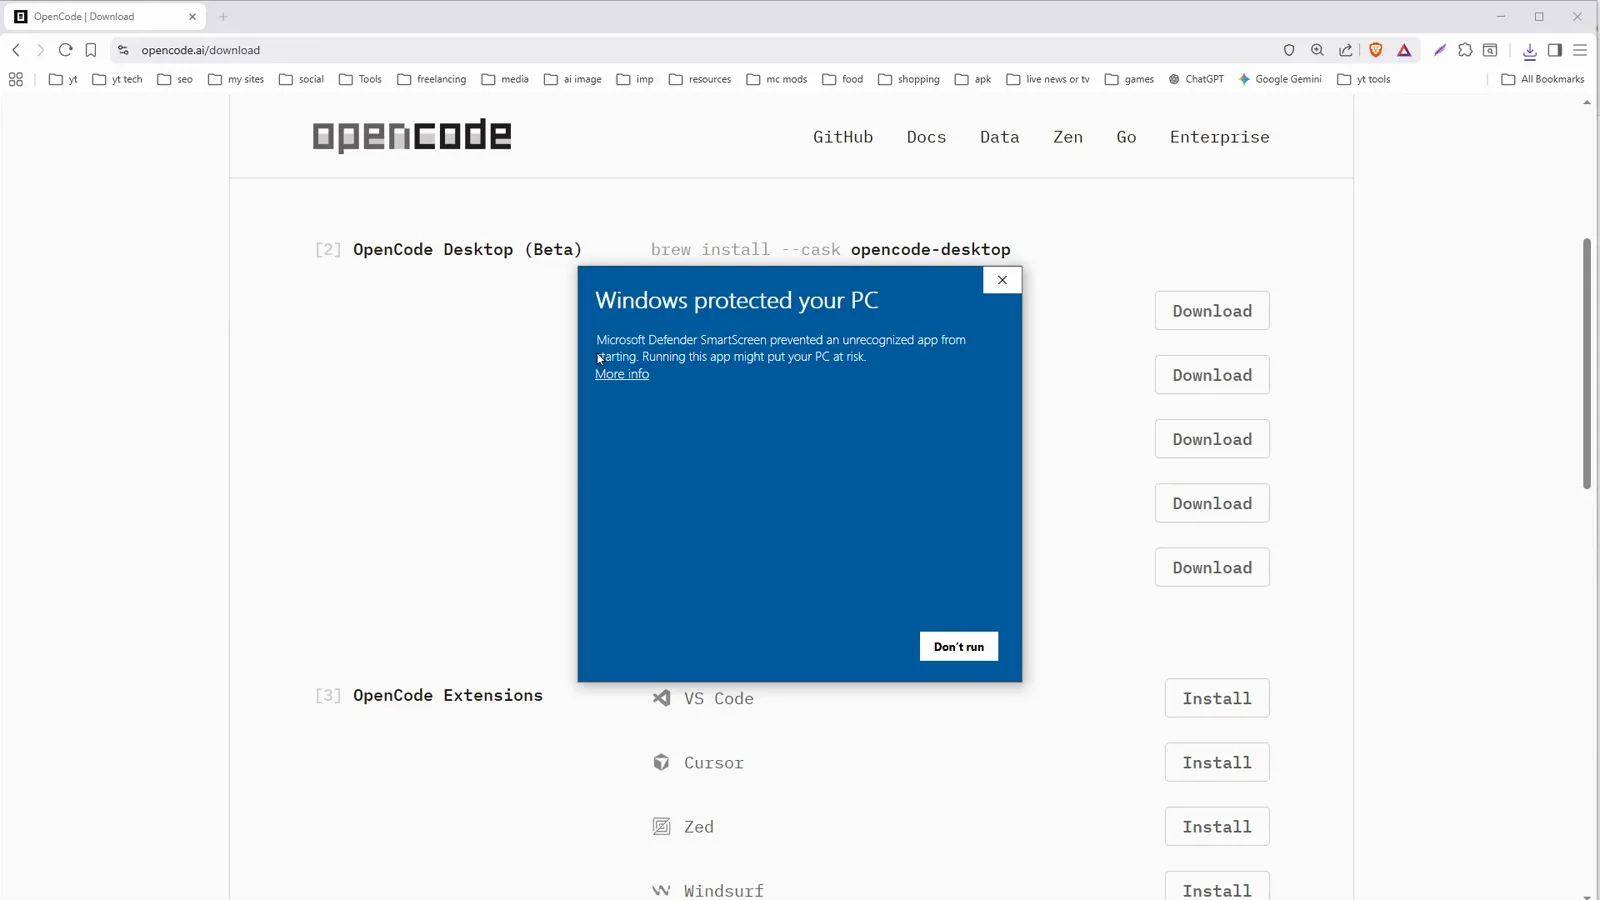
SmartScreen 会拦下未识别的安装包,点 More info 才能继续。看视频 0:33 - 3
Run anyway,等安装向导跑完
展开后的对话框会写明 OpenCode Desktop Installer.exe 和签名方 Anomaly Innovations, Inc。点 Run anyway,安装向导会完成剩下的工作。首次启动时应用要起本地服务,加载几秒属正常现象,三个平台都一样。
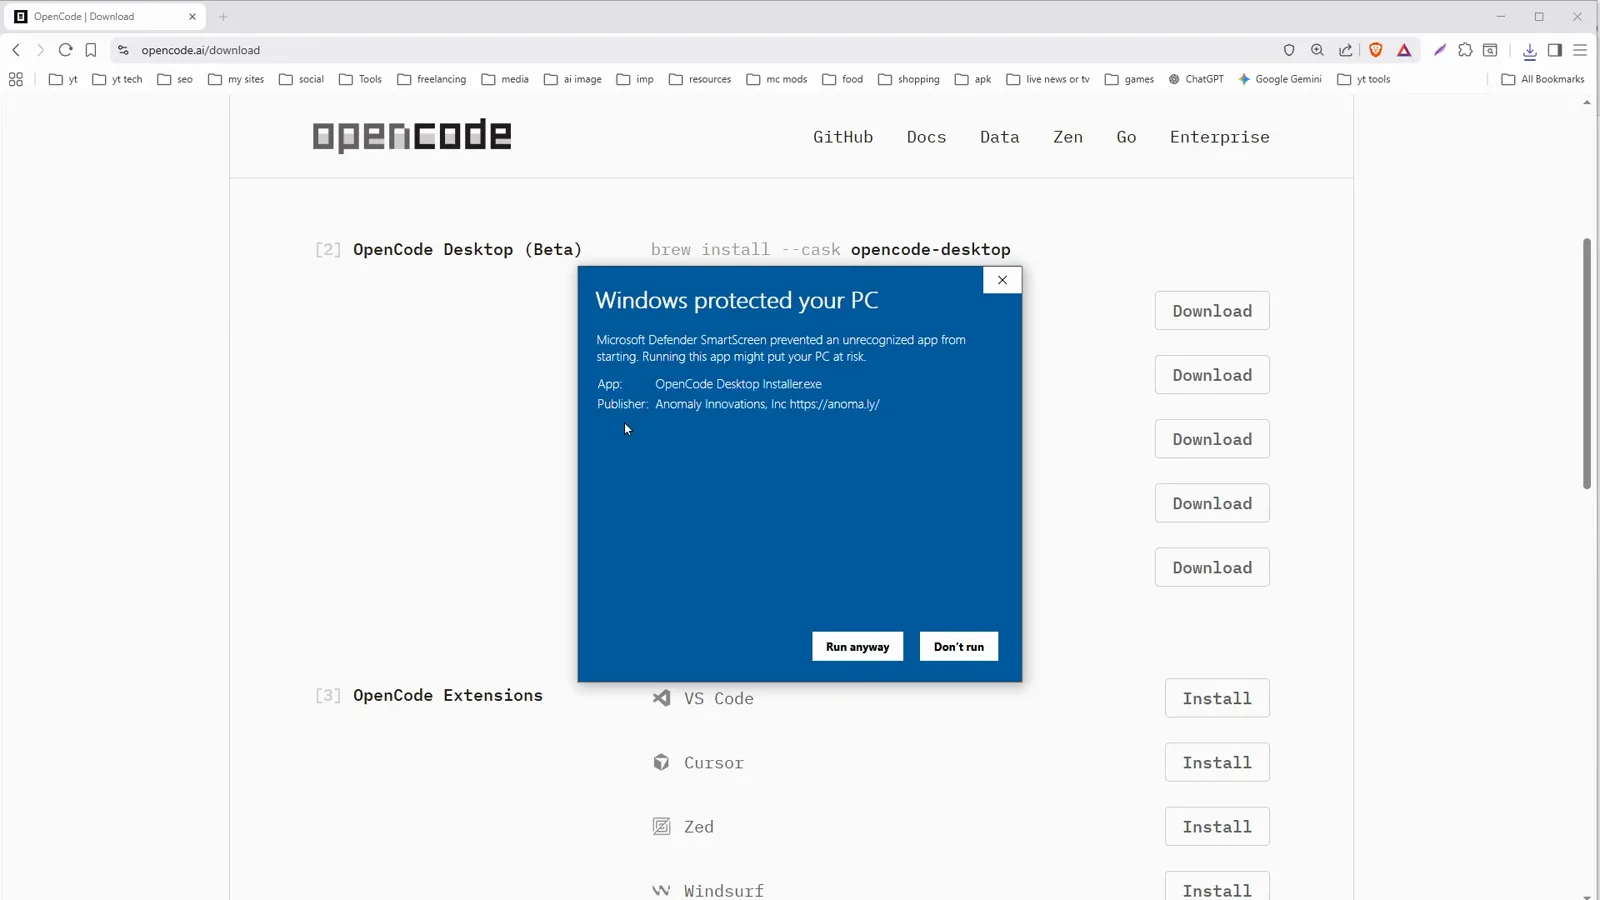
展开后能看到签名方;点 Run anyway 开始安装。看视频 0:40 - 4
首次启动:确认 Local Server,打开一个项目
主屏幕上有一个绿色的 Local Server 圆点、Recent projects 列表和 Open project 按钮。点 Open project,随便选一个文件夹——全新的空文件夹也没问题——应用就会带你进入带 Build anything 输入框的工作区。之后 Recent projects 会记住你打开过的文件夹。
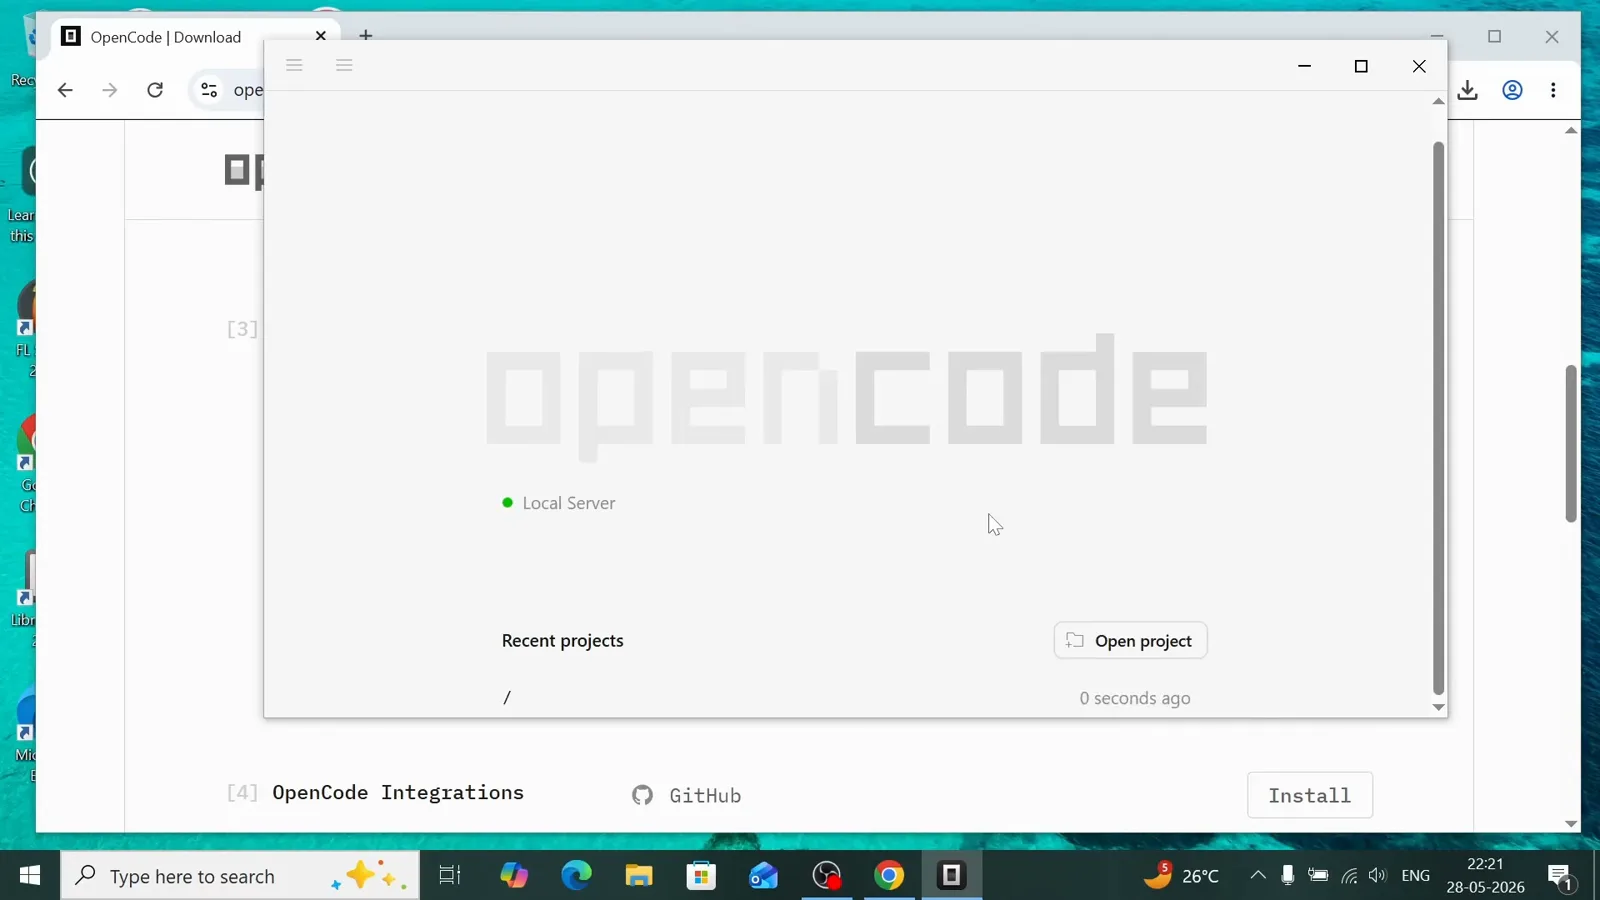
首次启动:Local Server 已就绪,打开文件夹前 Recent projects 是空的。看视频 1:02
2 · 接入服务商,选好模型
- 5
用 Getting started 卡片接入第一个服务商
全新安装会看到 Getting started 卡片:OpenCode 内置免费模型,开箱即用;也可以 Connect any provider,使用 Claude、GPT、Gemini 等模型。卡片上的 Connect provider 按钮是进入服务商配置最快的入口——想先免费用,直接跳过也行。
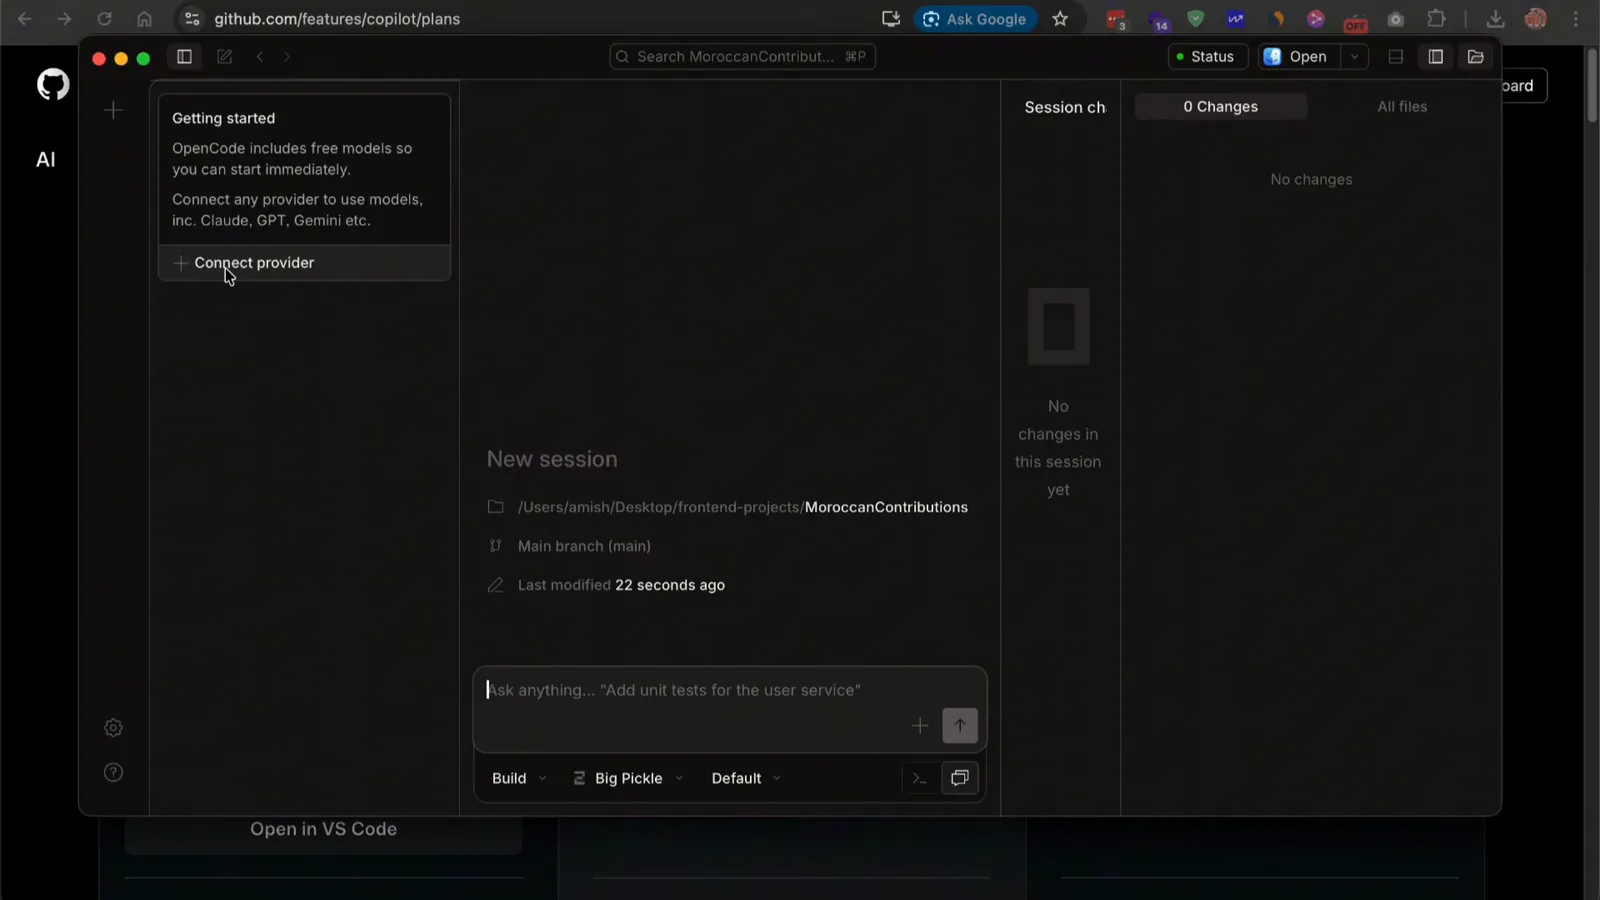
Getting started 卡片指向 Connect provider;免费模型开箱即用。看视频 2:20 - 6
在 Settings → Providers 里选服务商
点左下角齿轮,选 Providers。OpenCode Zen(精选 Claude、GPT、Gemini 等模型)和 OpenCode Go(低价订阅)标着 Recommended 排在最前,之后是直连 Claude 的 Anthropic、GitHub Copilot、OpenAI、Google——还有自带一堆免费模型的 OpenRouter。自定义服务商入口可以接其余任何家。
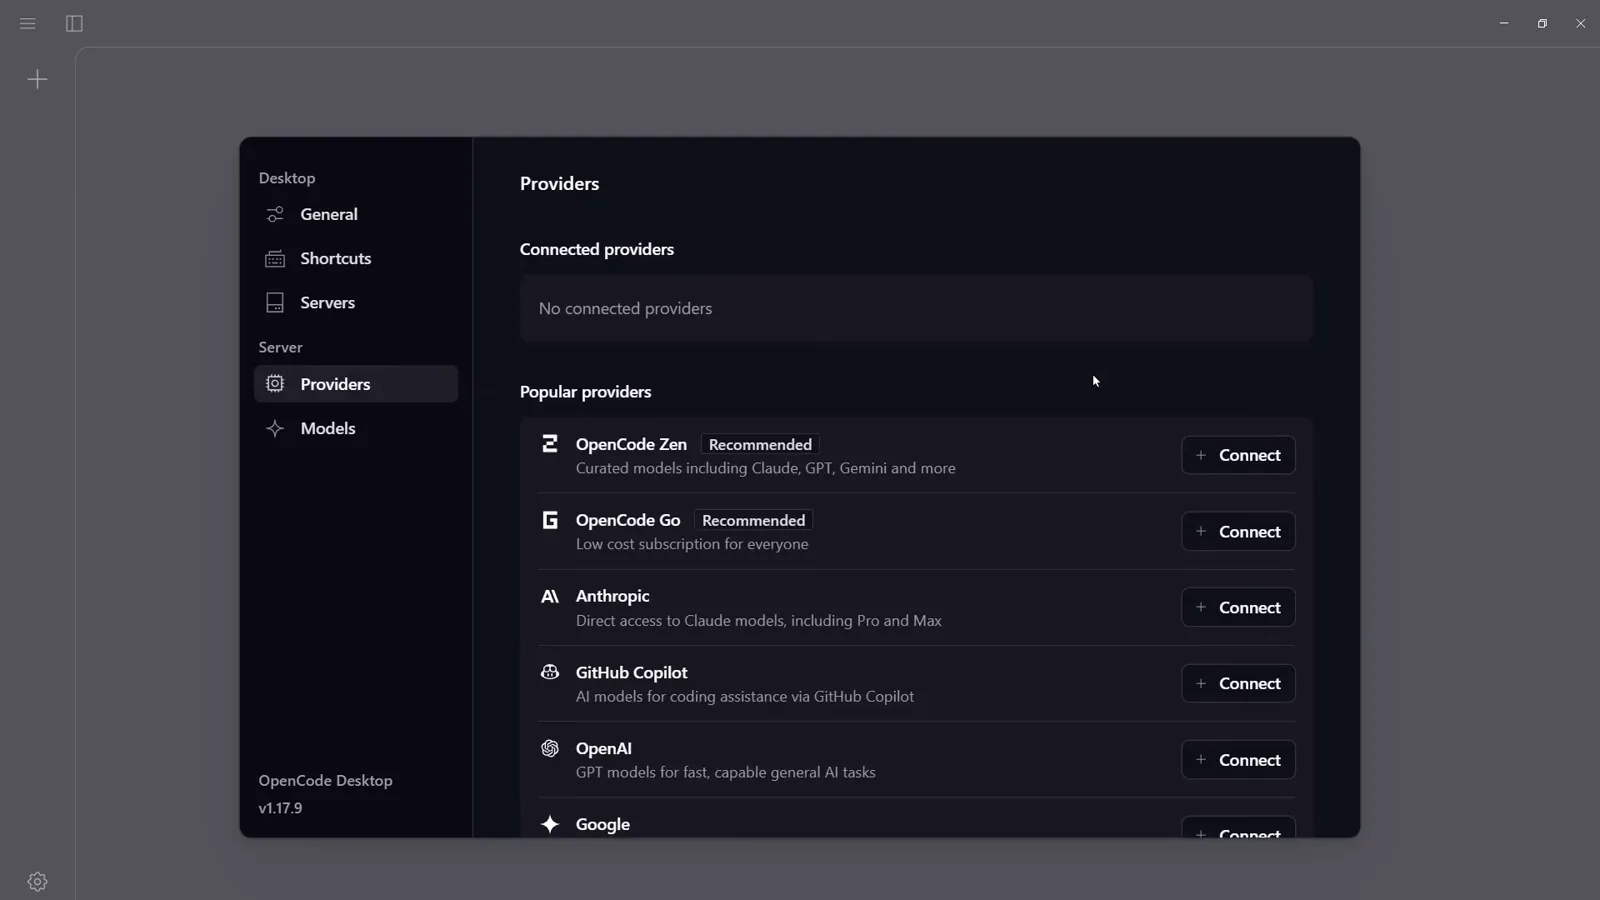
Settings → Providers:OpenCode Zen 和 OpenCode Go 是推荐的两行。看视频 1:26 - 7
用设备登录接入 GitHub Copilot
如果你已经订阅 GitHub Copilot——Pro、Pro+、Business 或 Enterprise——无需额外 API key 就能用。选择 GitHub Copilot 后,应用弹出 Connect GitHub Copilot 对话框,给出一串确认码和一个链接:打开 github.com/login/device,输入确认码并授权,Copilot 套餐内的模型就会出现在选择器里。
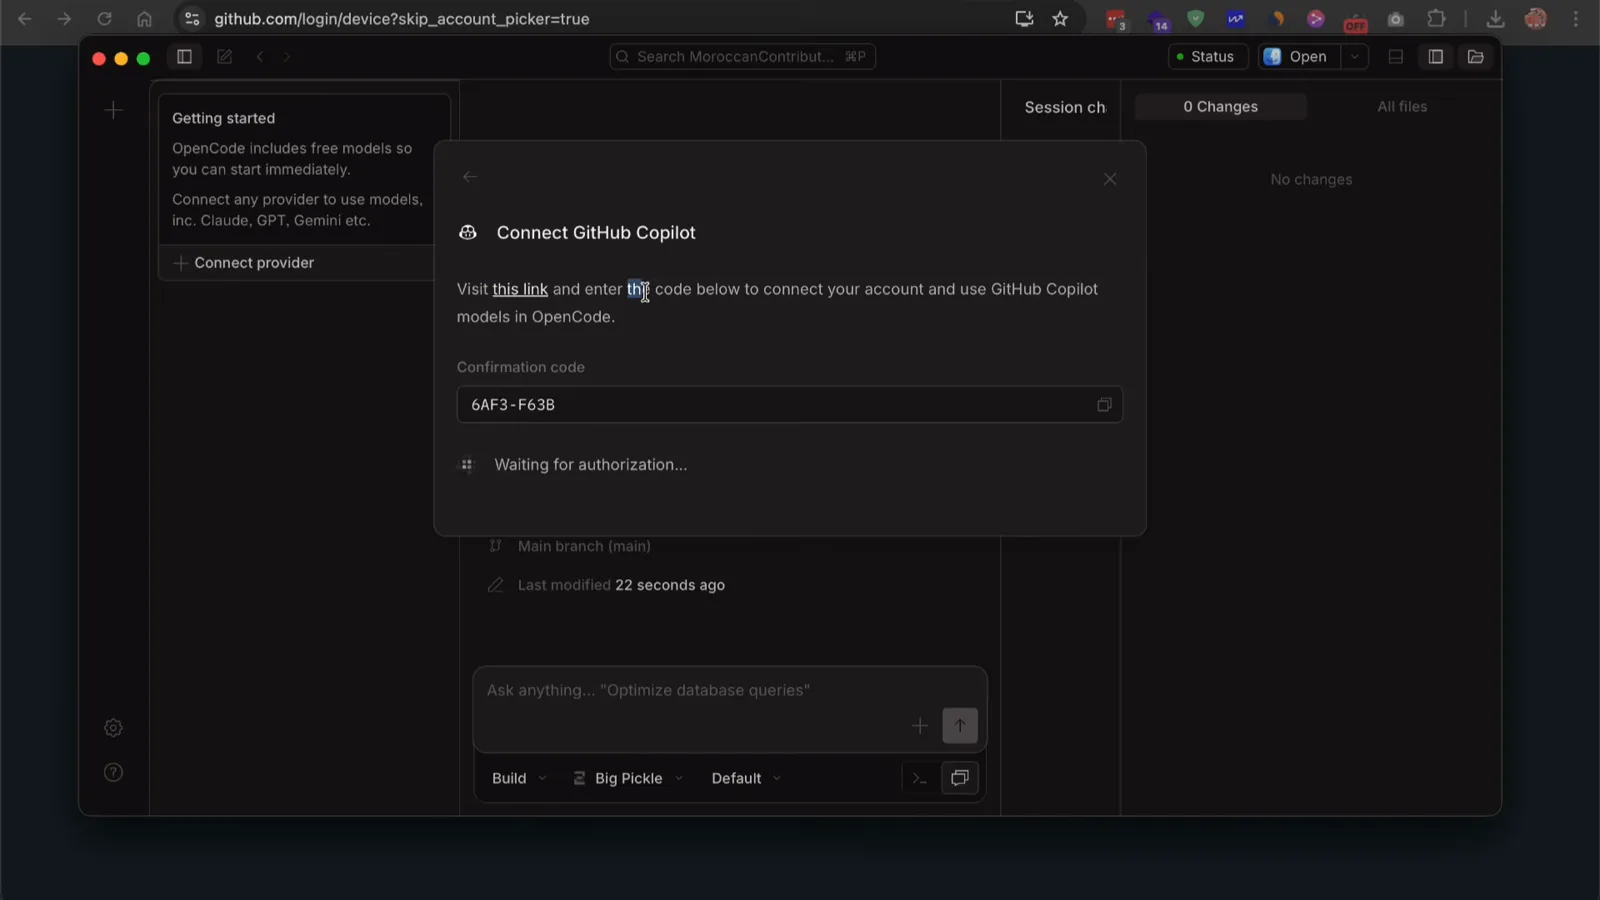
设备登录流程:在 github.com/login/device 输入确认码并授权。看视频 2:30 - 8
选模型——内置免费模型直接用
Select model 对话框列出 OpenCode 提供的免费模型:Big Pickle、DeepSeek V4 Flash Free、MiMo V2.5 Free、Nemotron 3 Ultra Free、North Mini Code Free。下方的 Add more models from popular providers 可以再接 OpenCode Zen、Anthropic、GitHub Copilot 等。部分模型还会出现思考力度(thinking effort)选择器(从 low 到 max)——第一次跑建议保持默认。
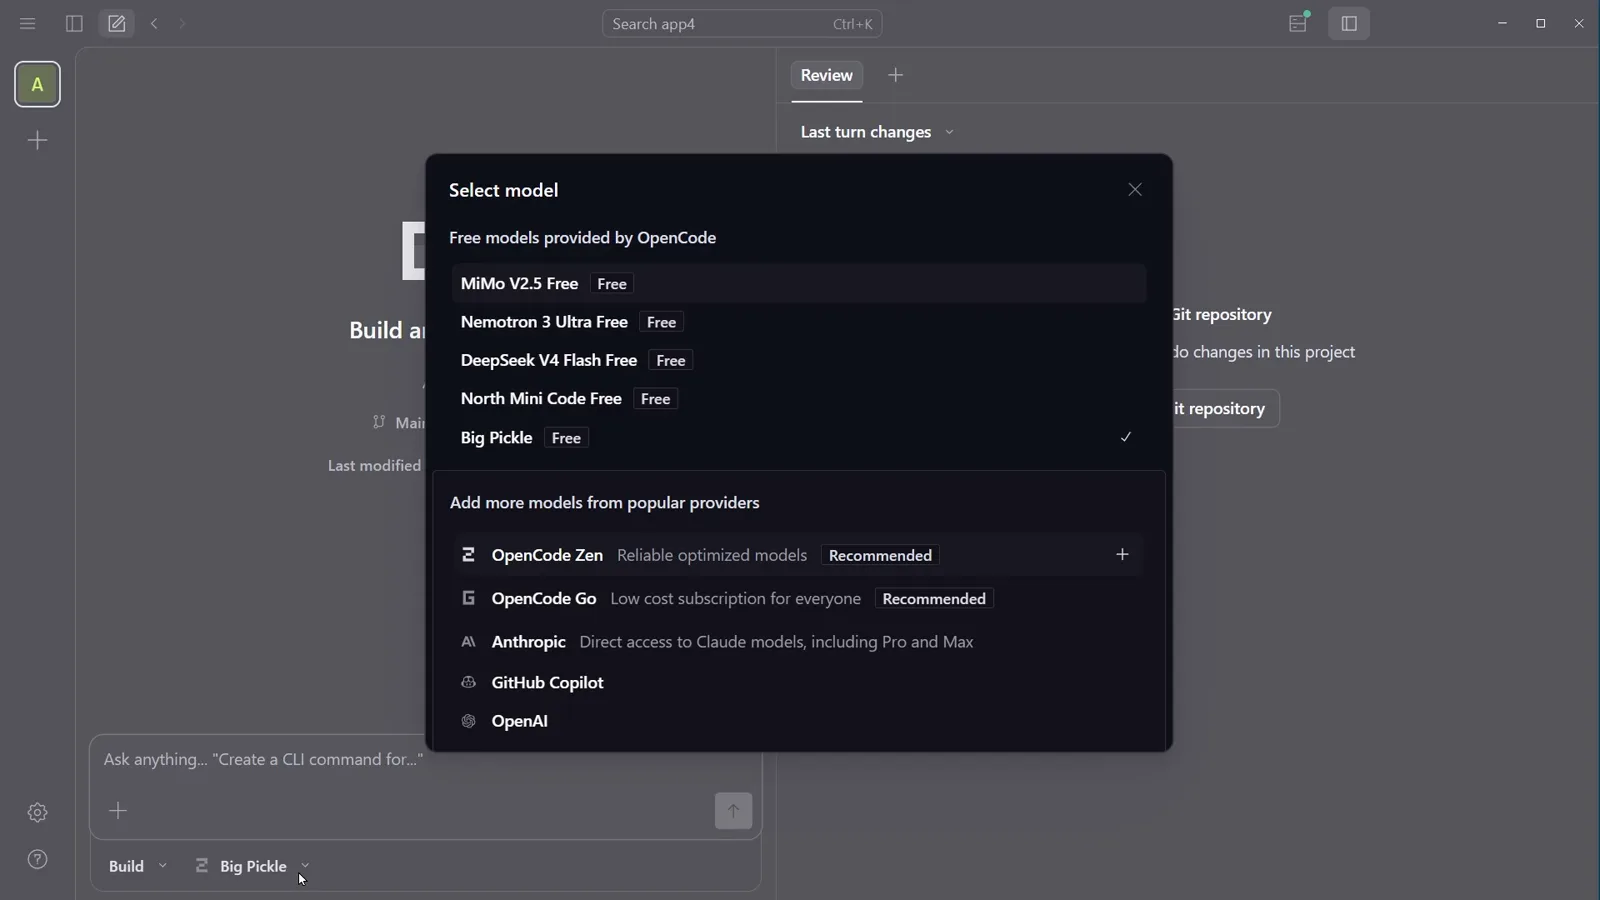
应用自带五个免费模型;同一个对话框里还能加服务商模型。看视频 2:44
3 · Plan 模式:写代码之前先定方案
- 9
把输入框切到 Plan 模式
提示词输入框下方有两个下拉框:模式(Build 或 Plan)和模型。发送任何内容之前,先把模式切到 Plan。Plan 是内置的两个智能体之一:它可以分析项目、提出实现思路,但不能写或改文件——和终端 UI 里用 Tab 键切换的 Plan/Build 是同一对,终端里右下角有指示器标明当前模式。
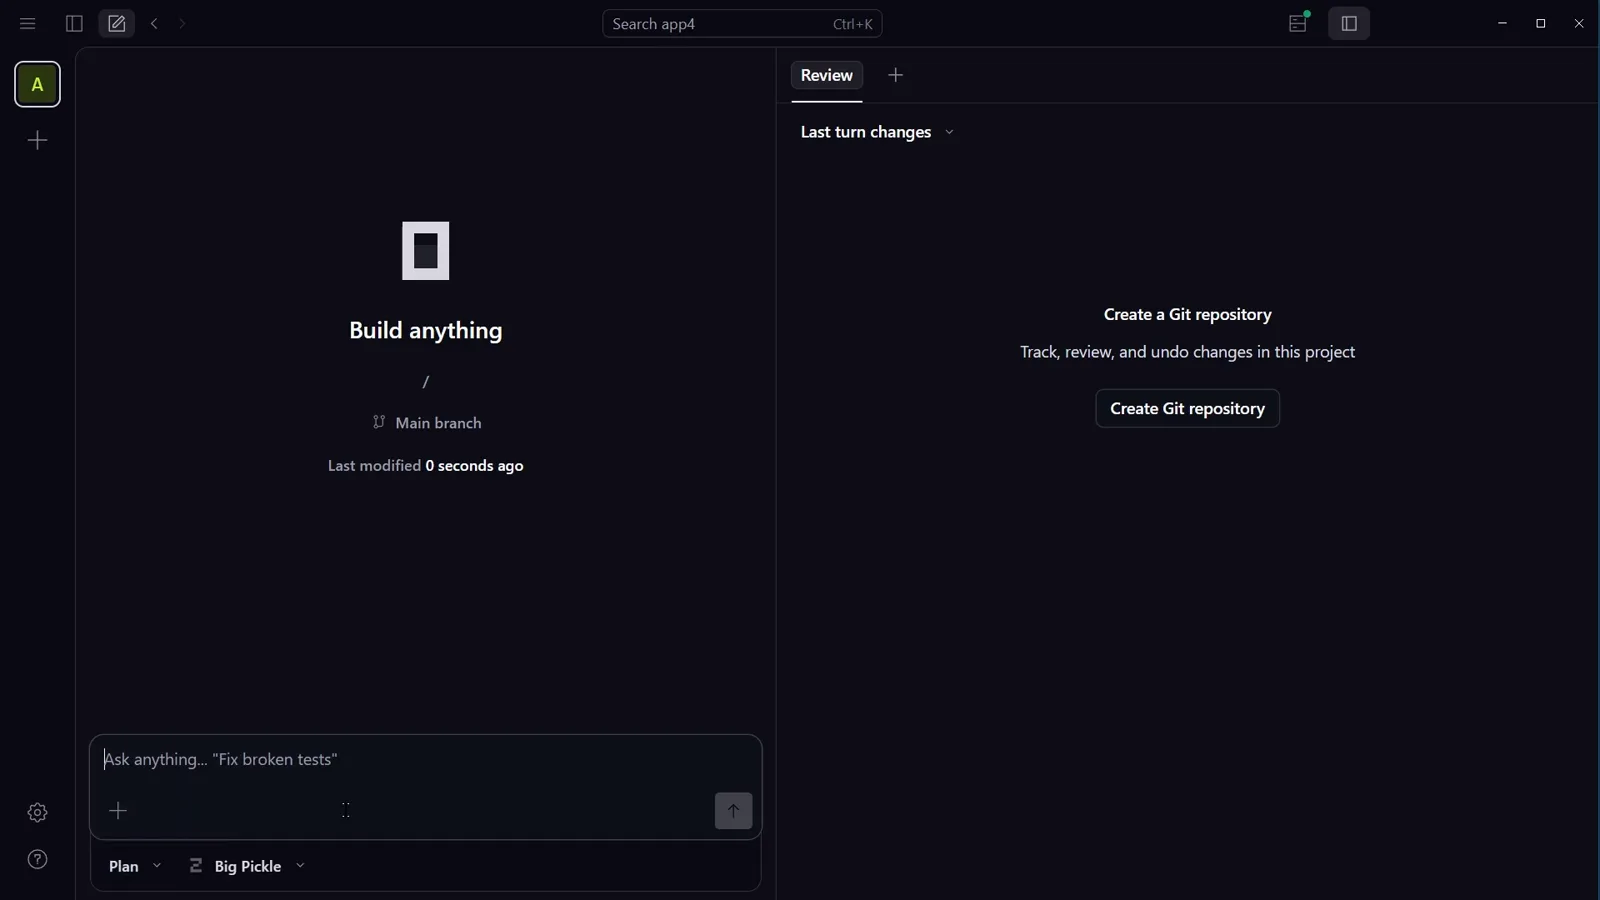
模式下拉框就在输入框下方,在 Plan 和 Build 之间切换。看视频 3:00 - 10
回答澄清提问
把需求发出去——录像里是一个 CSV 数据分析 Web 应用——Plan 模式回给你的不是代码,而是一个 Questions 面板。这个会话里有四问:Tech Stack(React + Node.js、Next.js、Vue + FastAPI 或 Plain HTML/JS)、Charting Library、Processing Location 和 Insight Depth。逐项作答、补充自己的要求再提交;答案决定方案的走向。
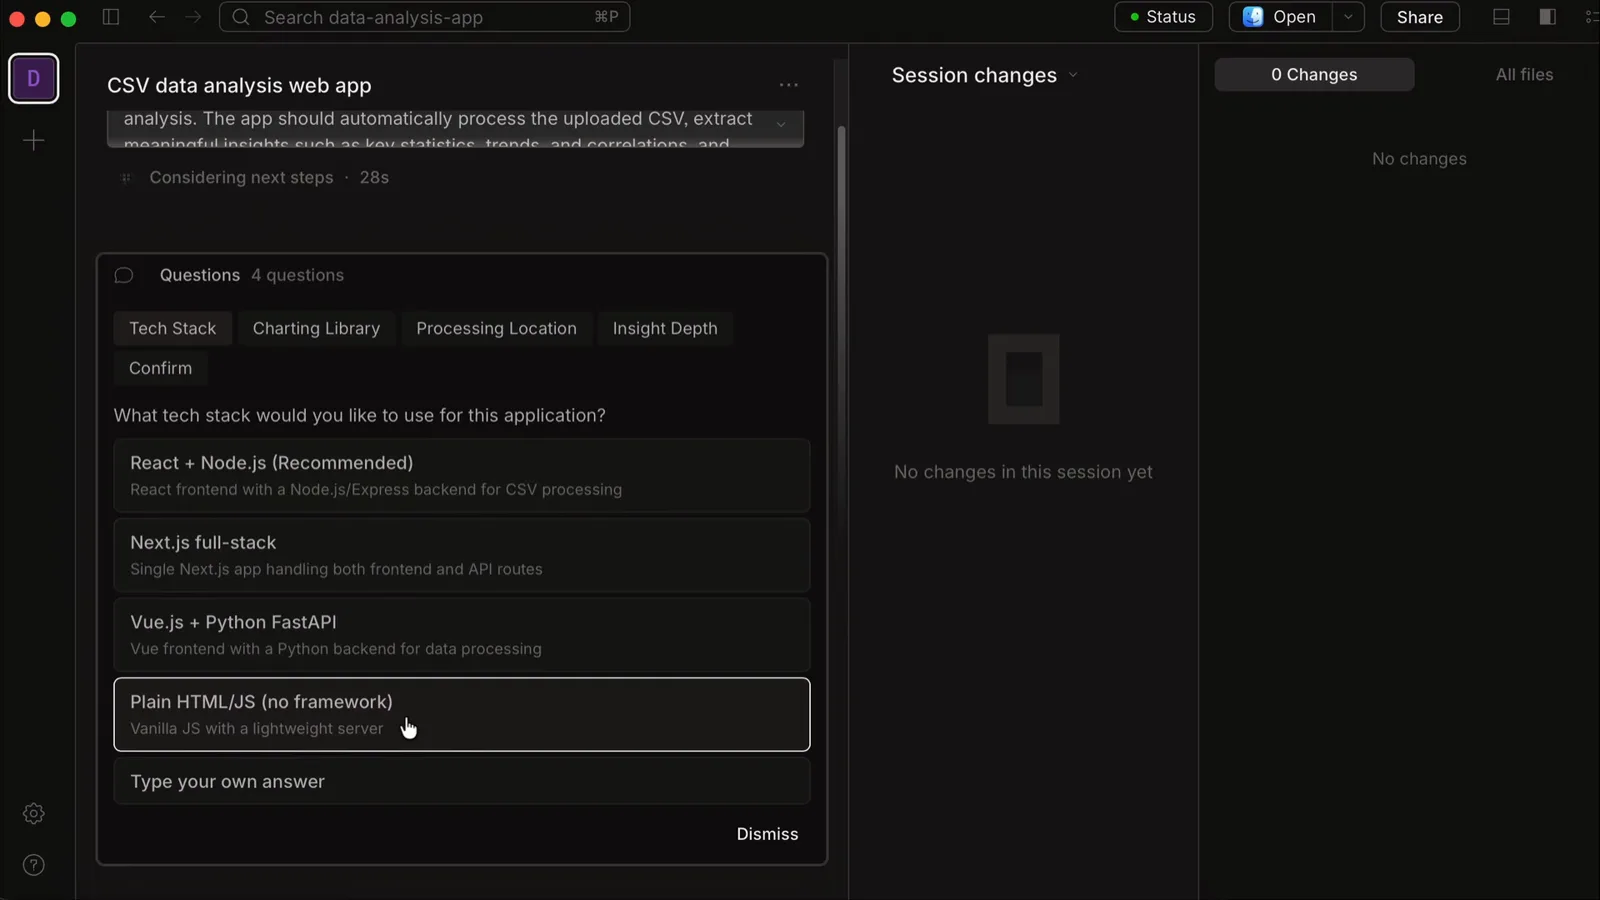
Plan 模式在写下任何文件之前,先提澄清问题。看视频 3:20 - 11
确认方案,切到 Build
方案敲定后,智能体会问 Ready to build. Should I proceed?,并给出 yes proceed 快捷回复。在 Build 模式启用之前文件写入始终被锁——Beta 里智能体可能不会自己切模式,所以自己把模式下拉框从 Plan 拨到 Build 再确认。这与官方文档一致:先 plan,再切 build 动手改。
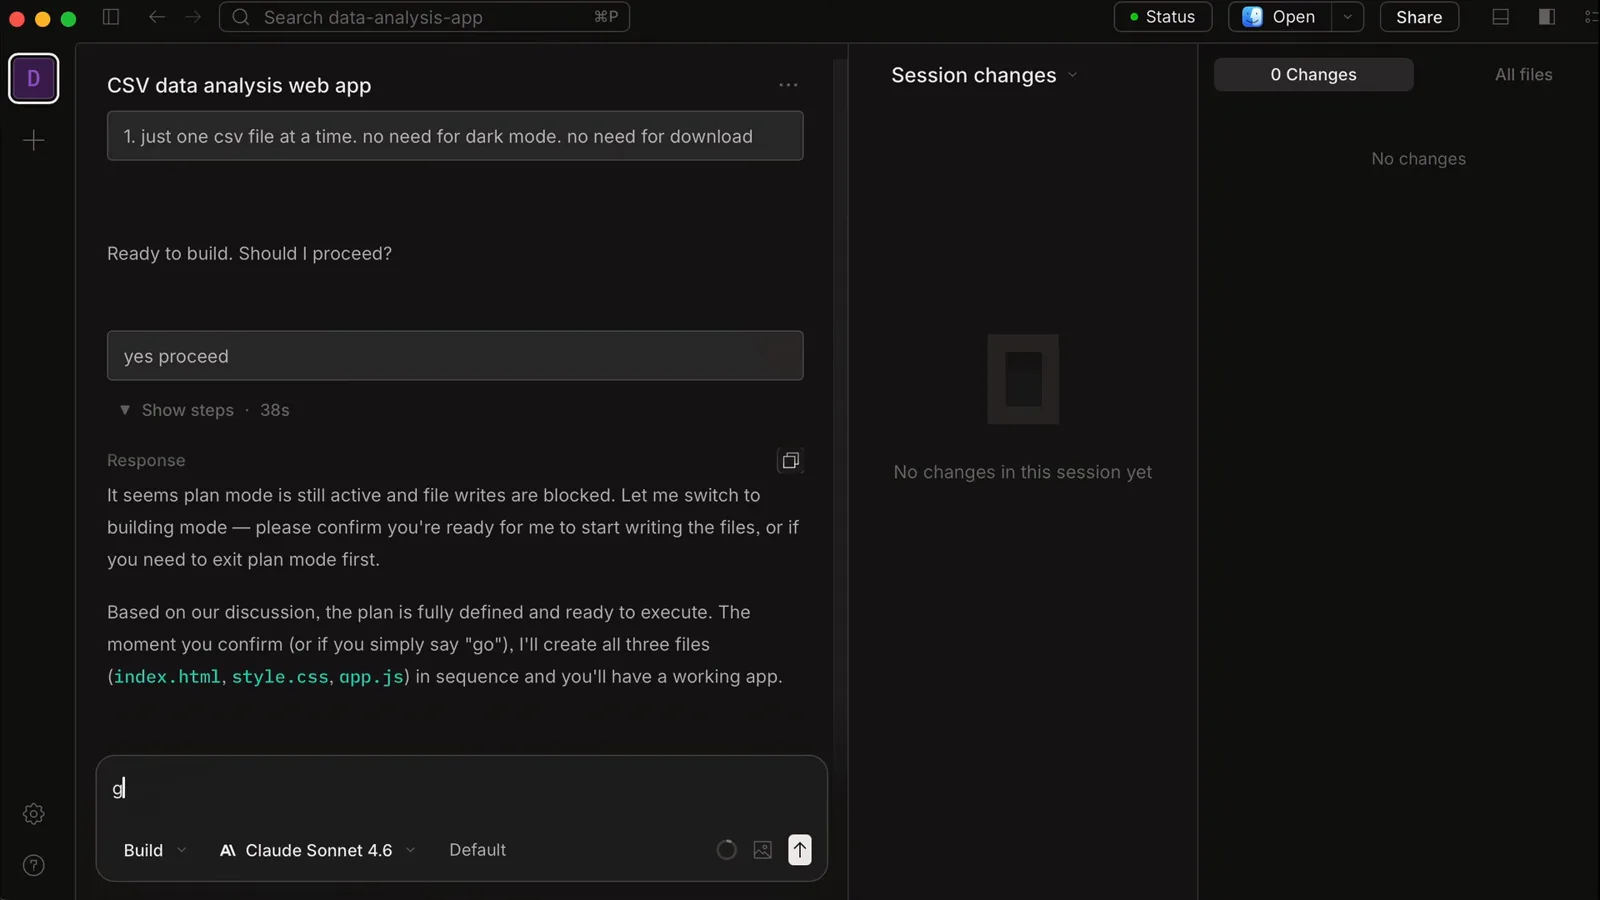
用快捷回复确认方案,再把模式下拉框拨到 Build。看视频 4:05 - 12
看 Build 模式逐项划掉待办清单
Build 模式把方案变成 To-dos 清单——Create index.html、Create style.css、Create app.js——然后通过 Write 工具调用逐项完成、逐项打勾。录像里有个 Beta 小毛病:待办面板渲染了两遍;无伤大雅,但这正是 Beta 阶段该有的心理预期。
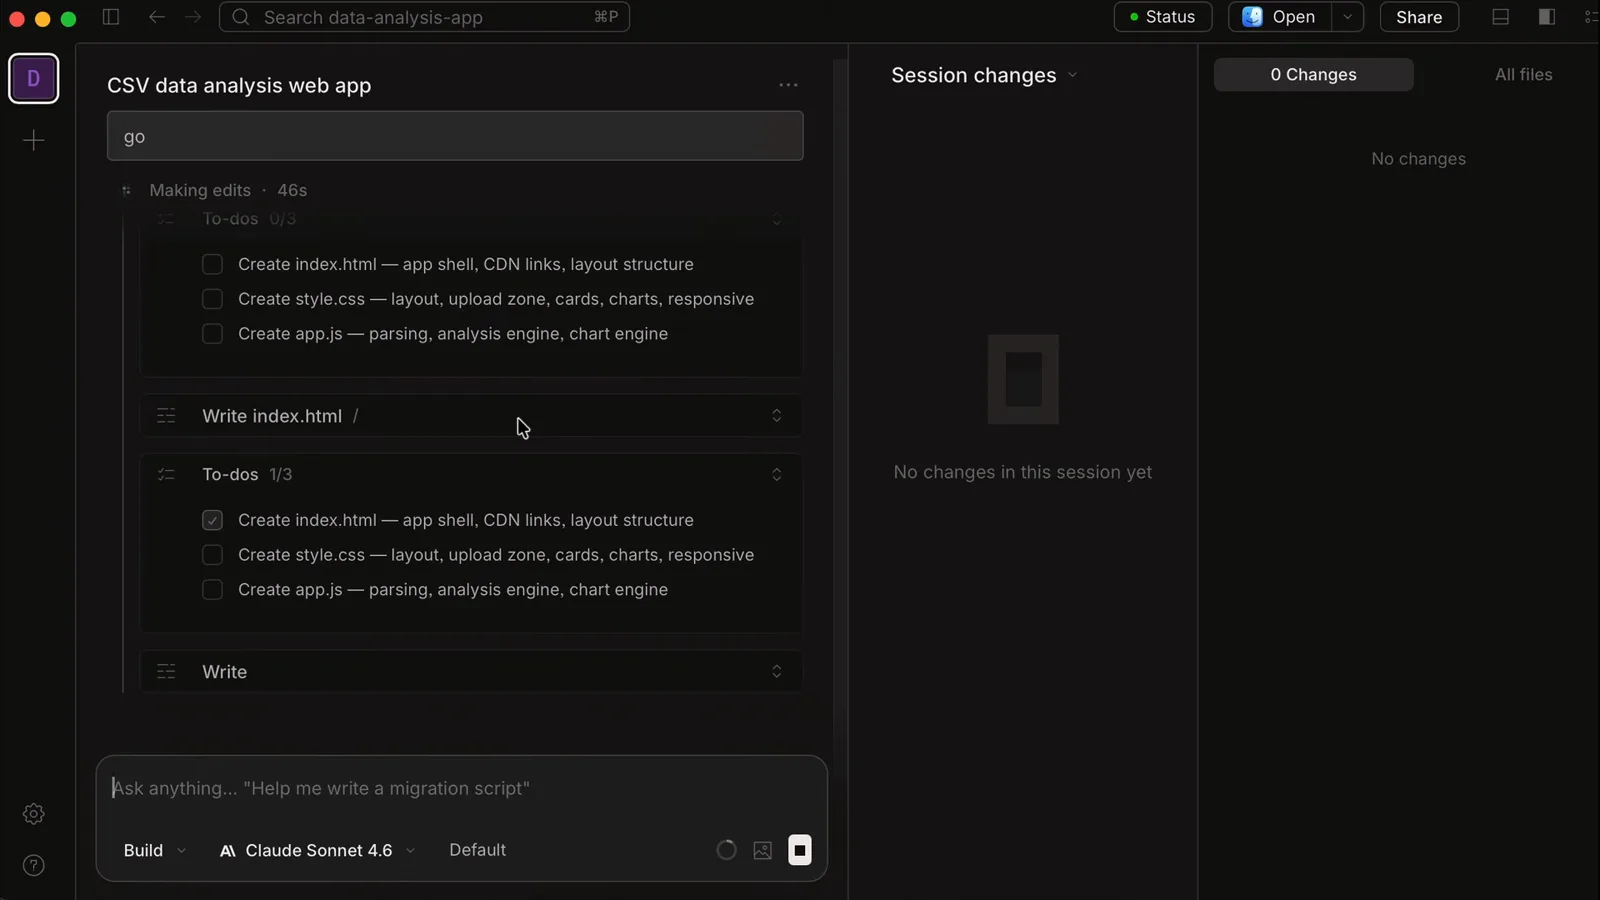
Build 模式按 To-dos 清单推进,每写一个文件打一个勾。看视频 4:11
4 · Build、审查并运行你的应用
- 13
在 Session changes 里审查 diff
Session changes 面板统计本次会话动过的每个文件——理财应用那个会话是 11 Changes——旁边还有 All files,每个 diff 都可用 Unified 或 Split 视图打开,并支持 Collapse all。绿行是新增、红行是删除;改动按会话记录,还可以用 undo 逐步回退。
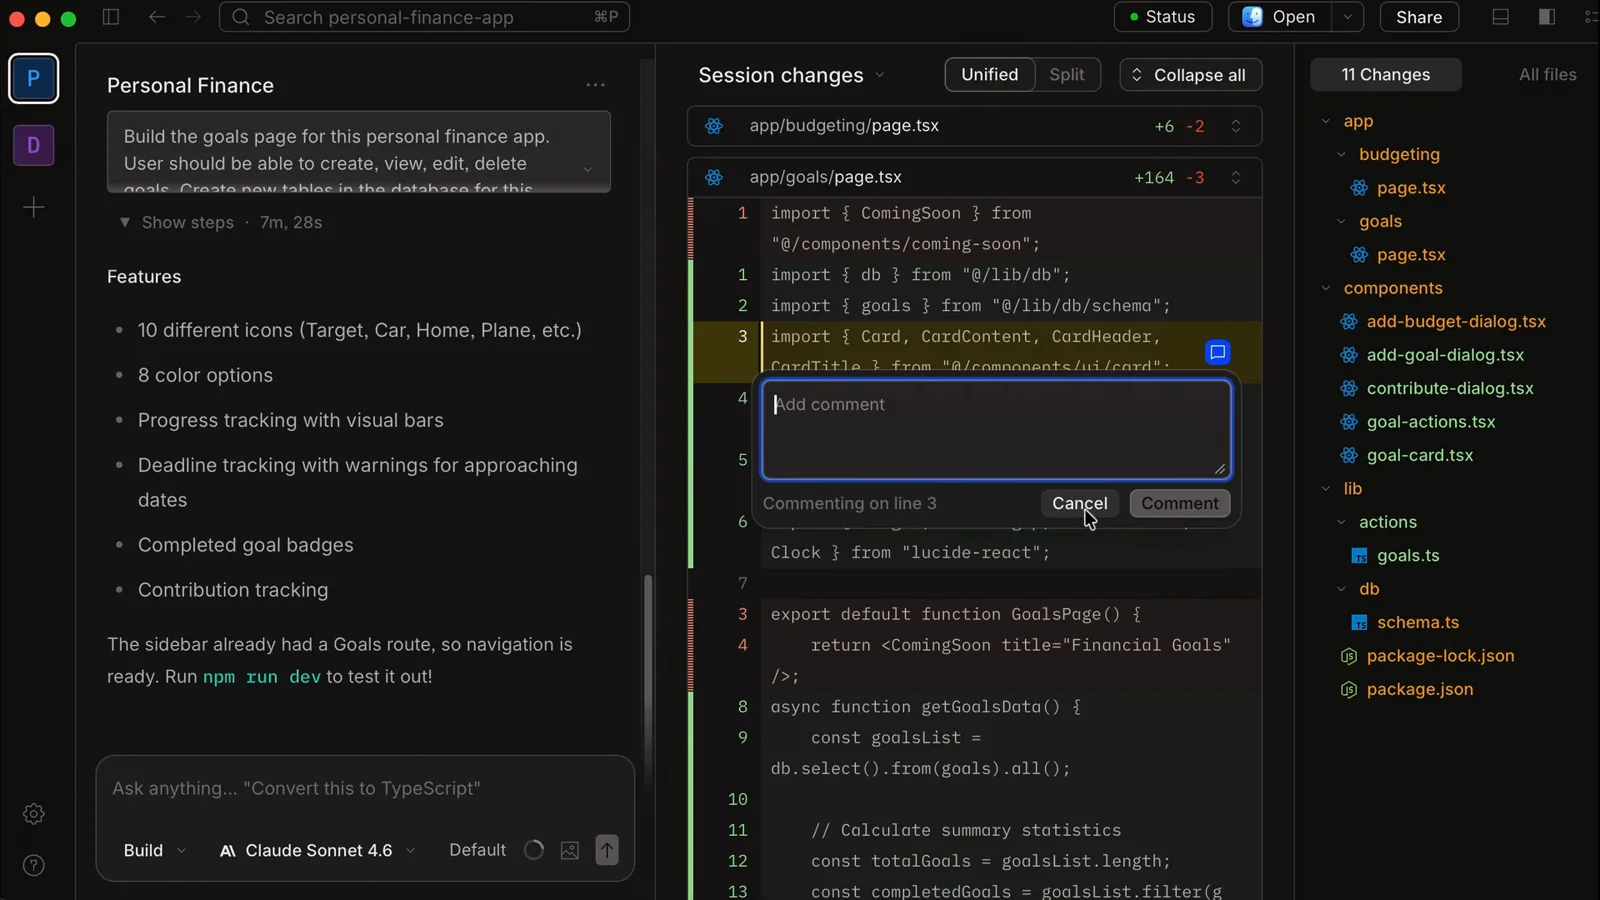
Session changes:动了 11 个文件,Unified 视图配 Split 可切换。看视频 8:20 - 14
用行内评论指挥智能体
在文件查看器里打开任意生成文件,点中某一行——录像里是 app.js 第 62 行——直接在那里加评论。评论框显示 Commenting on line N,配 Cancel 和 Comment 按钮;智能体会把行内评论当作定向指令来读,比在聊天里描述“第几行附近”精准得多。
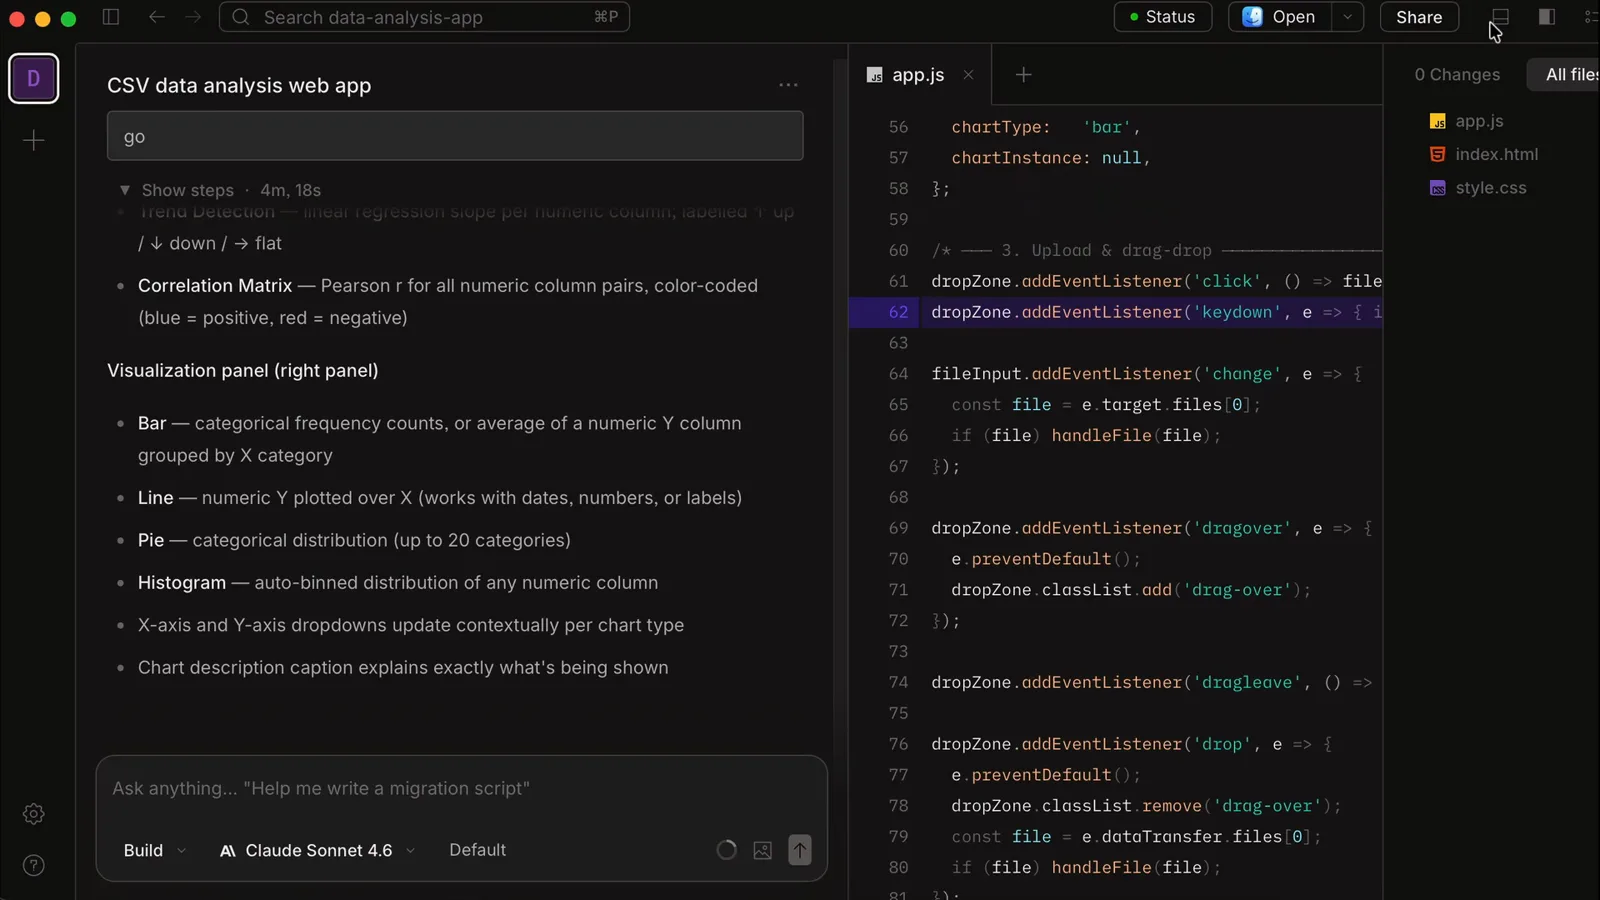
在文件查看器里选中任意一行,就能给智能体留行内评论。看视频 5:12 - 15
在内置终端里跑命令
终端标签页能跑 npm run dev、git status、装依赖——想同时用 TUI 和 GUI,甚至可以在里面直接跑 OpenCode CLI。有个设置要注意:Settings → General → Terminal Shell。录像里 bash shell 让聊天里的 dev server 命令没了下文,换成 Auto 之后命令就能跑了。没有特殊理由就保持 Auto。
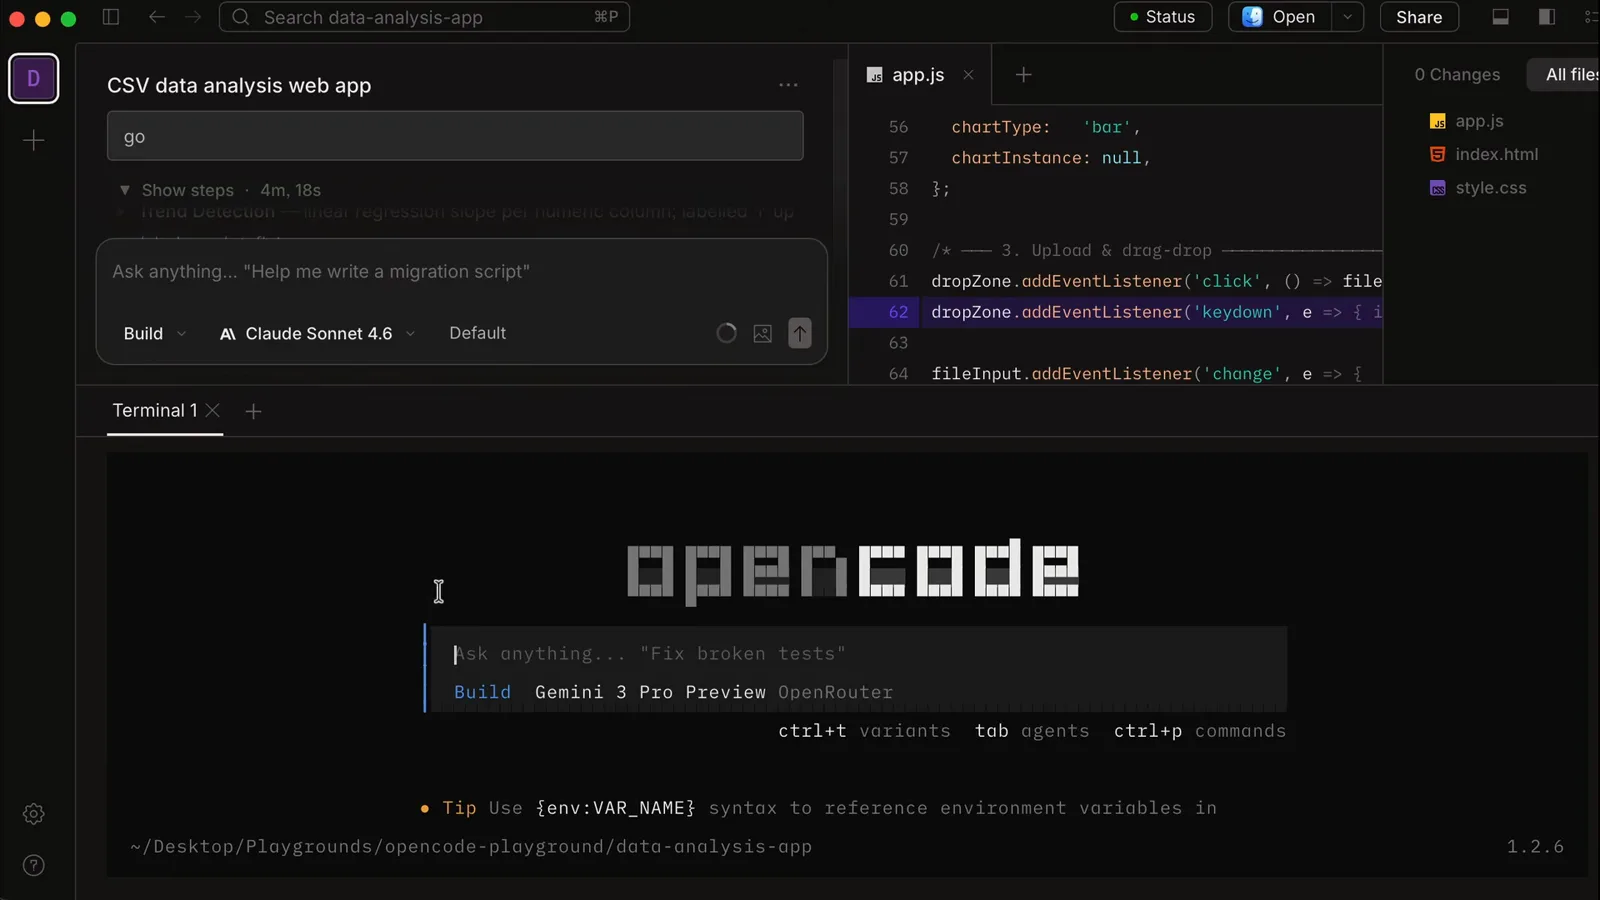
终端标签页能跑 dev server——也能直接跑 OpenCode CLI 本身。看视频 5:18 - 16
打开成品,继续迭代
纯静态应用双击 index.html 就能跑;Next.js 应用在 npm run dev 之后跑在 localhost:3000——完成的 Goals 页面有 Total Goals、Total Saved、Overall Progress 卡片和新建的 Vacation 目标。想改就在同一会话里继续提;也可以并行开新会话——多个智能体各带各的项目和模型同时干活。
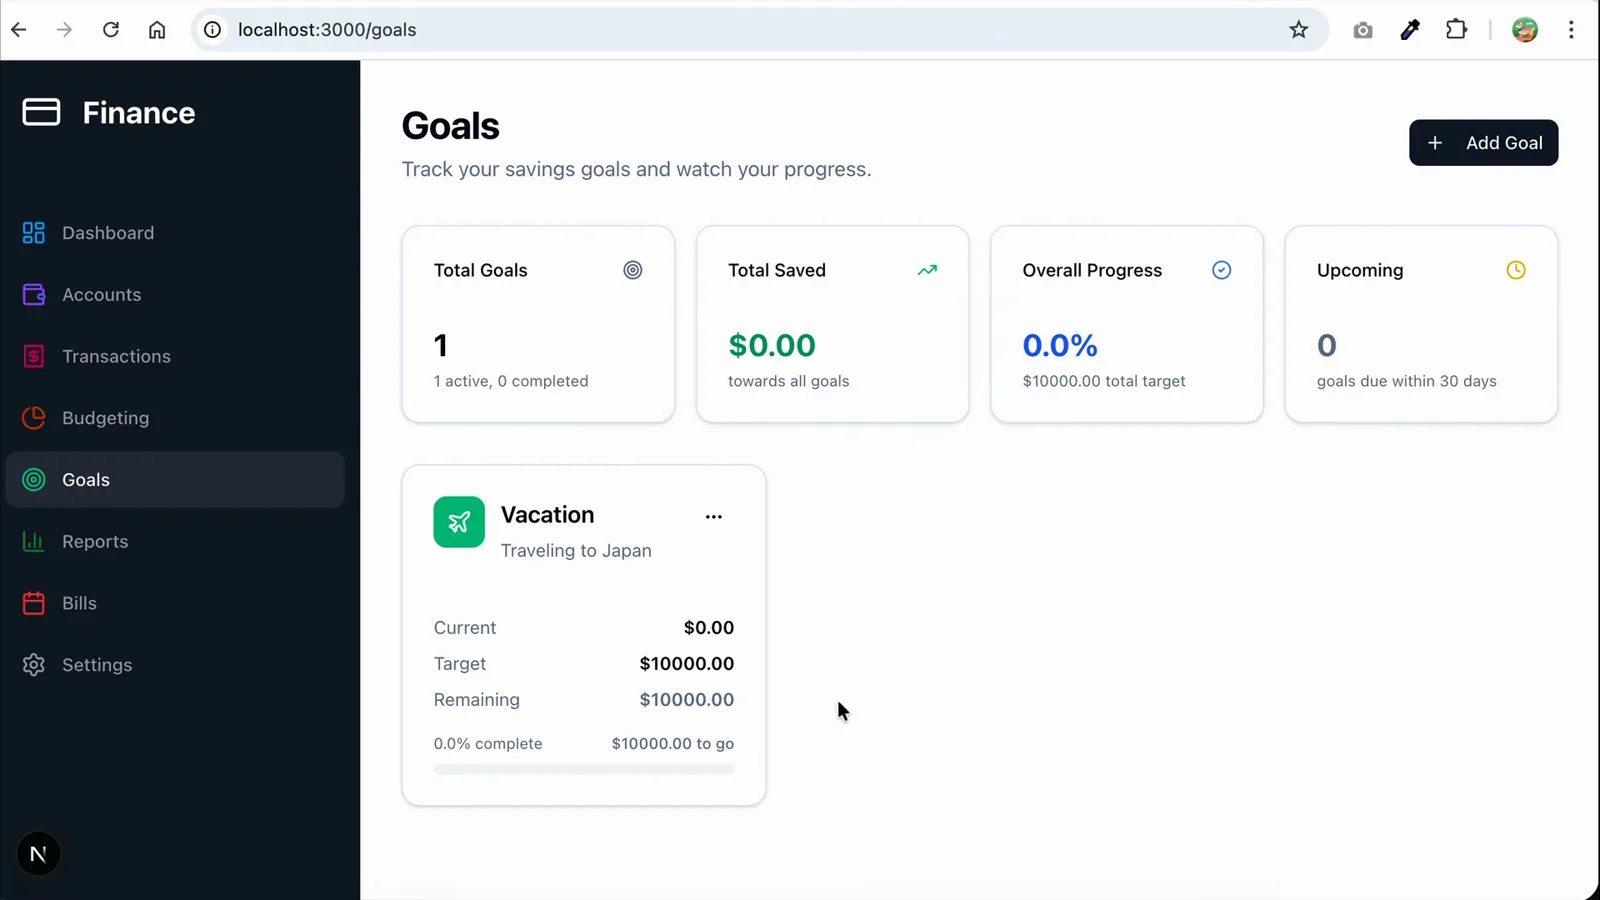
智能体做出来的 Goals 页面,正跑在 localhost:3000/goals。看视频 7:40