
Unity Codex プラグインチュートリアル:Unity公式31スキルをCodexへ導入
Unity公式のCodex向けプラグインは、unity-cliからアプリ内課金まで31のスキルを一度に届け、さらにMCP経由で動作中のエディタも操作できます。この図解ウォークスルーでは、インストールコマンド、Unity CLI、エディタ制御、そしてCodexプラグインとClaude Codeプラグインの違いまで解説します。
要点まとめ
- 導入はターミナル2コマンドだけ:codex plugin marketplace add Unity-Technologies/unity-agent-plugin のあとに codex plugin add unity@unity-agent-plugin。Package Manager も Asset Store も不要です。
- unity-cli スキルでCodexはUnityのコマンドラインを扱えるようになります:ステータス確認、スクリーンショット、シーンを開く、Playモードへの移行、さらに unity exec によるドメインリロードなしのC#スニペット実行まで。
- エディタへのライブアクセスには、Unity 6のMCP Serverが52個のツールを公開し、Codex用のConfigureボタンをワンクリックで用意 — 設定後は codex-mcp-client が Connected Clients に Accepted として表示されます。
- UnityはMCPをCLI上に再構築中(unity mcp configure)。同じプラグインリポジトリはClaude Codeにも対応 — 両方入れて、開いたほうのエージェントでUnityを動かせばOKです。
Codex released a Unity plugin featuring over 30 skills
チャンネル:Vibegame3:38
Getting started with Unity CLI
チャンネル:Unity7:06
Get started with Unity MCP
チャンネル:Unity6:17
Unity's plugin for Codex — install and verification
ドキュメント:docs.unity.comDocs
フレームは3本のクリーンなスクリーン録画から(カメラ映像なし)。インストールコマンド、スキル数、Unity 6+要件、MCP移行計画はUnity公式ドキュメントおよびunity-agent-pluginリポジトリと突き合わせて確認しています。
スクリーンショットの帰属は録画チャンネルとUnity公式動画に。各ステップは正確なタイムスタンプへ深リンクします。
空のCodexからUnity接続まで、全15ステップ
CodexにUnity公式プラグインを入れる
- 1
UnityのプラグインマーケットプレイスをCodexに追加
ターミナルで codex plugin marketplace add Unity-Technologies/unity-agent-plugin を実行し、続けて codex plugin add unity@unity-agent-plugin を実行します。プラグインはUnity公式のGitHubリポジトリから直接届きます — Asset StoreのアセットでもPackage Managerのパッケージでもなく、プロジェクトには一切触れません。新しいCodexセッションを開くと、PluginsセクションにTry nowボタンと3つの定型プロンプト付きでUnityが並びます(画像の通り)。
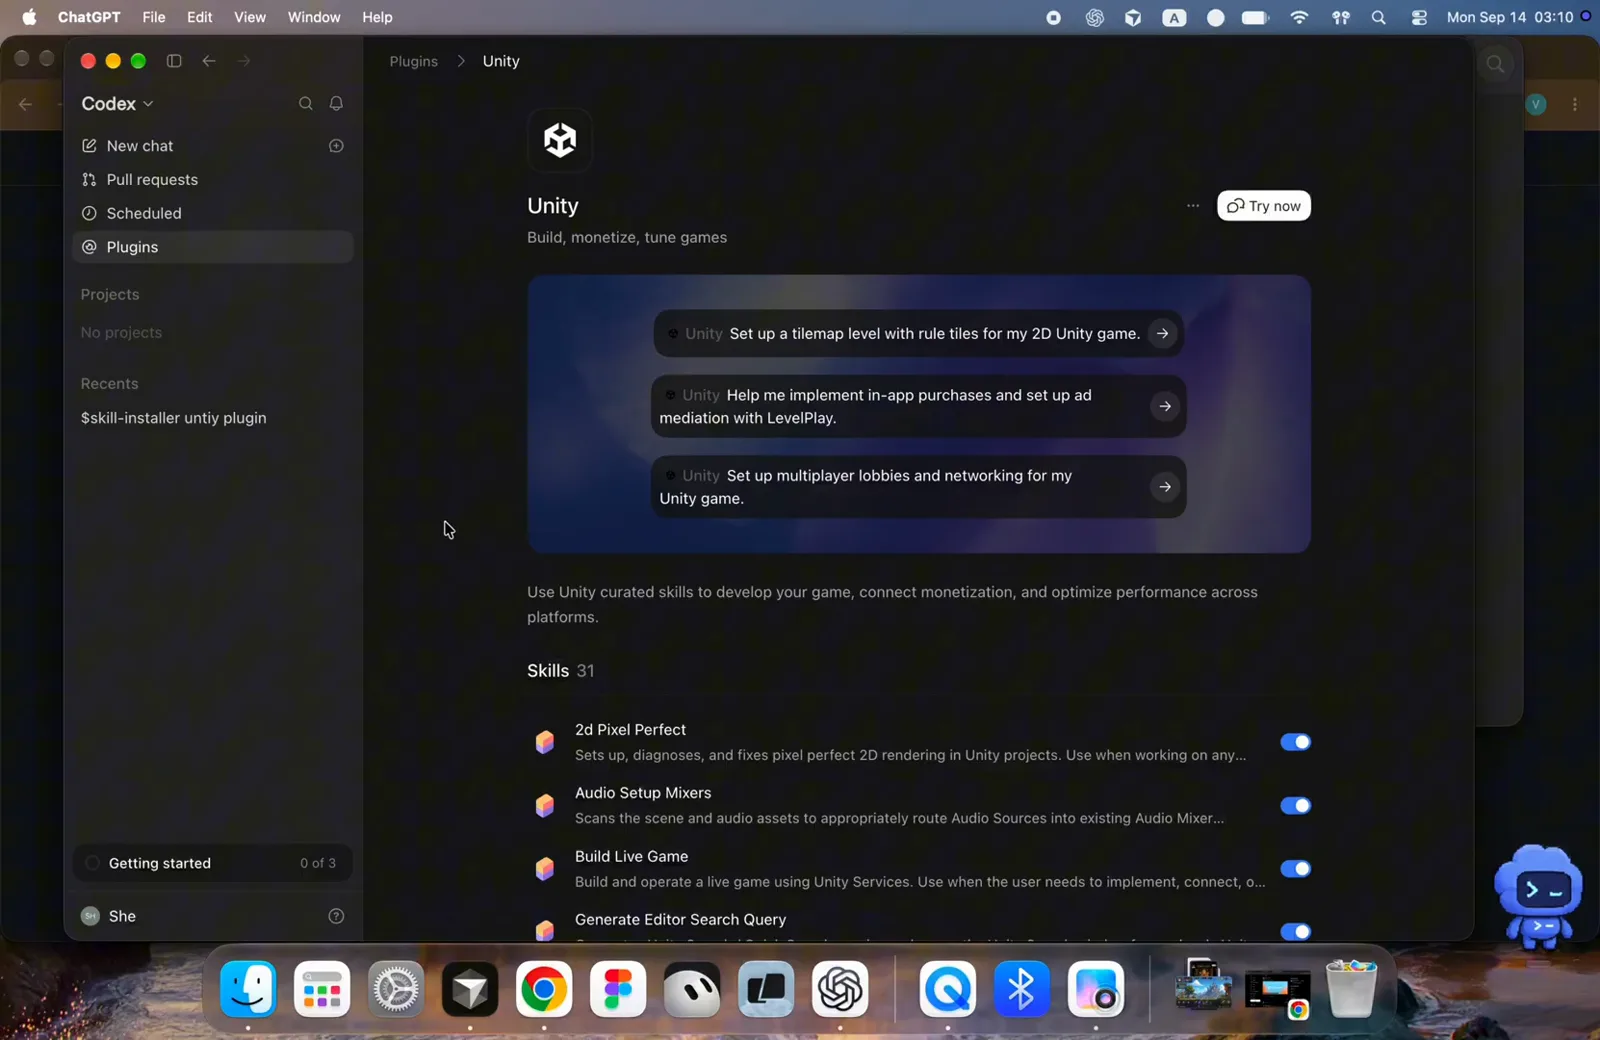
インストール直後のCodex内Unityプラグインページ — Try nowでプラグイン読み込み済みのチャットを開始できます。1:28 の場面 - 2
31スキルを眺めて、必要なものだけ有効化
Plugins → Unity を開いてSkillsリストをスクロール。Unityは31のスキルを同梱しています:2Dとピクセルパーフェクト描画、オーディオミキサー、ライブゲーム、エディタ検索、アプリ内課金、AIナビゲーション、LevelPlay広告、ローカライゼーション、スプライトアトラス、マルチプレイ、Vivoxボイス、UI(IMGUI・uGUI・UI Toolkit)、タイルマップ、シェーダーなど。各スキルは依頼が一致したときにエージェントが読み込む文書化されたプレイブックで、全開のままでも、使わない分野だけオフにもできます。
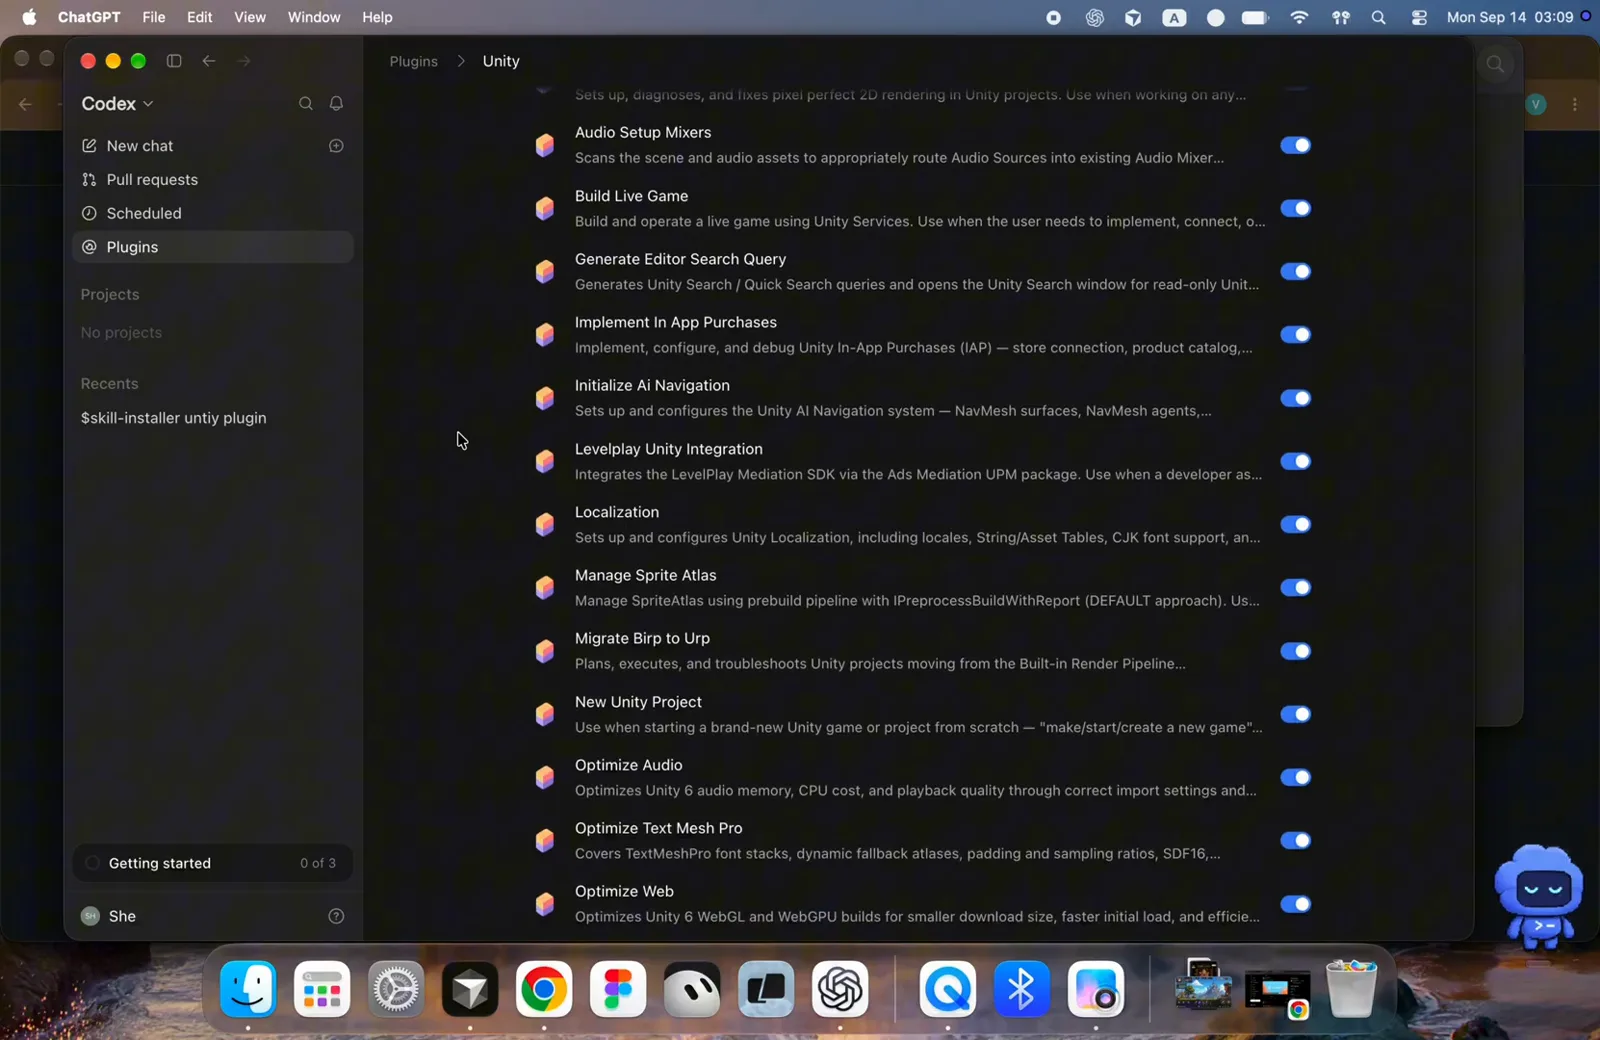
スキルは既定で全て有効。トグルでプロジェクトに必要なコンテキストに絞り込めます。1:00 の場面 - 3
unity-cliスキルを見つける:ターミナルへの橋
さらにスクロールすると Unity CLI(説明は「ターミナルからUnity CLIを操作するとき、実行中のUnity Editorを制御するときに使用」)と Unity Package Management に到達します。下のInformationブロックが本物の証明です:Capabilities は Interactive・Read・Write、Developer は Unity Technologies。このチュートリアル前半のコマンドライン部分を担うのがこのスキルです。
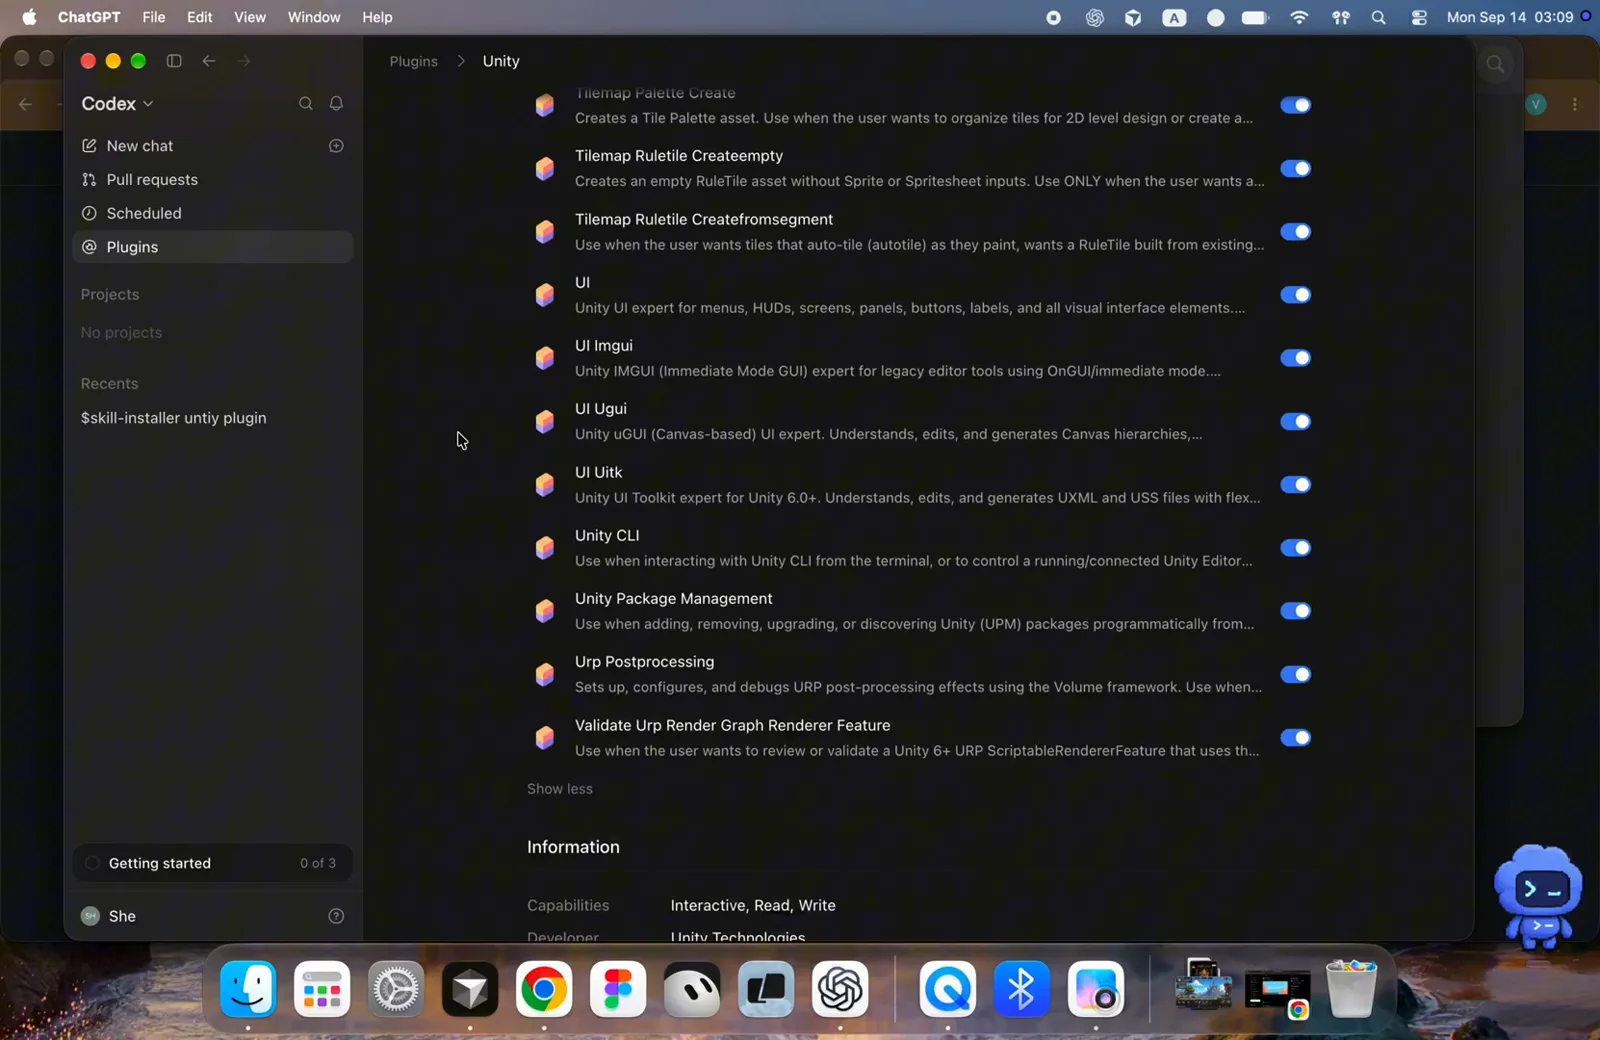
リストの末尾はunity-cliとパッケージ管理のスキル。Information欄には開発者としてUnity Technologiesの表記。1:08 の場面 - 4
どのチャットからでも呼び出す
特別な起動は不要です。Codexのチャットに unity と打つ — または画像のように @ メンションで「Unity game.」— あとはタスクを自然言語で説明するだけ。依頼がスキルに一致すれば自動で読み込まれ、Codexのコンテキストメニューから明示的に選ぶこともできます。「Set up a tilemap level with rule tiles for my 2D Unity game.」などUnity提示のサンプルプロンプトを試してみてください。
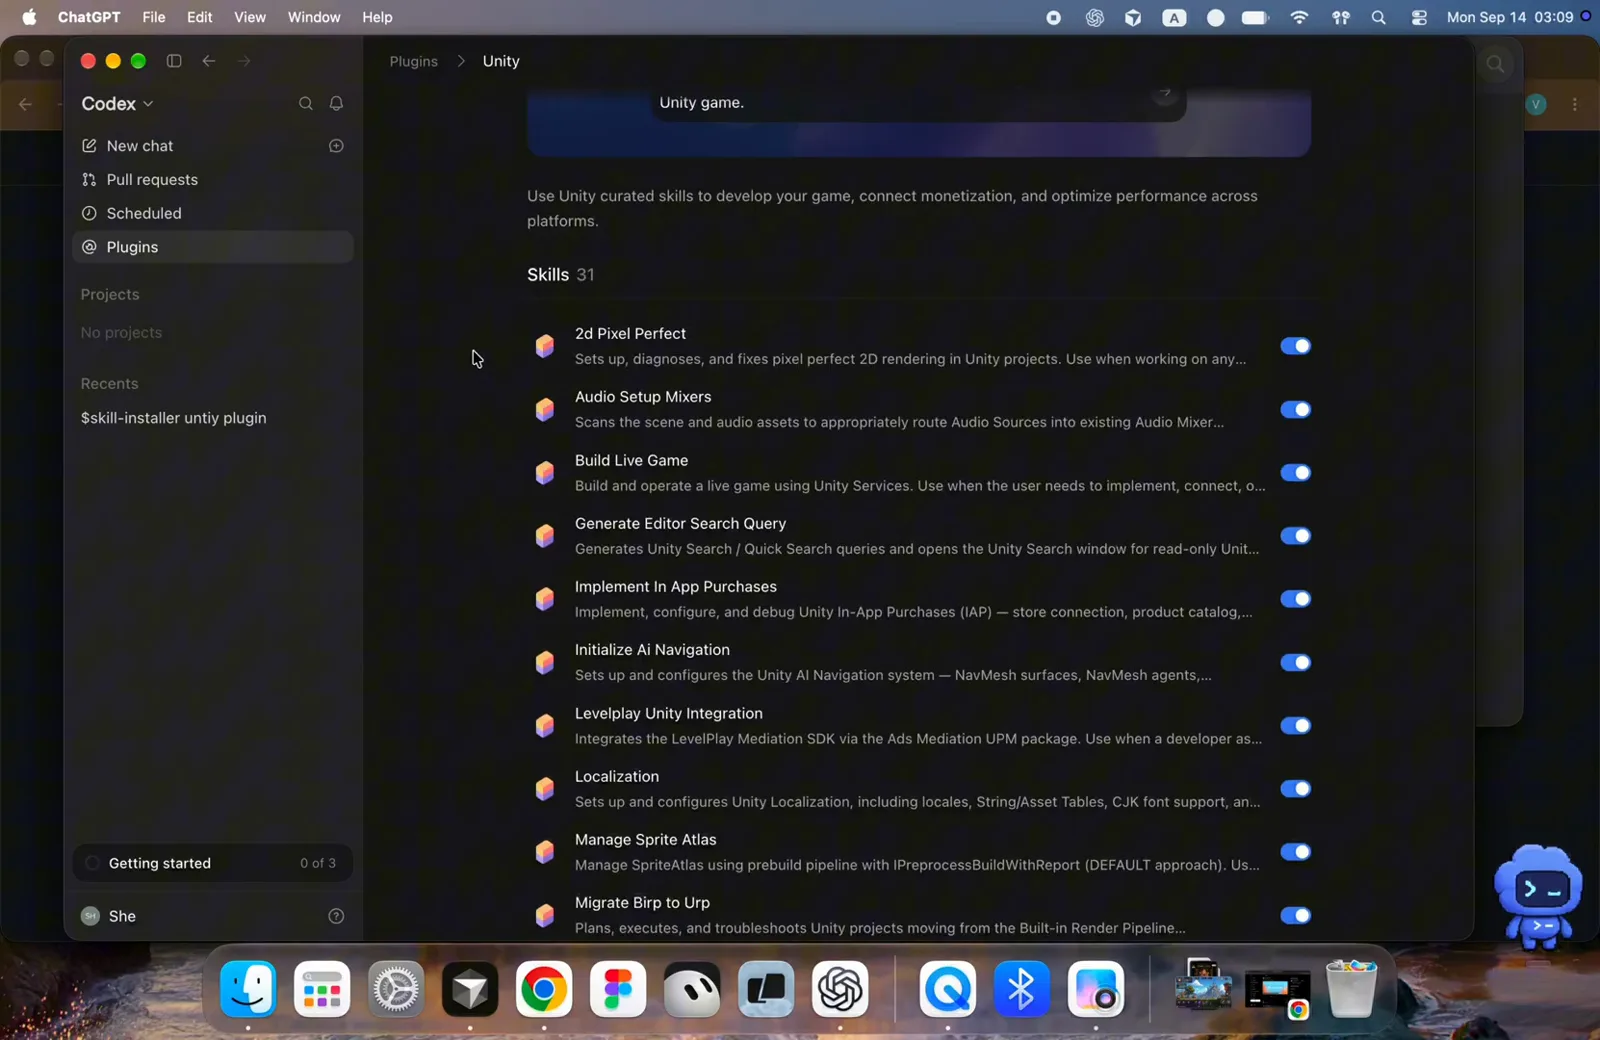
「Unity game.」の一言で、Codexはプラグインのスキルを引き込みます。0:44 の場面
CodexにUnity CLIを教える
- 5
Unity CLIをインストール
プラグインの知識はUnity CLIがあると活きます。Windowsなら画像のワンライナー:irm https://public-cdn.cloud.unity3d.com/hub/prod/cli/install.ps1 | iex。macOSとLinuxはHomebrewでも導入できます。インストーラは「Unity CLI 1.0.0-beta.6 installed!」で終わり、はじめのコマンド — unity --help、unity editors list、unity install、unity upgrade — を表示してくれます。
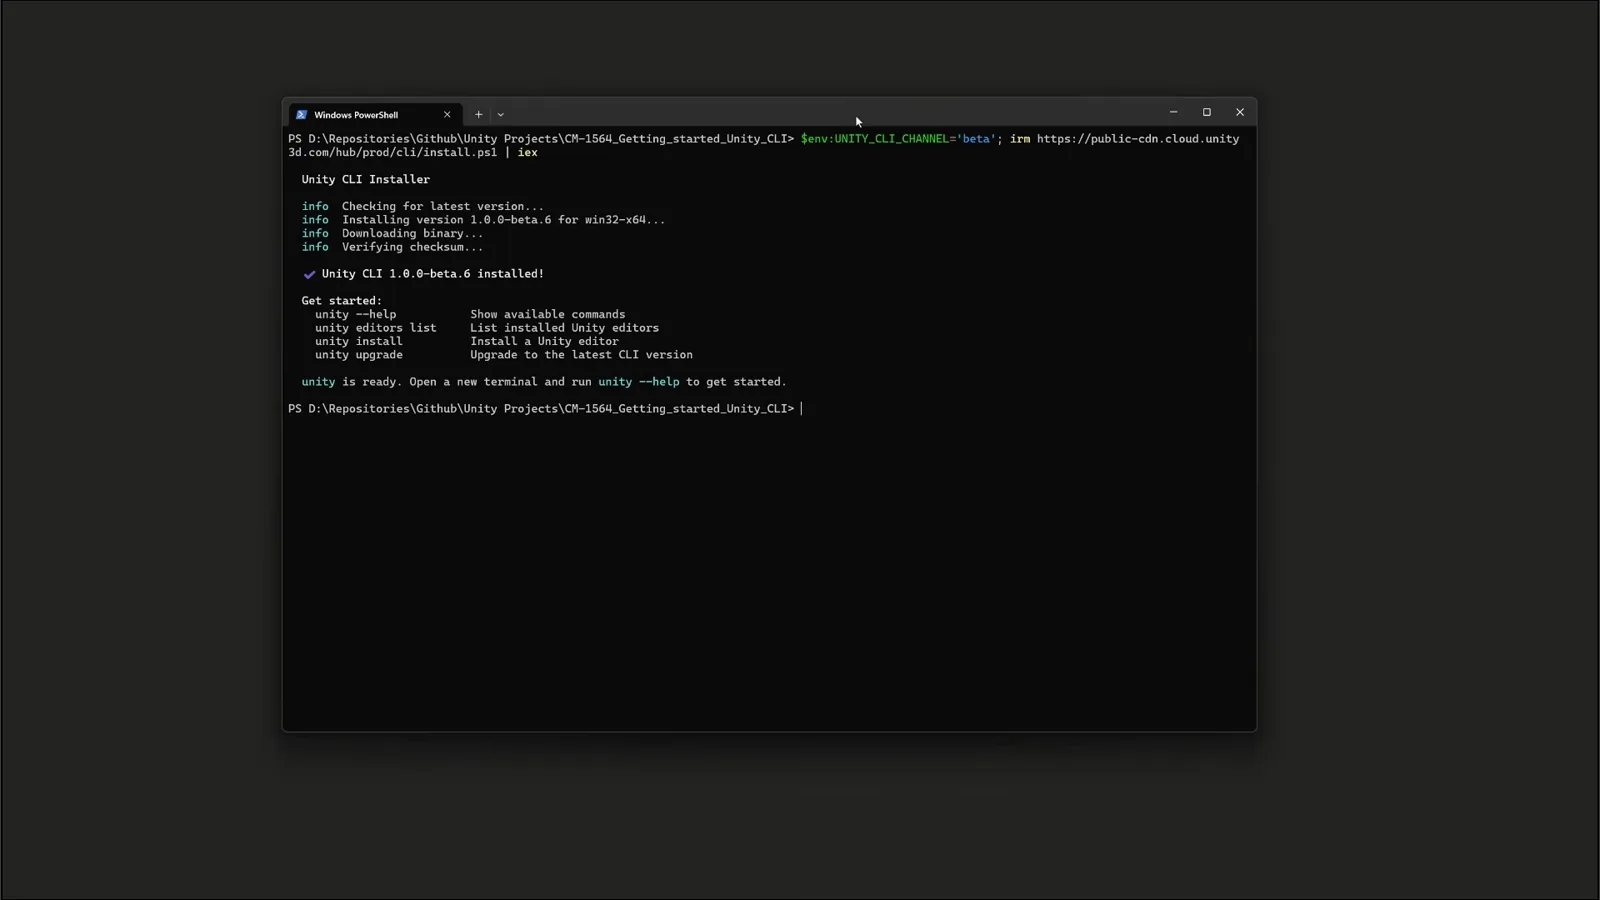
Windowsに Unity CLI 1.0.0-beta.6 を導入。ウェルカム文に覚える価値のある4コマンドが並びます。2:50 の場面 - 6
CLIでできること・できないこと
Unity自身の説明が一番的確です:$ unity — A Command Line Interface for managing Unity — No GUI、Built for automation、Built for agents。扱うのは環境:エディタの導入、ライセンス管理、プロジェクトの作成とオープン。それ自体はビルドパイプラインではありません — それは次のpipelineパッケージの仕事です。
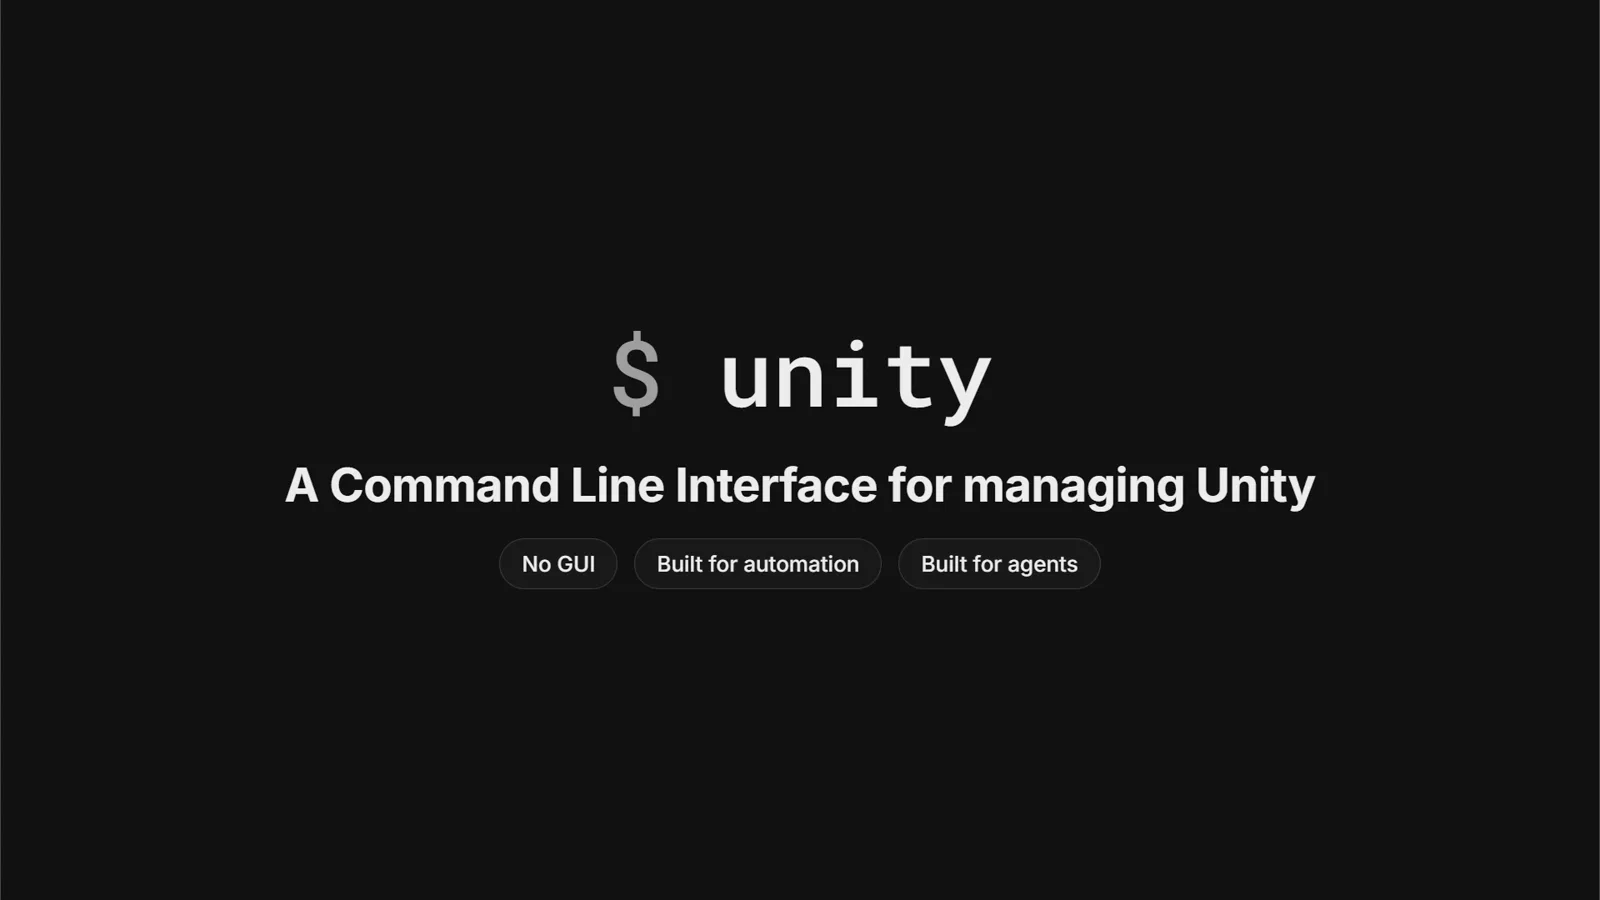
Unity公式の紹介スライド:GUIなし、自動化のため、エージェントのため。1:28 の場面 - 7
再コンパイルなしでエディタ内C#を実行
CLIにpipelineパッケージ(プロジェクト内で unity pipeline install)を組み合わせると、起動中のエディタがローカルサーバーになります。恩恵はこうです:unity exec snippet.cs がC#をその場でコンパイルし、Unityのメインスレッドで実行して結果を返す — プロジェクト全体の再コンパイルもドメインリロードもなし、結果はミリ秒。このeval系コマンドが、エージェントにシーン調整と自己検証をさせる最短ルートです。
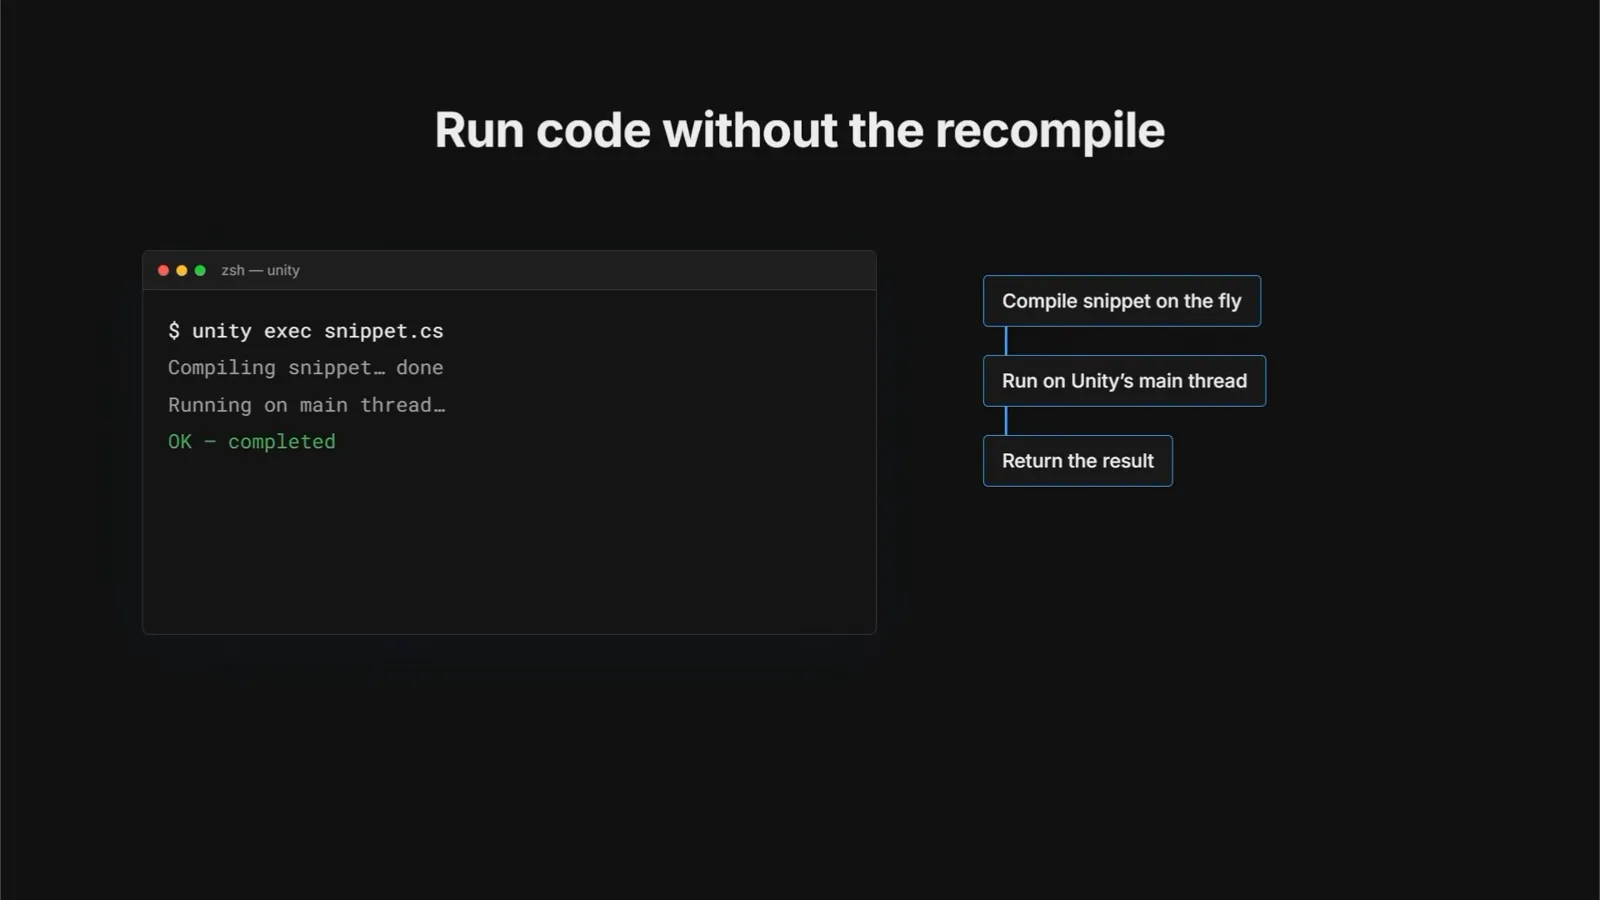
スニペットをその場でコンパイル、メインスレッドで実行、結果を返す。2:26 の場面 - 8
エージェントをCLIに向ける
シェルコマンドを実行できるエージェントなら、誰でもUnityを動かせます — Claude、Codex、Cursor、Copilot。Unity公式のデモではプロンプト1つで遊べる球体シーンを構築し、エディタにはClaude Codeのセッションがドッキングしています。Codexでも同じコマンドが同じように動きます。迷ったらエージェントに unity --help を実行させてください — ヘルプ出力自体がコマンド文法を教えてくれます。
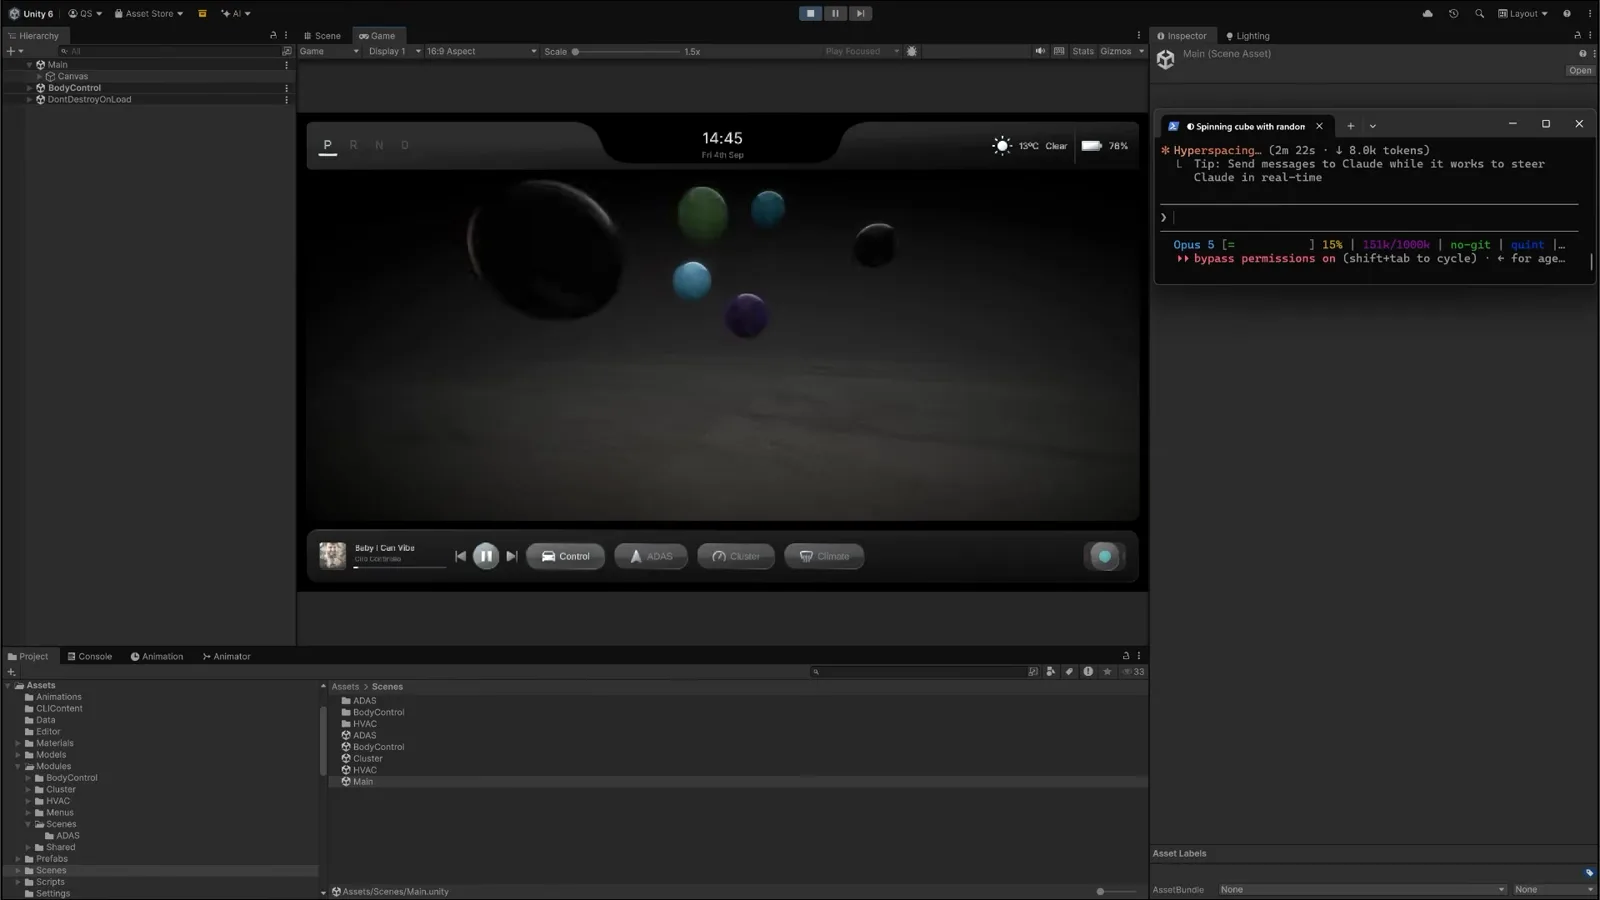
Playモードで動くエージェント製シーン — 球体・マテリアル・動く音楽プレイヤー、すべて1つのプロンプトから。5:55 の場面
Unity MCPでエディタを開く
- 9
Project Settings → AI → Unity MCP Server を開く
CLIを超えたライブなエディタアクセスには、Unity 6がAI Assistantパッケージに同梱するMCPサーバーを使います(Edit → Project Settings → AI)。パネルで確認すべきは2点:Unity BridgeのステータスがRunning、そしてConnected Clients — 画像ではCodex由来の codex-mcp-client が2件ともAccepted、隣にcursor-vscodeの接続。Codexのエディタセッションはここに現れます。
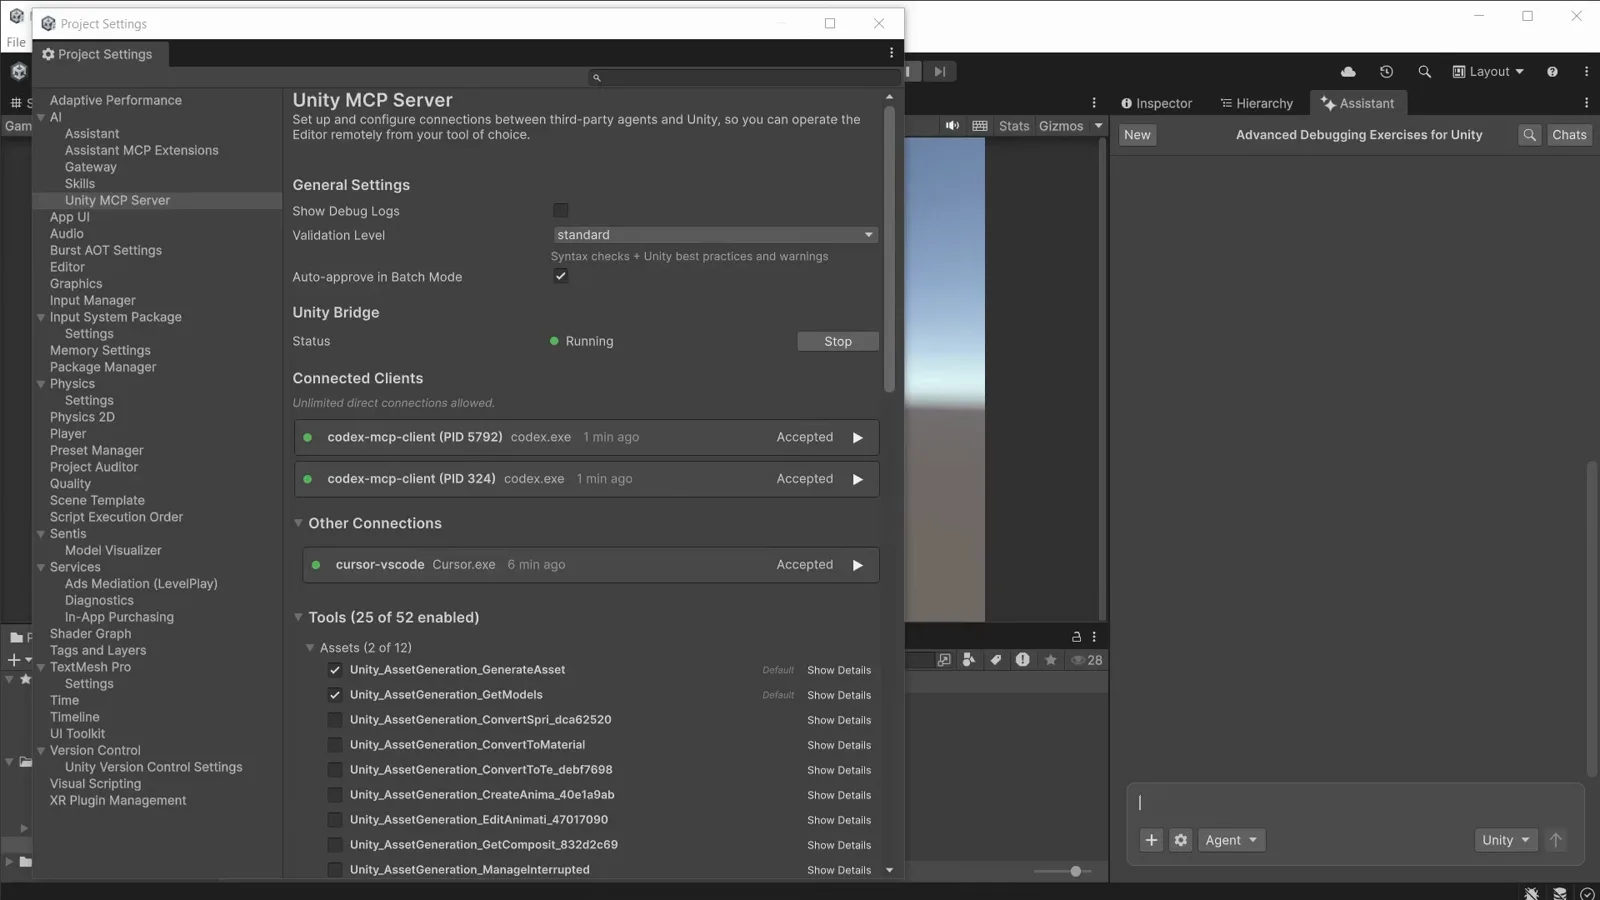
Unity Bridgeは稼働中、codex-mcp-clientが2件Accepted — Codexはすでにエディタと会話しています。0:10 の場面 - 10
Codexの行でConfigureをクリック
Integrationsまでスクロールすると、エージェントごとのワンクリック設定が並びます:Cursor、Claude Code、Windsurf、Claude Desktop、VSCode GitHub Copilot、Kiro、Codex、Gemini。Configureをクリックすると、そのクライアントに設定ファイル(Unityのrelayを指すmcpServersエントリ)が書き込まれます。リストにないCodexビルドなら、ステップ15のCLI経由でターミナルから同じことができます。
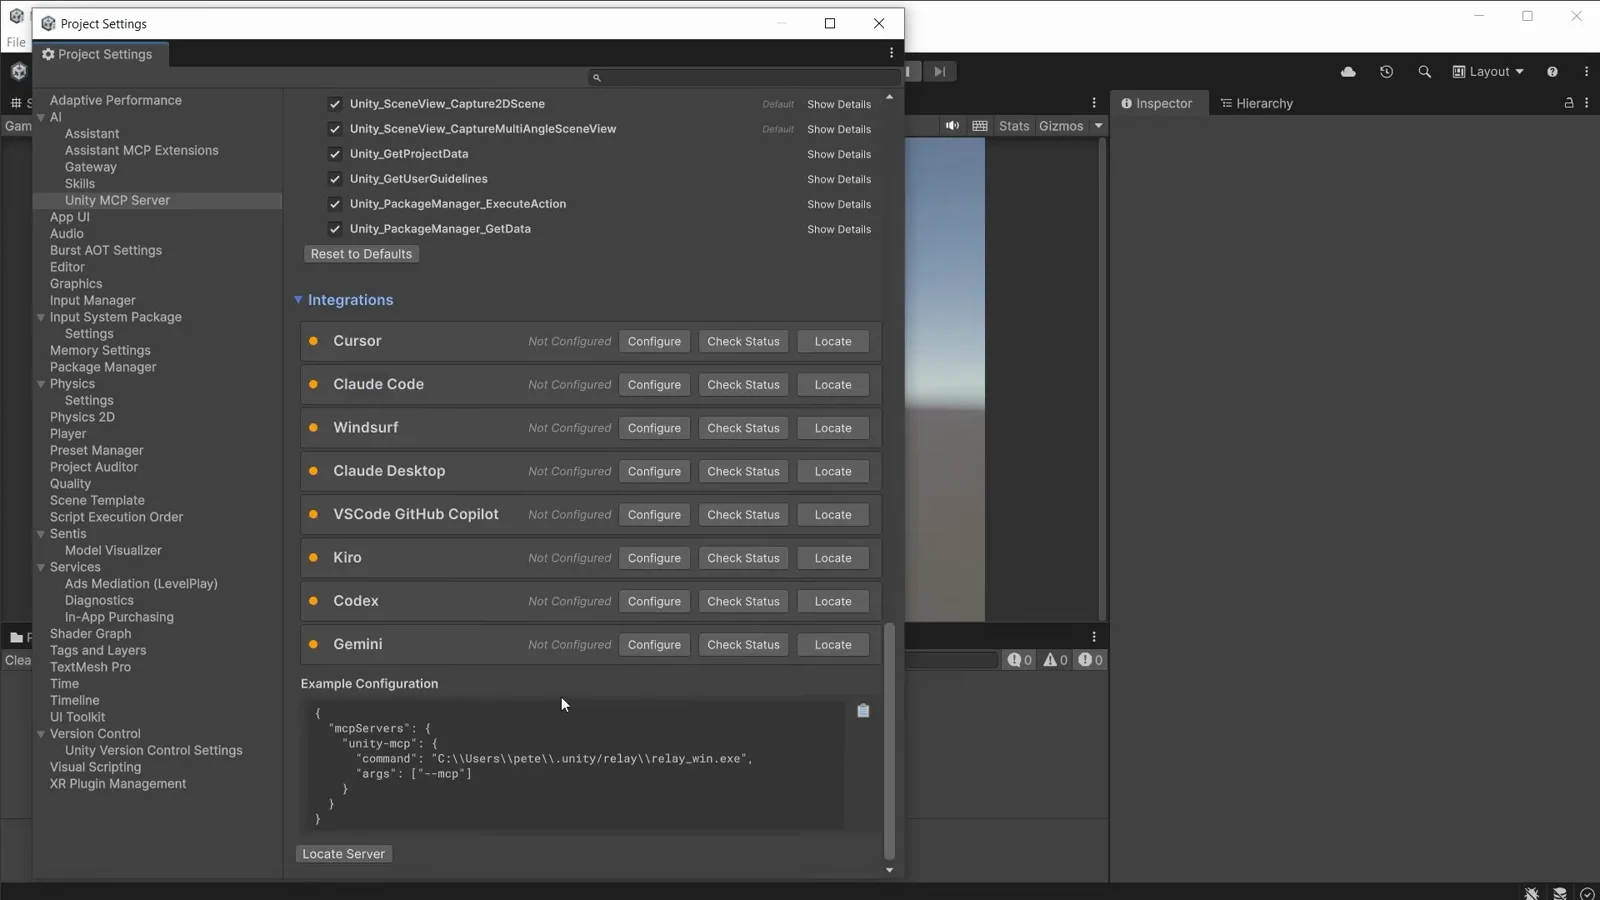
エージェントごとにConfigure 1クリックでmcpServers設定を書き込み — CodexはClaude Codeと同じリストに。1:56 の場面 - 11
エージェント側で登録を確認
エージェントのMCP設定を開き、登録を確認します。画像のCursorのTools & MCPsページでは、設定直後に新しいunity-mcpサーバーが「8 tools, 1 prompts enabled」と表示されます — Codexではconfig/mcpの一覧が相当します。8ツールはデフォルトセット。Unityが公開しているのはもっと多く、次の手順で有効化します。
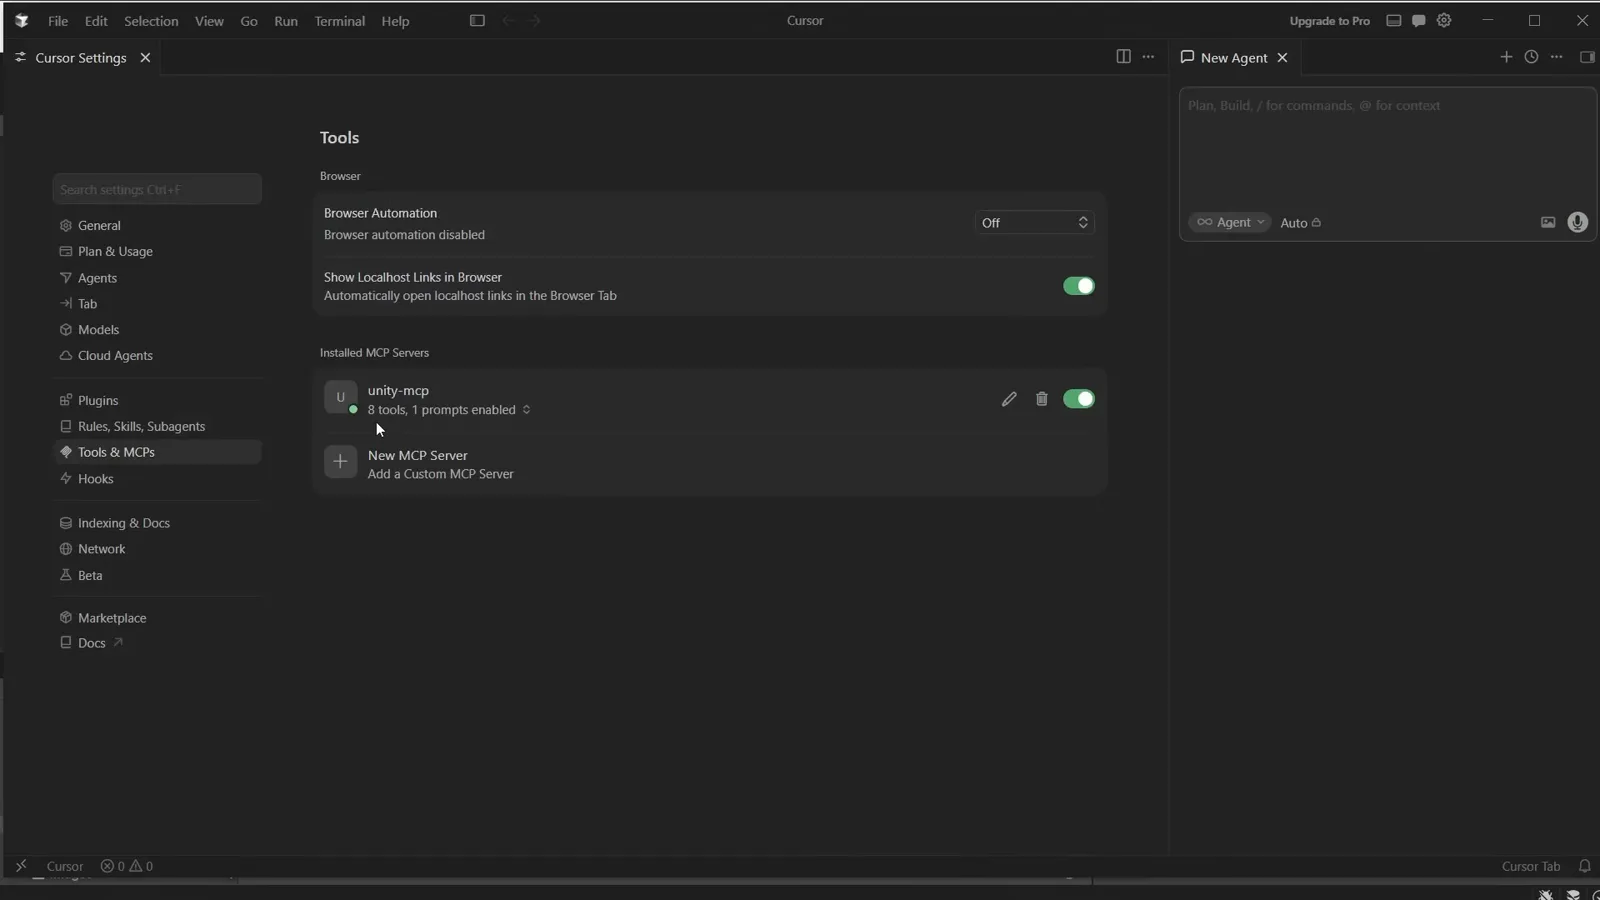
クライアント側に登録されたunity-mcpサーバー:デフォルトで8ツールと1プロンプト。3:08 の場面 - 12
Unityが公開する52ツールを一通り見る
Unityに戻り、Toolsセクションでサーバーにできることを一覧します — このプロジェクトは52中25が有効で、Assets・Assistant・Coreのグループに跨がります:アセット生成、プロジェクトデータ取得、コマンド実行、スクリプト作成、テキスト編集の適用など。タスクに必要なツールを有効化し、Show Detailsで各ツールの仕様を読んでからエージェントに渡しましょう。
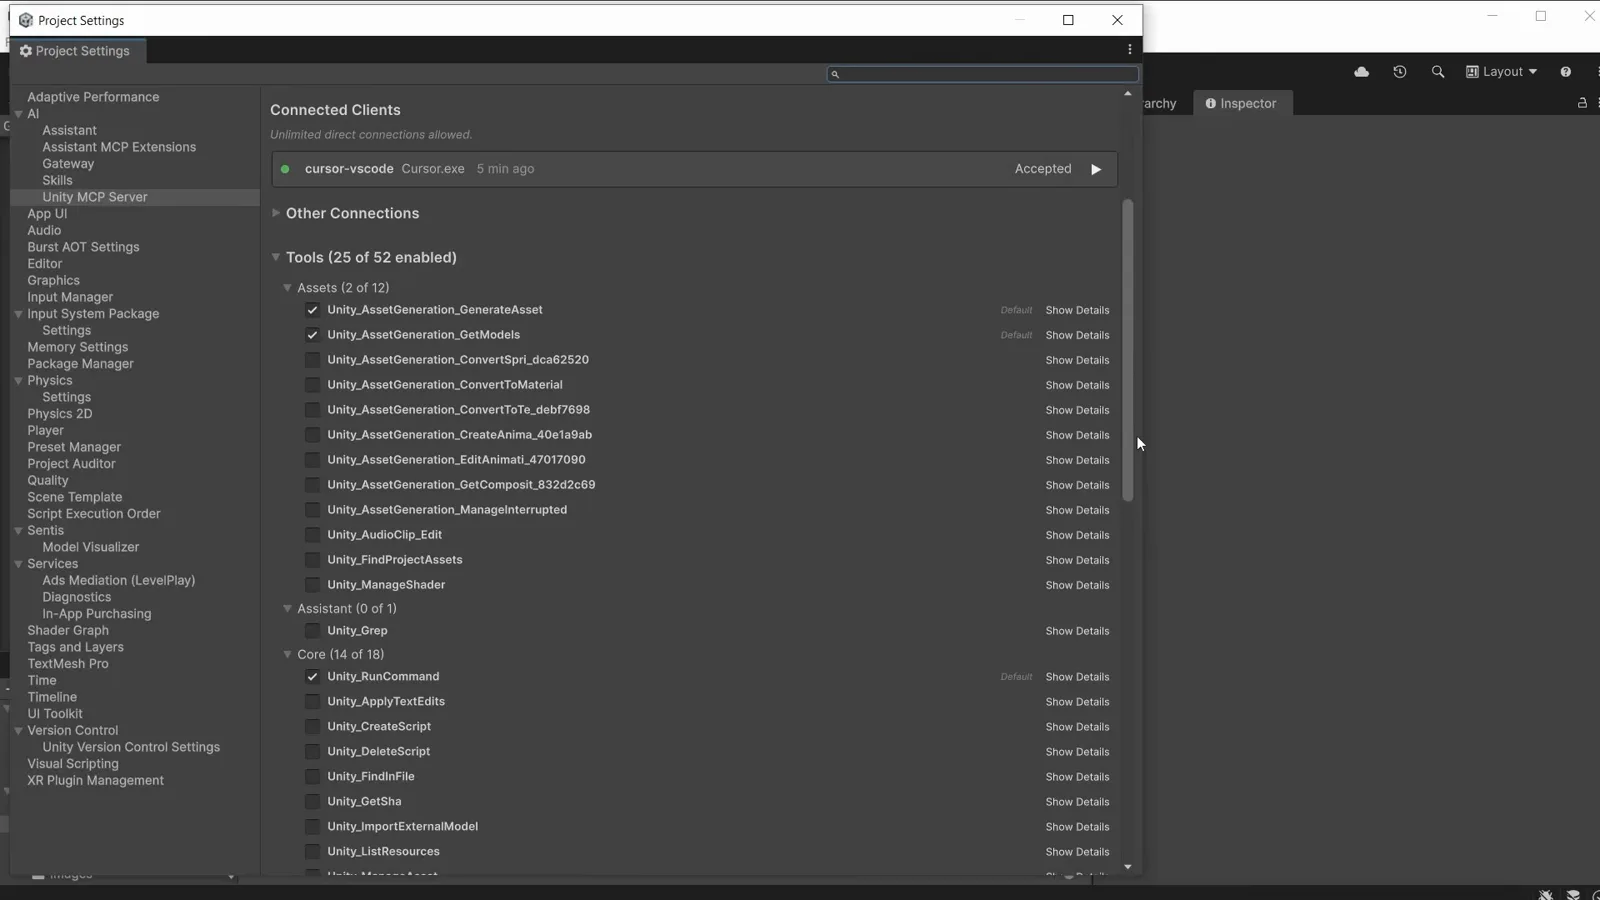
ここでは52中25ツールが有効 — 有効化する前にShow Detailsでツールの仕様を確認。2:58 の場面 - 13
エージェントに聞く:Am I connected to Unity?
一番速い健全性チェックは質問です。画像のエージェントは実際に Unity_GetProjectData を呼んで答えています:「Yes — you're connected to Unity… 返ってきたのはライブなプロジェクトデータ(アセットフォルダ、シーン、スクリプト、マテリアルなど)」。最初のツール呼び出し時にはUnity内で許可プロンプトが出るので、承認するとクライアントはConnected ClientsでAcceptedに変わります。以降は「SpaceshipObject用のスクリプトを作成」のような依頼が、オブジェクトが本当にシーンに現れるところまで進みます。
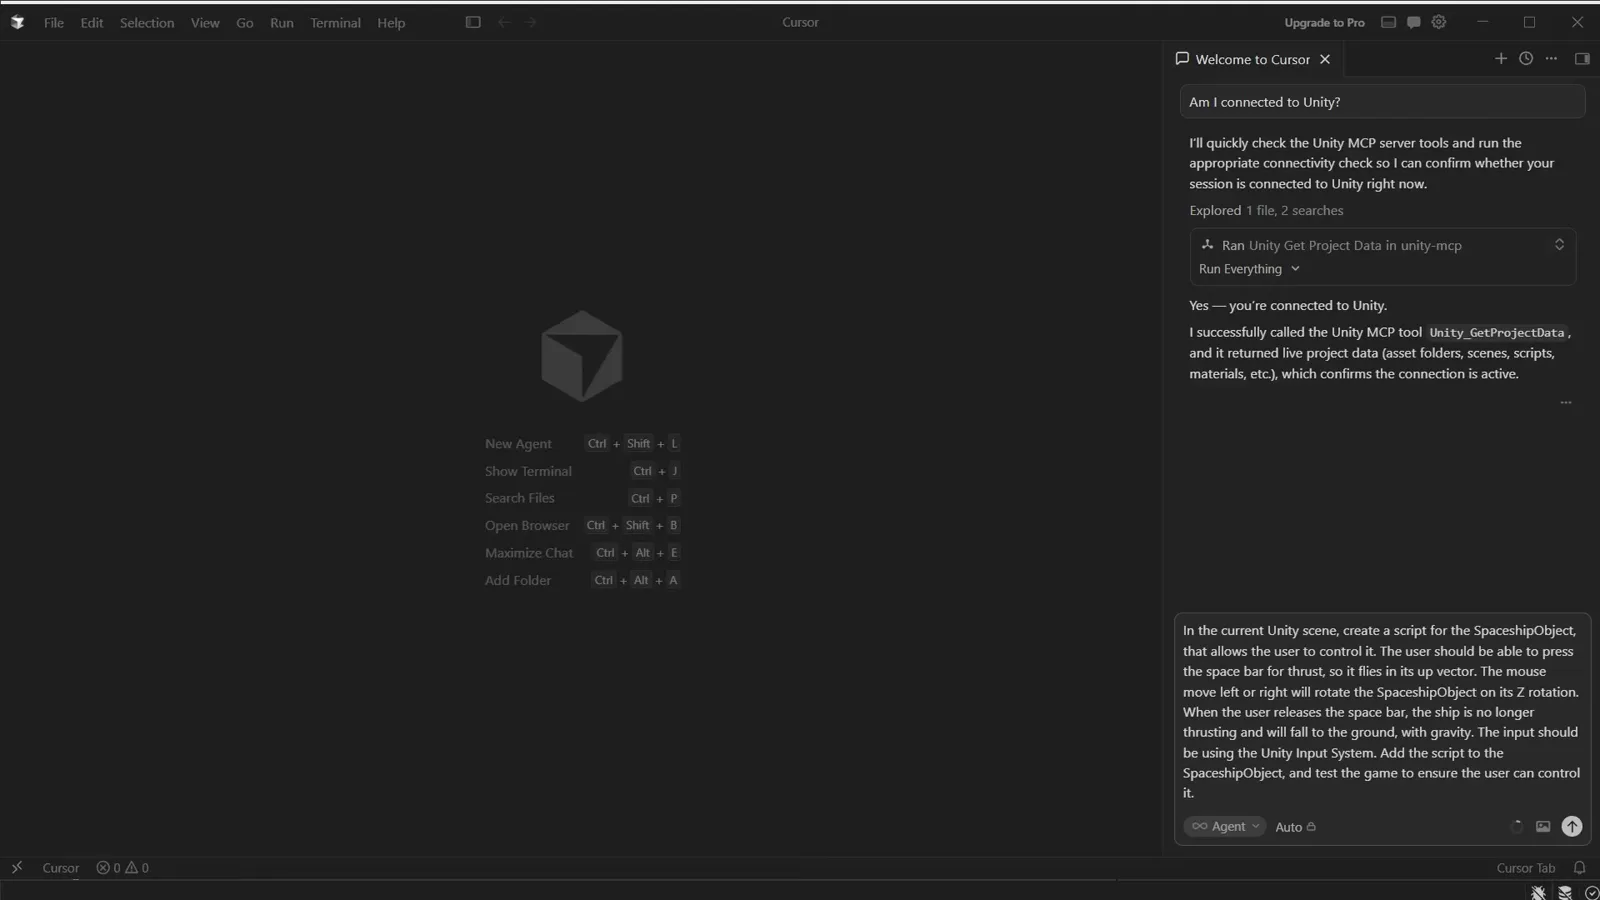
実際のUnity_GetProjectData呼び出しで決着 — エージェントは本物のプロジェクトを読んでいます。3:42 の場面
CodexかClaude Codeか、そして次の一歩
- 14
Unity MCPの行方を知る
「MCPはなくなるのか?」へのUnity自身の答え:サポートは廃止されませんが、現行の実装 — エディタプロセス内で動いていたもの — は退役し、Unity CLIとpipelineパッケージ(組み込みMCPモード)に置き換わります。カバレッジは同じ、より速く、より確実に。実務では:上のインテグレーションをそのまま使い、CLIコマンドで賄えるものはそちらを優先、という順です。
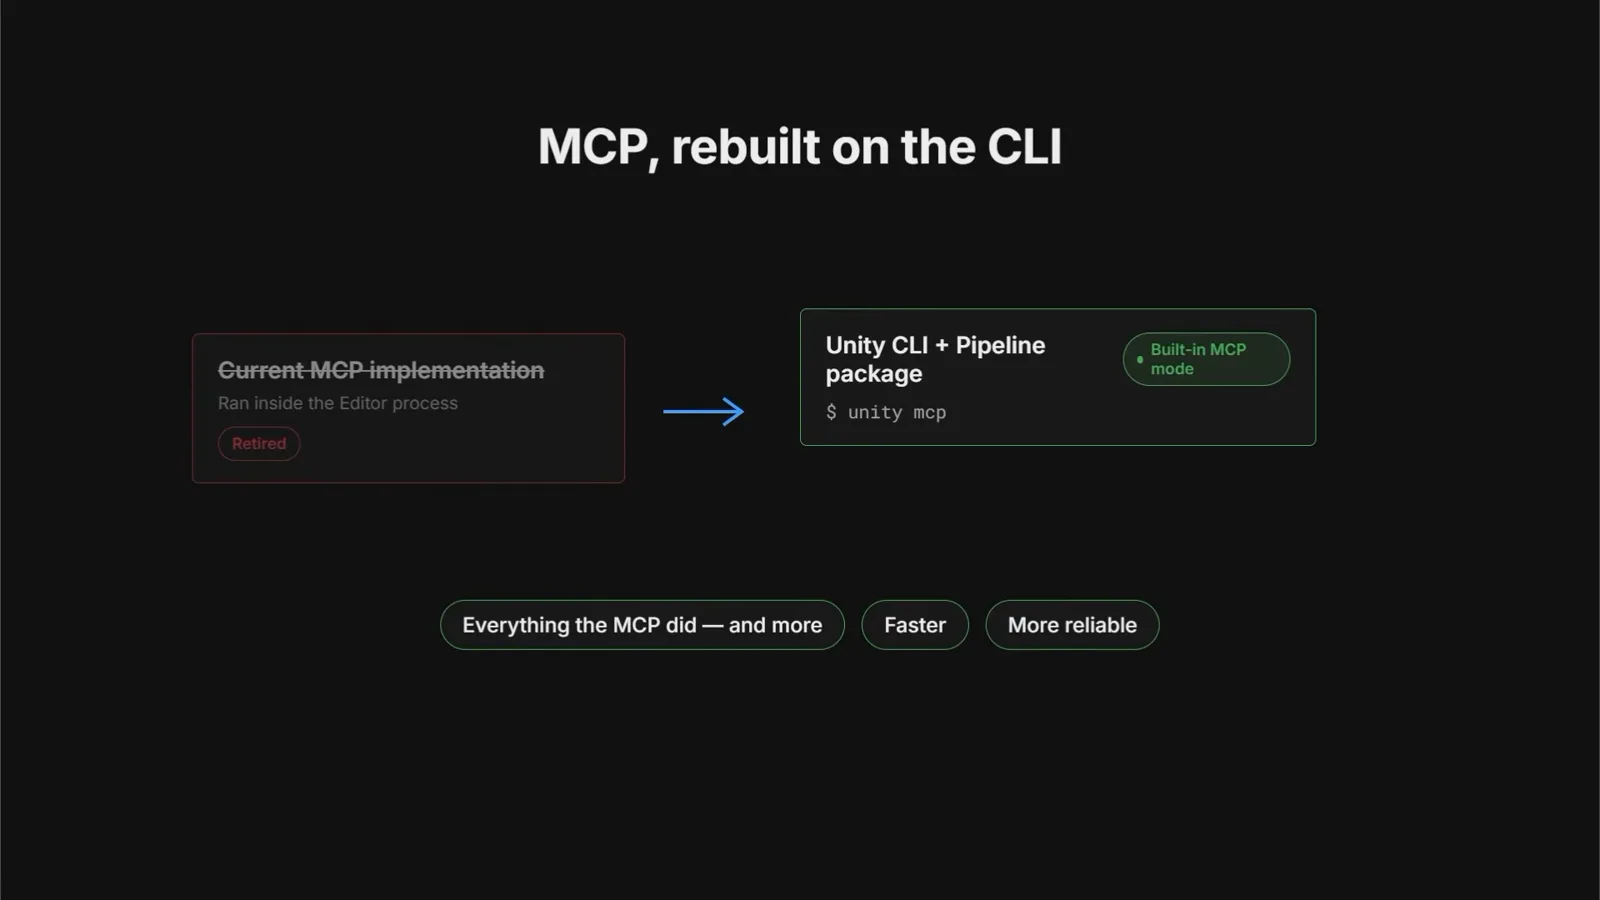
現行MCP実装はRetired。組み込みMCPモードのUnity CLI + Pipelineが引き継ぎます。6:24 の場面 - 15
1コマンドでどんなエージェントも接続
ターミナル派なら:unity mcp configure が対応クライアントをすべて列挙します — Codex、Claude Code、Claude Desktop、Cursor、VS Code、Windsurf、Kiro、Kimi、Zed など — そのうえで unity mcp configure codex の1コマンドで登録完了。CodexとClaude Codeが同じリストに並んでいる点に注目:どちらを選んでも、向こう側にあるエディタは同じ — まさにUnityが1つのプラグインリポジトリで両エージェントを賄える理由です。
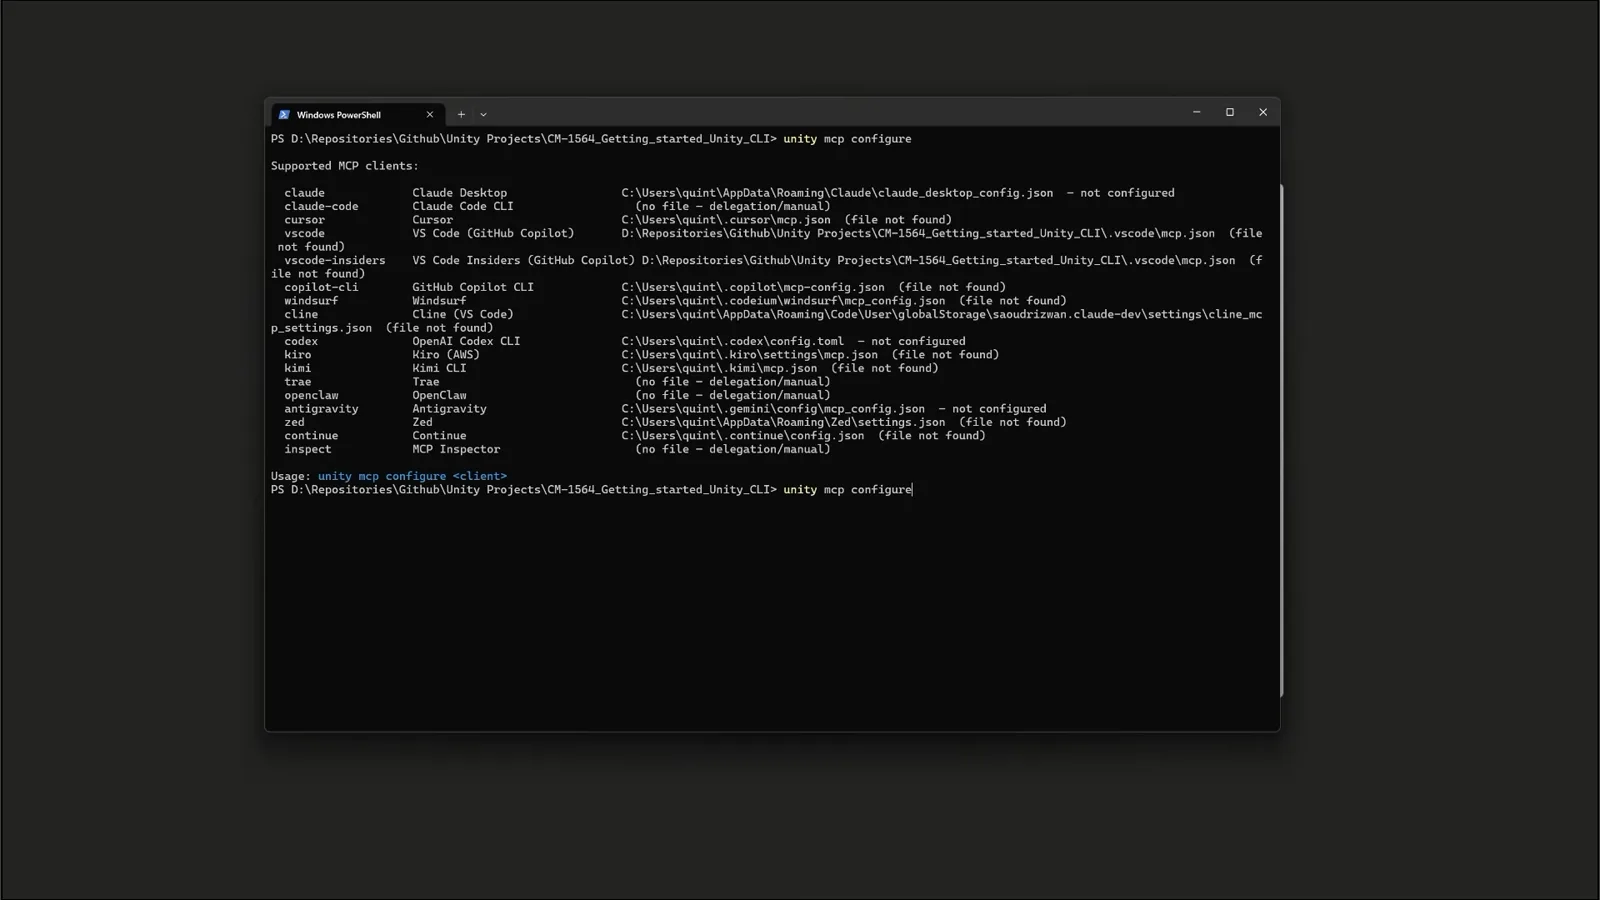
unity mcp configure は接続可能な全クライアントを列挙 — CodexとClaude Codeが並んでいます。6:30 の場面